

If you have any questions about the software, please feel free to email us at info@aiaccount.com for inquiries.
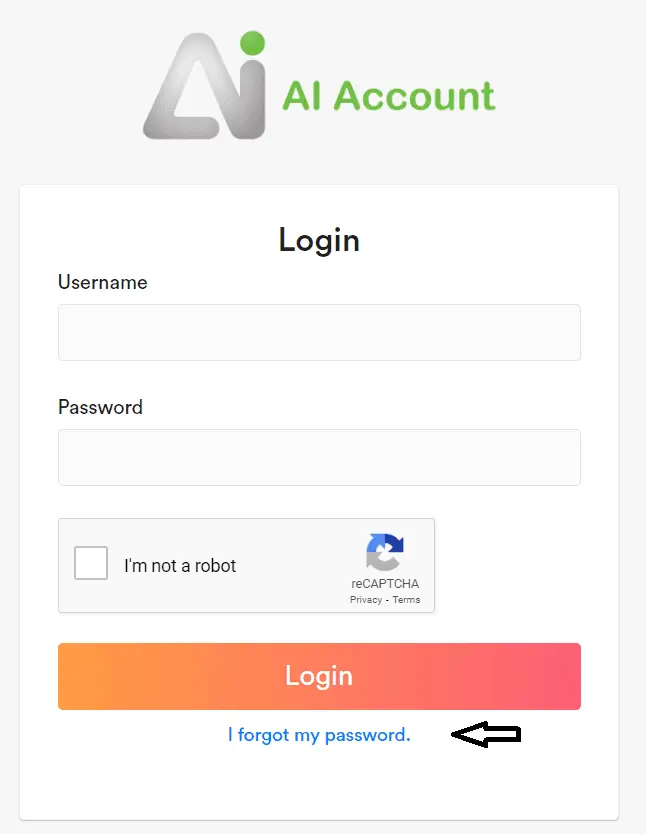
First Time Login
You can check your spam mail folder, as the reset password email and 2FA email may have been directed there.
For first-time users, please visit https://app.ai-account.com/ and follow the steps outlined below:
Click on “I forgot my password.”
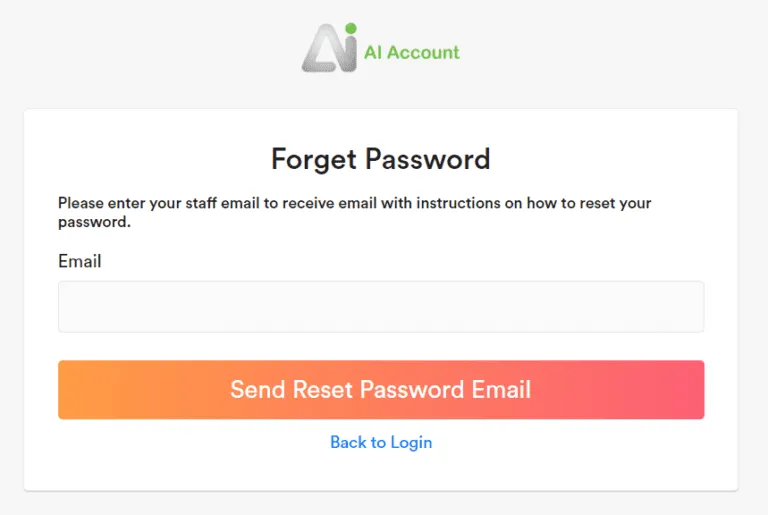
Enter your email address and click “Send Reset Password Email”. You will receive an email from our system, allowing you to set a new password and log in to your account.
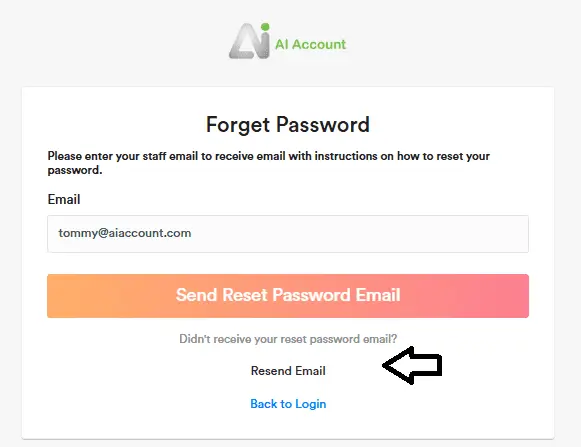
Click Resend Email to send the reset password email again if you didn’t receive it the first time.
Enter your email and password to log in to your account.
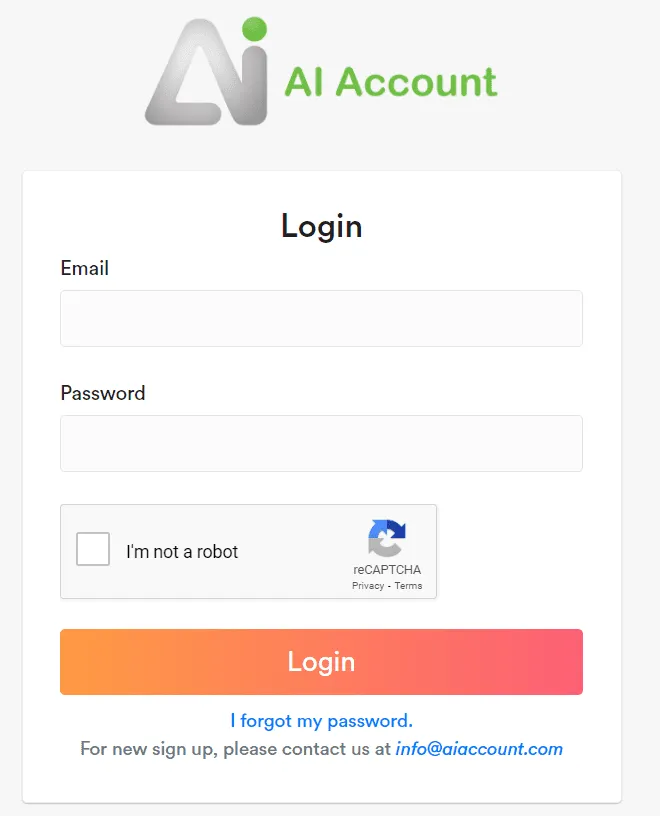
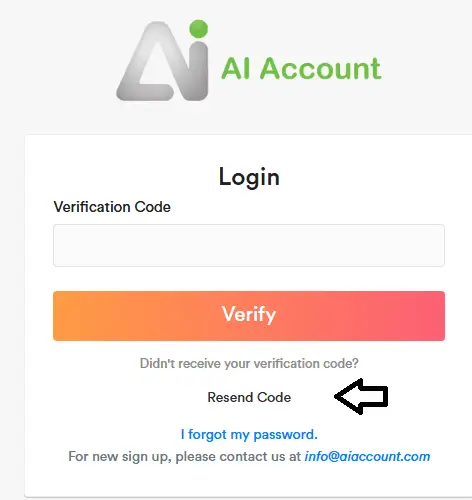
Thereafter, enter the verification code sent to your email and click ‘Verify’.
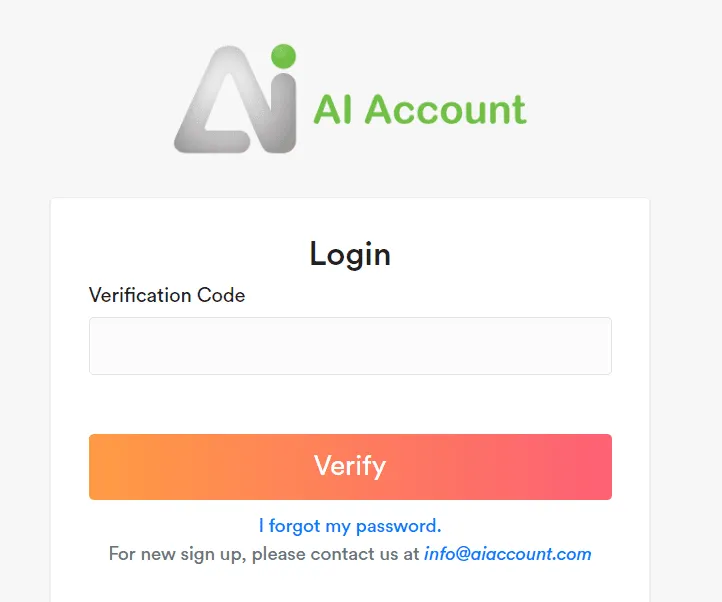
Click Resend Code to send the Verification Code again if you didn’t receive it the first time.
Customise Plan
Customise Plan (Create Your Own Login Page)
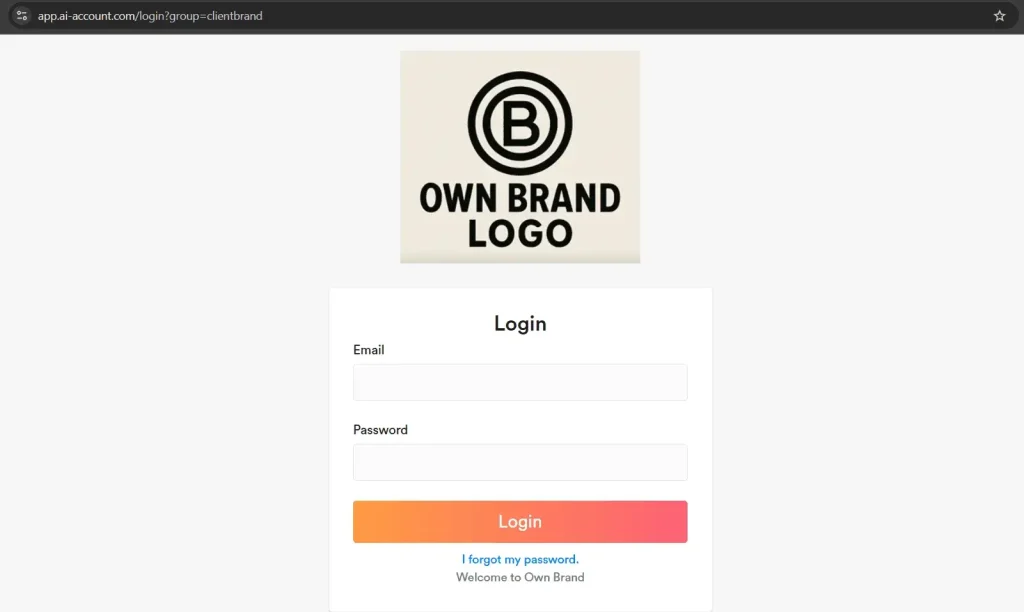
You can create a personalised login page with your own logo, allowing your customers to log in to AI Account and see your company branding. This lets you white-label the accounting software, making it easier to resell to your customers.
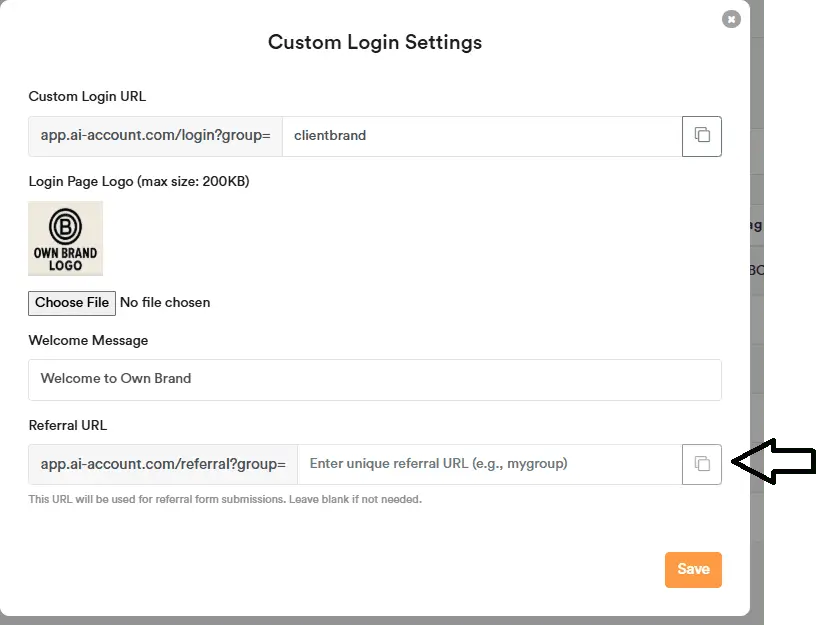
To set it up, click on Custom Login.

Next, fill in your desired URL name, upload your branding logo, and enter a welcome message for your customers. Click Save. Then, click the copy icon beside the URL to copy and share it with your customers.

Your customers can then use the custom URL to log in and see your branding on the login page, as shown below.
Customise Plan (Create Your Referral URL)
In Custom Login Settings, you’ll find the Referral URL. Enter your own preferred URL, save it, and share it with your friends. When a referral is successful, we’ll process your referral fee.
Your friend can submit their interest and we’ll then contact them to set up a free trial or a package that suits their needs.

Customise Plan (Group Access with Unlimited Company Support)
When clients sign up for the Customised Plan, you will receive Group Access with support for an unlimited number of companies.
A group will be created under your brand.
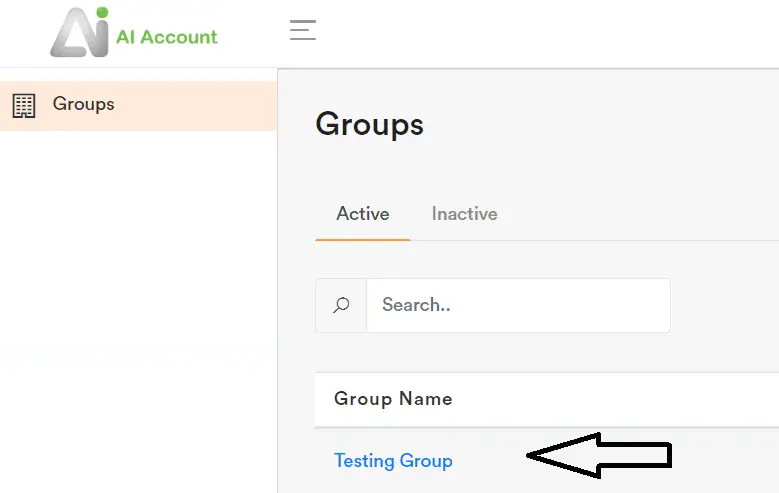
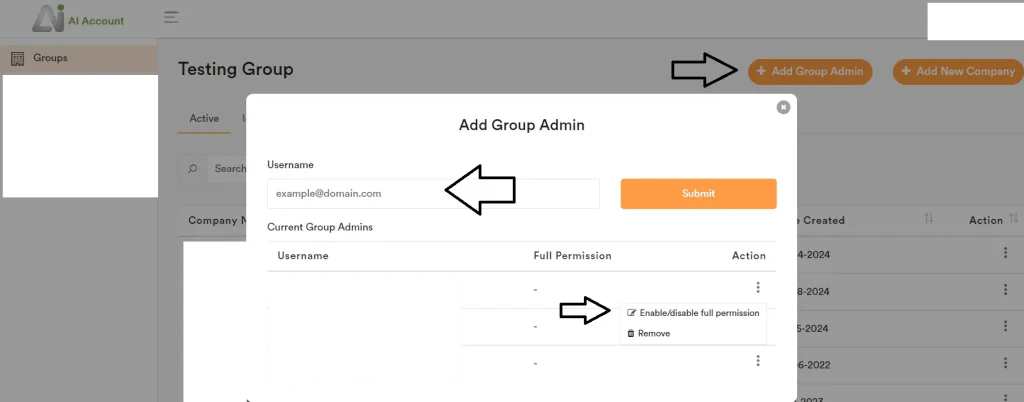
You can assign Group Admins (input the email at the Username box and click ‘Submit’) and grant them ‘full permission’ as needed. Group Admins with full permission can add or remove other Group Admins within the group.
Group Admins also have the ability to add new company within the group.
Customise Plan (How to Create a New Company)
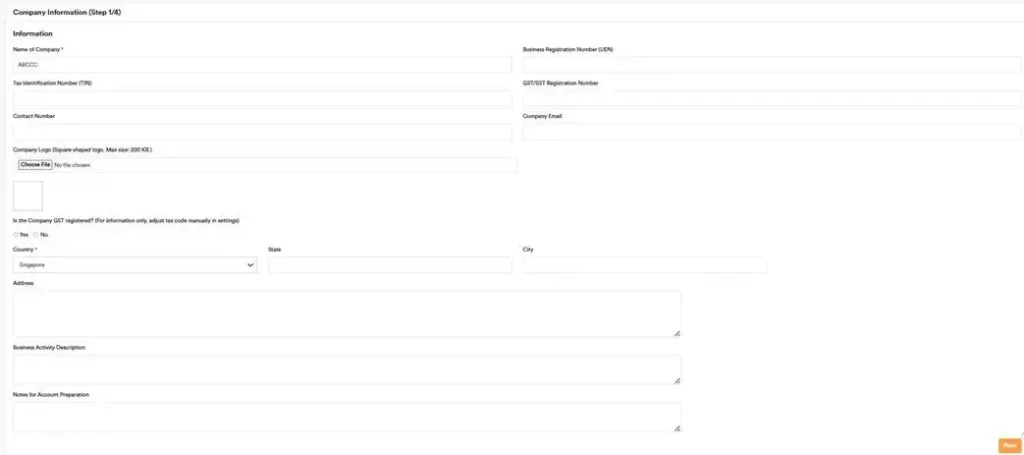
After clicking into your group, click “Add New Company” to create a new company account.

Fill in the required fields (at minimum, the company name and country), then click Next.
Note: The default tax codes for the selected country will be automatically set based on your country selection.
Enter the Incorporation Date (entries before this date are not allowed), Accounting Year Start Date, and Accounting Year End Date, then click Next.
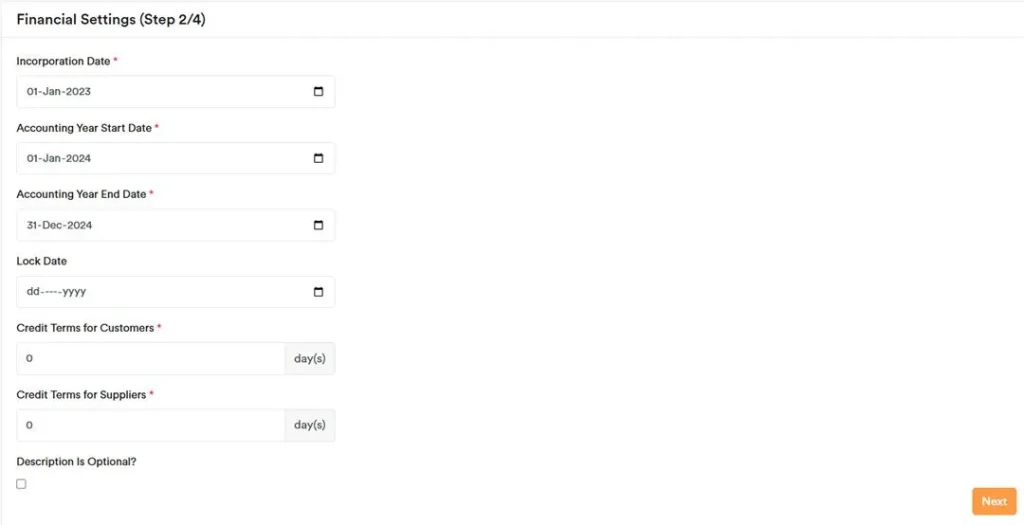
Click Add Currency to set the company’s Home Currency (also known as the functional currency).
Select the currency and click Submit, then click Next.
Note: The home currency cannot be changed after setup. If the company wants to change its home currency, a new company must be created.

The Default Chart of Accounts will be automatically created. If no customisation is needed, simply click Next.
To add your staff or client as a user for the newly created company, go to the “Add New Users” section and follow the steps there if needed.
For Group Admins with full access, you can add or edit tags for each company. This feature allows you to group clients (e.g., those under the same group) by assigning specific tags. You can also use tags to differentiate between companies with the same name, such as tagging one as “HQ” and the other as “Branch”.
Customise Plan (Get your Certificate)
After logging in, open your Group and click the ‘Export Certificate’ button at the top right to download your Certified Partner certificate.


Supported Countries
AI Account currently supports the following countries. We’ve customised the chart of accounts and local tax codes for each:
- Australia
- Bermuda
- British Virgin Islands
- Brunei Darussalam
- Cambodia
- Canada
- Cayman Islands
- China
- Hong Kong
- India
- Indonesia
- Lao PDR
- Malaysia
- Maldives
- Myanmar
- New Zealand
- Pakistan
- Philippines
- Singapore
- Taiwan
- Thailand
- United Arab Emirates
- United Kingdom
- United States
- Vietnam
E-Invoicing Support
We currently support e-invoicing in:
- Malaysia
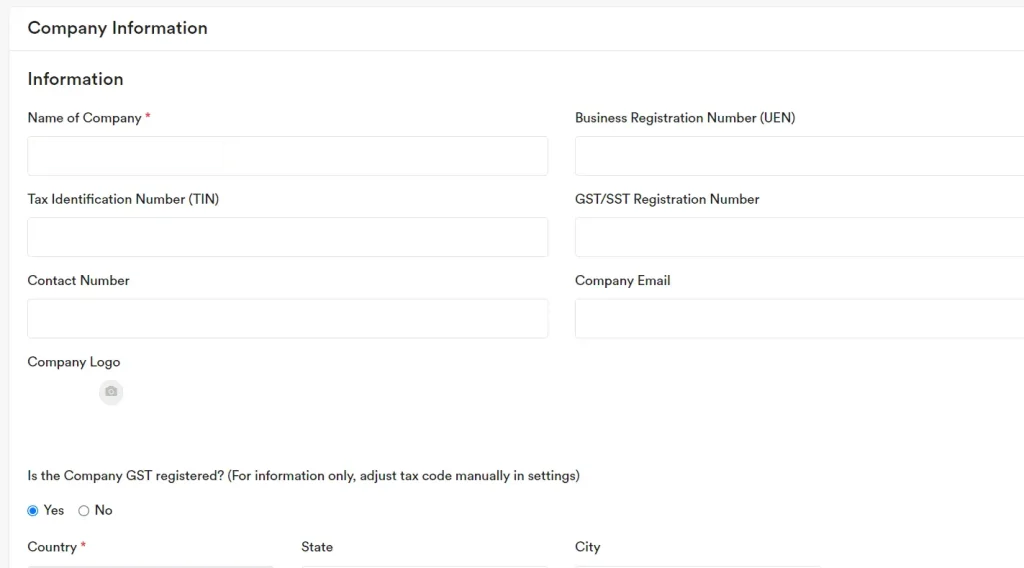
Company Information
Complete the relevant fields that apply to your company.
Security & Data Protection
AI Account is Singapore-headquartered (AI Account Pte. Ltd.), and our handling of personal data follows the Singapore Personal Data Protection Act (PDPA). Our Data Protection Policy explains what we collect, how we use and disclose data, the legal bases for doing so, and covers retention, access/correction rights, overseas transfers with PDPA-comparable protection, and governance under Singapore law.
ISO 27001-certified information security
AI Account’s Information Security Management System (ISMS) is certified to ISO/IEC 27001:2022 — a globally recognised standard for managing information security risks through formal governance, controls, and continual improvement.
The certification scope covers the governance, design, development, operation, maintenance, and support of the AI Account cloud-based accounting platform (including applications, data, and supporting services).
It also includes the supporting cloud infrastructure and managed services hosted across multiple environments.
This certification is issued following an independent assessment and is maintained through ongoing surveillance audits during the certificate period.
Layered security controls and resilience
We apply layered protection across:
- People: access restricted to authorised staff operating under clear security rules and procedures
- Providers: reputable cloud/hosting infrastructure with strong safeguards
- Technology: encryption and strong access controls to protect data
We also maintain daily backups of production data to support business continuity and recovery. While no method of transmission or storage is 100% secure, we continuously review and enhance our measures.
Secure connections and external safety checks
Connections to our app are protected using modern TLS. An independent SSL Labs test of app.ai-account.com shows an A rating with TLS 1.3 support (assessed 19 Aug 2025), indicating a strong HTTPS configuration.
You can also verify our domain’s current safety status anytime via Google Safe Browsing’s Site Status checker (results are dynamic and reflect the status at the time you view them).
Systems Requirements
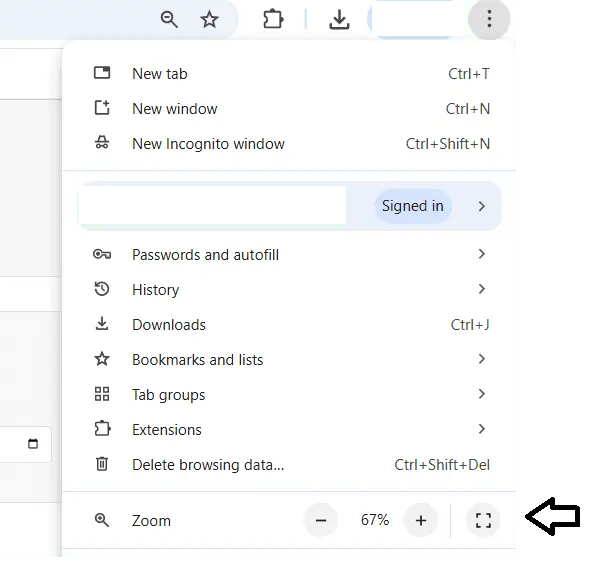
Recommended Browser
Latest Google Chrome
For the best viewing experience, set your zoom level to 67%. This zoom level makes it easier to adjust items such as the top notes and bottom notes, and it more accurately reflects the actual report.
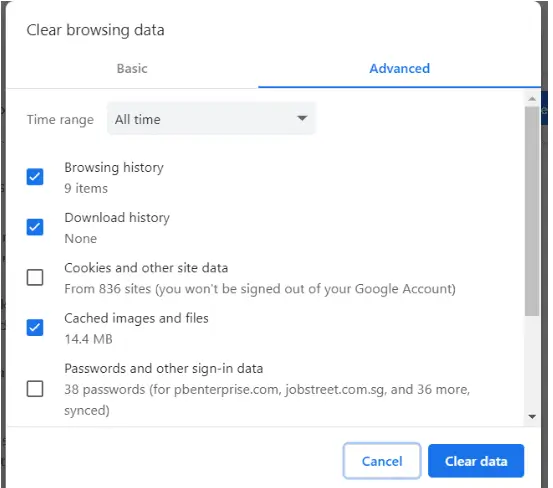
Clear Cache
Sometimes, you need to clear the browser cache to receive the latest software updates. Press Ctrl + Alt + Delete, and select the following items to clear:
Remember to choose the time range ‘All time’.
Exchange Rates
The exchange rates used in this software are retrieved automatically via API from Exchangerate-API ( https://www.exchangerate-api.com ). Their rates are compiled from central banks that publish daily reference rates and recognised financial market data providers, and are documented here: https://www.exchangerate-api.com/product/our-exchange-rate-data
IAS 21 The Effects of Changes in Foreign Exchange Rates does not prescribe any specific source of exchange rates; it requires the use of a reliable, observable market-based spot rate. Because Exchangerate-API’s rates are derived from multiple independent market sources and reflect indicative mid-market spot rates, they are appropriate for use under IAS 21 and equivalent local standards, and are generally acceptable to auditors and authorities such as MAS, ACRA, IRAS, IRB and similar bodies.
Our system uses live market rates, updated automatically from these sources. This is a stronger and more defensible approach than using a single fixed “monthly rate,” which some companies apply for convenience. A fixed monthly rate can deviate significantly from actual market conditions during the month, leading to less accurate translation of transactions and unrealised gains or losses, and weakening the link to the spot rates required by IAS 21.
Accordingly, it is advisable to use the exchange rates provided by our system rather than setting your own arbitrary monthly rate. Using live, transparent, market-based rates improves accuracy, aligns better with accounting standards, and provides a clearer, more supportable basis if your figures are reviewed by auditors or government authorities.
Unit Price
Unit Price supports up to 6 decimal places. If the calculated amount (Quantity × Unit Price) is less than 0.01, it will be rounded up and displayed as 0.01.
Accounting Automation
AI Account is working hard to stay at the forefront of AI automation. We currently offer the following automation features:
- Bank Reconciliation Automation – Easily upload your bank statements and let us automatically perform the reconciliation and matching for you.
- Bank Automation – Upload your bank statements and let the system automatically match each line to existing receipts, payments, and outstanding invoices or bills, while giving you the option to quickly create new receipts or journal entries where needed.
- Foreign Currency Exchange Gain/Loss – Exchange gains and losses are automatically calculated for you as you enter foreign currency transactions.
- Sales Recurring – Automatically generate invoices for your customers on a monthly, quarterly, half-yearly, or yearly basis, clearly showing the service period.
- Fixed Asset Automation – Automatically generate depreciation entries for your fixed assets and produce the fixed asset note to the accounts for you.
- Financial Performance Summary – combines key financial figures and ratios into a clear snapshot of profitability, cash flow, and efficiency, helping management and investors make faster, better-informed decisions without complex manual work.
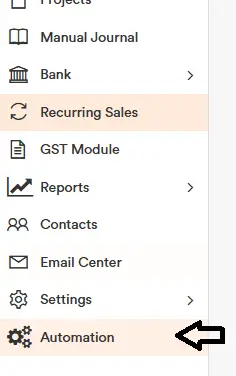
For more AI automation features and detailed walkthroughs, go to the Automation tab. There, you can find videos showing exactly how each process works, including how to:
- OCR to read expense and sales invoices, capture key details, and automatically prepare the double-entry postings.
- Matches unpaid invoices and bills to bank statement transactions and auto-generates the related receipt and payment entries.
- Imports bank statements, structures the data, and gets it ready for automated bank reconciliation.
- Imports opening balances and maps them to the correct ledger accounts for fast, accurate setup.
- Help you generate financial statements with minimal manual work.
Next-Gen AI Accountant
The AI Account Agent (BETA version) is a powerful intelligent agent that works like an autonomous accountant directly inside your software. Its true strength lies in its advanced reasoning capabilities, which allow it to go far beyond simple data processing.
Instead of just recording data, it analyzes context, cross-references information across documents, and applies sophisticated accounting logic to make complex decisions automatically. It can handle ambiguous transactions, infer missing details with high accuracy, instantly update your financial accounts, and dramatically streamline your entire accounting workflow.
Just like chat, you can chat with our agent, upload files, and it will automatically organize your data, complete your entries, detect and resolve issues, and post the entries into your accounting system — without you ever needing to open your accounting software. Everything is done in the chat, and your accounts are taken care of.
Contact our consultant to book a demo.
Key Functions
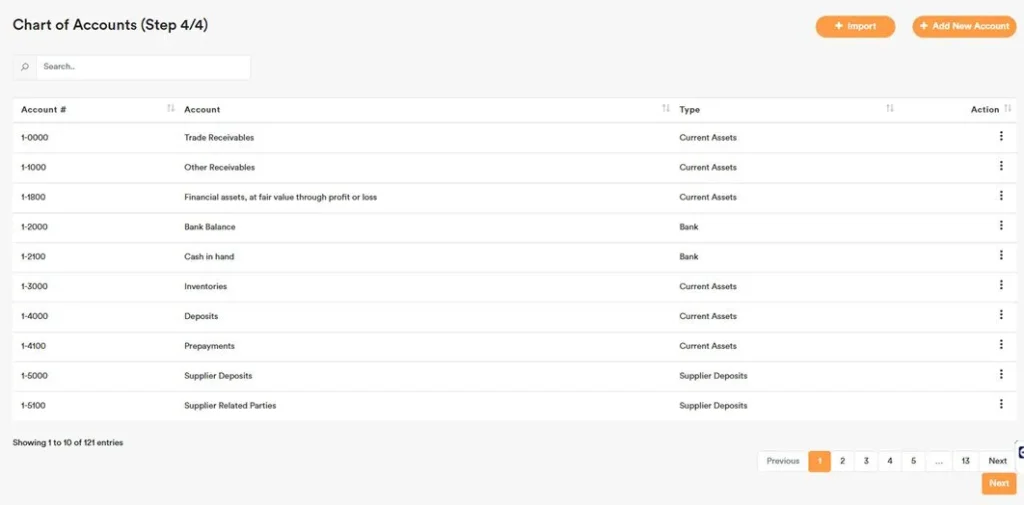
Chart of Accounts Setup
You can set up your Chart of Accounts at ‘Settings’ → ‘Accounts’
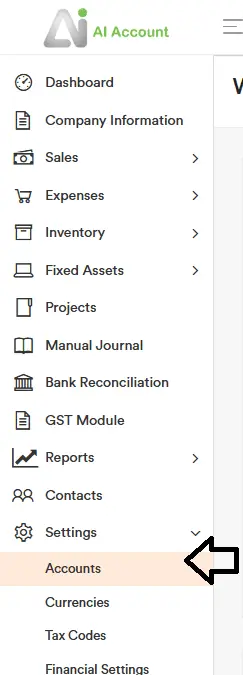
Chart of Accounts is created by default, suitable for most SMEs. You can add a new account or import one if needed.
The default chart of accounts is tailored to your country. For example, if the company is created as Malaysia, it will show EPF, SOCSO, and EIS accounts; if created as Singapore, it will show CPF accounts.
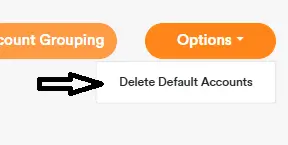
You can delete all default accounts and set up your own list using the top-right button, “Delete Default Accounts.”
You can edit or delete individual default accounts from the Action menu.
Accounts that are in use by transactions cannot be deleted.
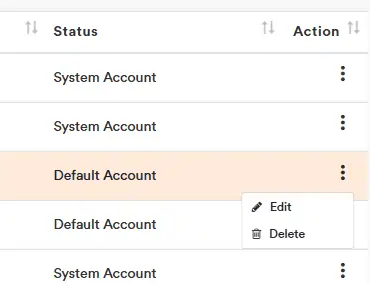
Chart of Accounts – Account Number and Name
Account Number (Account #)
Account numbers in the Chart of Accounts cannot be duplicated. The numbers 1-0000 and 10000 are treated as the same number and therefore cannot both exist at the same time, as this would be considered a duplicate.
Account Name
System account names cannot be duplicated. Other (non-system) account names can be duplicated.
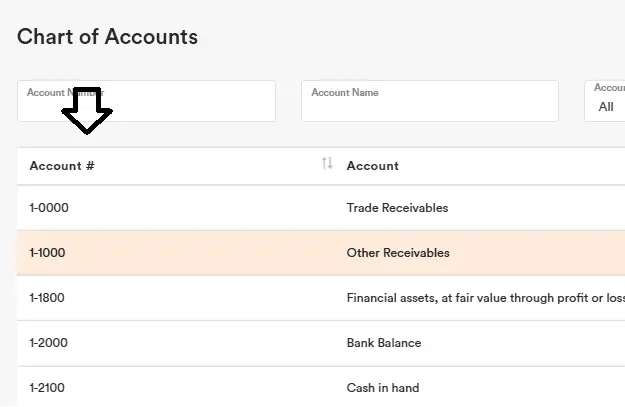
Chart of Accounts – Account Type
Use these account types when setting up your Chart of Accounts:
- Bank — For bank accounts and cash on hand. Selectable on payment and receipt transactions.
- Current Assets — For prepayments and deposits. Also used for trade receivables and inventory system accounts.
- Fixed Assets — For fixed assets. Selectable in the Fixed Assets and Expenses module.
- Income — For sales revenue. Selectable on sales transactions.
- Other Income — For non-operating income. Selectable in manual journals.
- Cost of Sales — For costs directly tied to sales. Selectable in the Expenses module.
- Expense — For operating expenses. Selectable in the Expenses module.
- Other Expense — For non-operating expenses (e.g., interest on borrowings, income tax, exchange gains/losses). Selectable in manual journals.
- Current Liabilities — For accruals, advance receipt, and short-term borrowings. Also used for trade payables and GST payables system accounts.
- Non-current Liabilities — For long-term borrowings.
- Equity — For share capital and similar equity accounts.
- Non-current Assets — For long-term investments.
- Customer Deposits — For deposits received from customers. Selectable on sales and receipt transactions.
- Supplier Deposits — For deposits paid to suppliers. Selectable on expenses and payment transactions.
Inventory system accounts are fixed and managed by the system — no setup or mapping is required. The system automatically posts to Inventory (asset) for stock movements, Sales (revenue) for sales transactions, and Cost of Goods Sold (expense) when inventory is sold.
Chart of Accounts – Receipts and Payments
For any account that you want to be selectable when recording receipt or payment transactions, you can tick the relevant options in the Chart of Accounts as shown below.
If you tick “Receipt Selection”, the account can be selected when creating a receipt, e.g.:
1-8000 Sales Prepaid Tax
If you tick “Payment Selection”, the account can be selected when creating a payment, e.g.:
2-4100 Expenses Withholding Tax
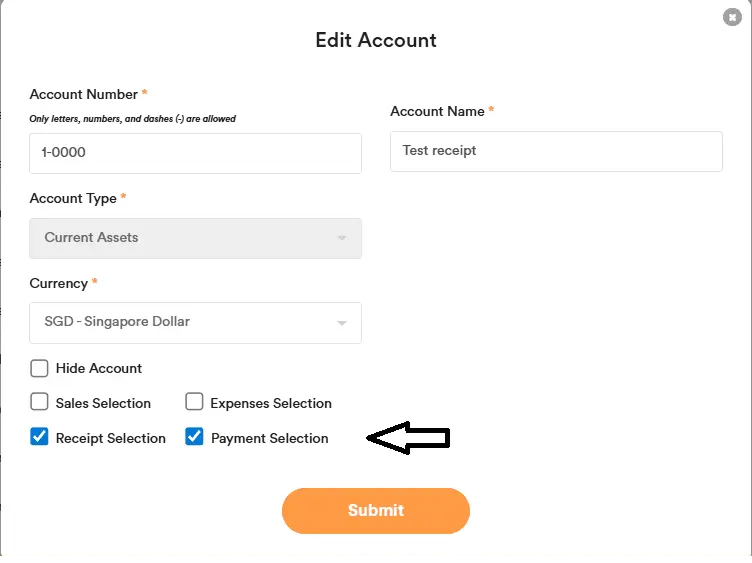
Chart of Accounts – Sales and Expenses Selection
Some accounts cannot be selected under Sales or Expenses by default, such as accrual accounts. If you want to use an account in the Expenses section, go to the Chart of Accounts, select the account you want, and tick ‘Sales Selection’ if you want to allow that account to be selected in the Sales section, or ‘Expenses Selection’ if you want to allow it to be selected in the Expenses section. Then click Submit.
Important note: For each Chart of Accounts entry, do not tick both “Sales Selection” and “Expenses Selection”. Select only what the system recommends for that account type. We highly recommend using the system-suggested selection only and not ticking any extra options, to ensure transactions flow into the correct e-Invoice module and to avoid missing records.
Example: Do not tick “Sales Selection” for Expense, Cost of Sales, and Fixed Asset account types. If these expense transactions are recorded in the Sales module, they will not appear in the Self-Billed e-Invoice module, and you will need to issue a Manual Self-Billed e-Invoice for these special postings. Conversely, do not tick “Expenses Selection” for Income account types. If sales transactions are recorded in the Expenses module, they will not appear in the e-Invoice Sales section, and you will need to issue a Manual e-Invoice for those cases.
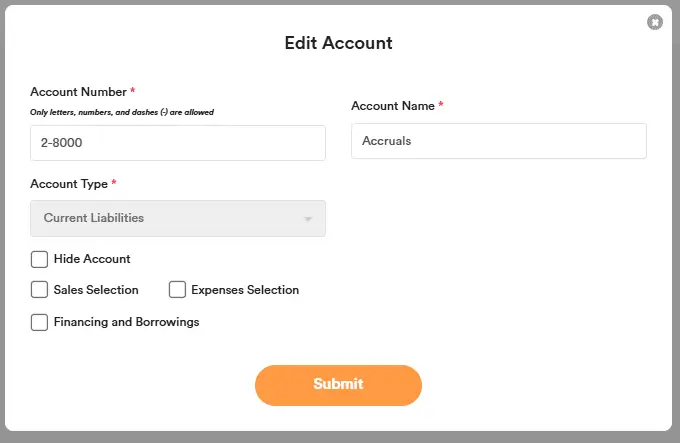
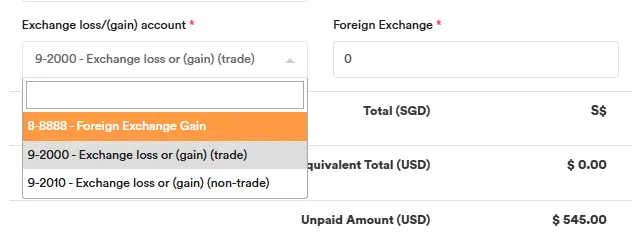
Chart of Accounts – Exchange Loss/Gain Selection
For the following five account types:
- Income
- Other Income
- Cost of Sales
- Expense
- Other Expense
You can tick the optional checkbox: “Exchange loss or (gain)”. If this option is selected, the account will appear in the *“Exchange loss/(gain) account ” field for selection when recording a payment or receipt.
Example: Create a foreign exchange account and set its type to Other Income. It will appear under Other Income in the Profit and Loss report.
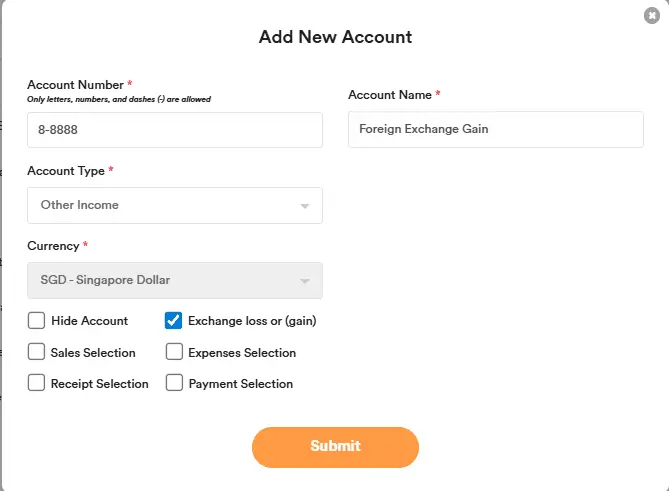
When creating a payment or receipt, the account will be available in the dropdown list.
For the existing system exchange gain/loss account, you can choose to hide it if you don’t want to use it.

Chart of Accounts – Income Tax Expenses
You can use the system account – Income Tax Expense to record your corporate income tax expenses.
Alternatively, you can create your own income tax expense account by selecting Account Type = ‘Other Expense’ and ticking ‘Income Tax Expenses’.
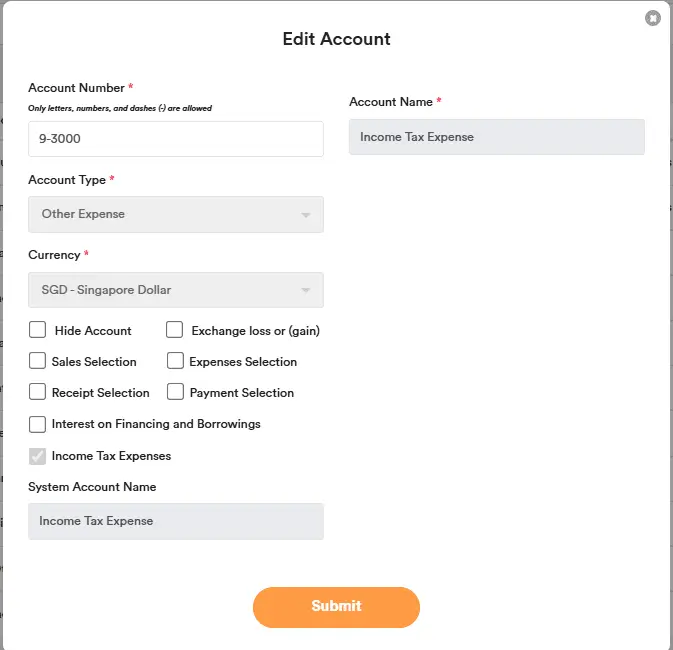
In the Profit and Loss report, the income tax expense account will appear in a separate section, allowing you to calculate profit before tax and net profit after tax.

Chart of Accounts – Borrowings
Borrowings are interest-bearing debts (e.g., bank loans, credit lines).
Record short-term portions under ‘Current Liabilities’; longer terms under ‘Non-current Liabilities’.
Use an ‘Other Expense’ account type for interest charges.
If the account type is Current Liabilities or Non-current Liabilities, tick ‘Financing and Borrowings’.
If the account type is Other Expense, tick ‘Interest on Financing and Borrowings’.
After these settings are applied, the cash flow statement will report these accounts under Financing activities.

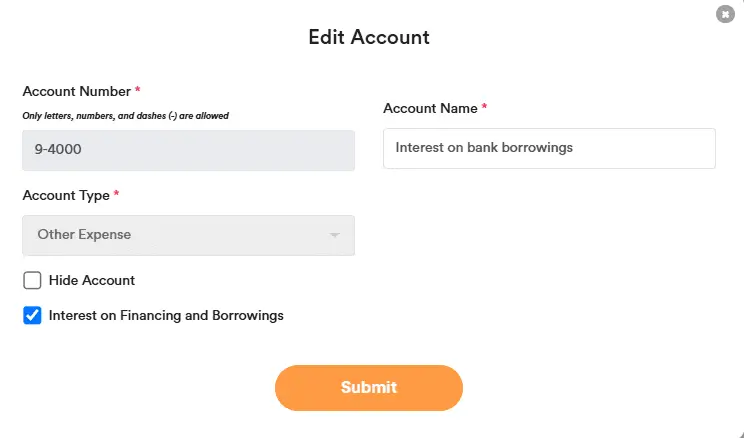
Chart of Accounts – Investments
Investments are long-term financial assets we hold (over 12 months).
Record them as Non-current Assets.
If the account type is Non-current Assets, tick ‘Investments’.
After these settings are applied, the cash flow statement will report these accounts under Investing activities.
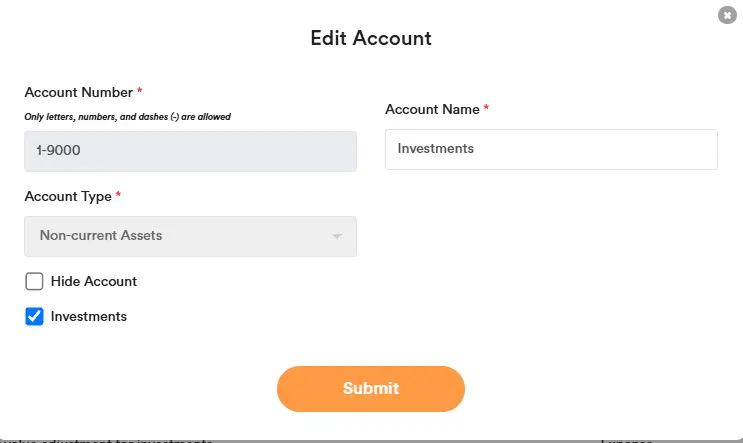
Chart of Accounts – Account Grouping
In the Accounts section, you can configure Account Grouping (via the top right button) and then generate the Balance Sheet (Group) and Profit and Loss (Group) reports, which will reflect the groupings you’ve defined.

Click Add New Account Group.
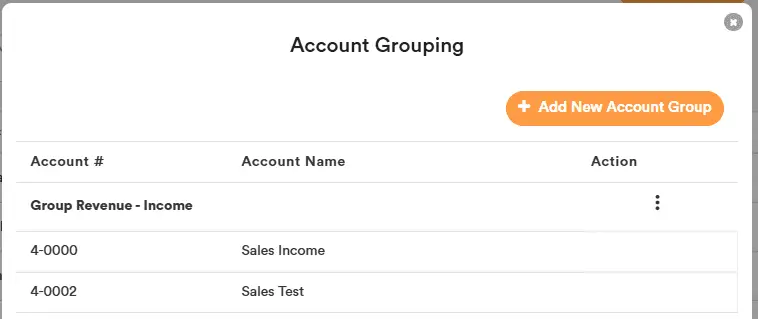
Select the Account Type you want to group, enter the Group Name, and choose the accounts to include for reporting. Thereafter, click on ‘Create Grouping’.
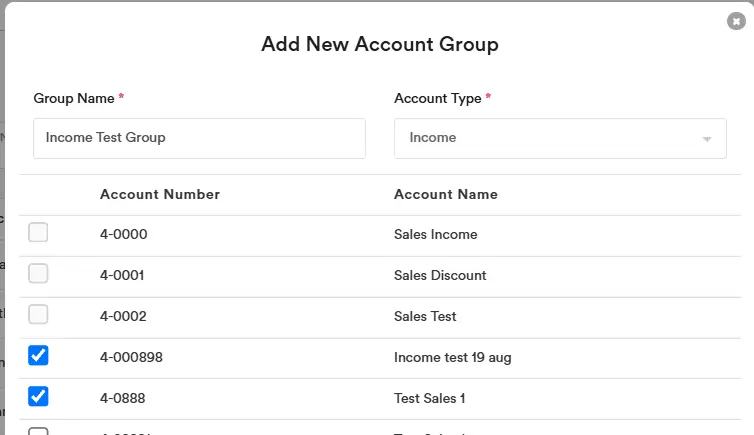
Note: You cannot post double-entry journals or transactions to the Account Group. It’s for header-level reporting/presentation only.
Chart of Accounts – System Account
You may rename, delete, or hide any default account (e.g. Sales, Expenses).
However, the following system accounts (Status = System Account) are locked for automation. You may change their account numbers if needed, but you cannot delete them:
- Trade Receivables
- Other Receivables
- Inventories
- Trade Payables
- Other Payables
- GST Payables
- Expenses Withholding Tax
- Retained Earnings
- Sales Inventories
- Service Charges
- Sales of Fixed Assets
- Cost of Goods Sold
- Depreciation
- Impairment Loss
- Loss or (Gain) on Disposal
- Exchange loss or (gain) (trade)
- Exchange loss or (gain) (non-trade)
- Rounding Differences
- Others

Chart of Accounts Export and Import
You can export the full chart of accounts to Excel using the ‘Export’ button, make your changes in Excel, and then import the file back into the system to update the chart of accounts. Note that some accounts—such as system accounts—cannot be modified; if you try, you’ll see a warning.
To hide unused accounts in bulk, import an Excel file where the ‘Hide Account’ column is set to “Yes” for the accounts you want to hide.

Fill in the Account Grouping in the Excel export.
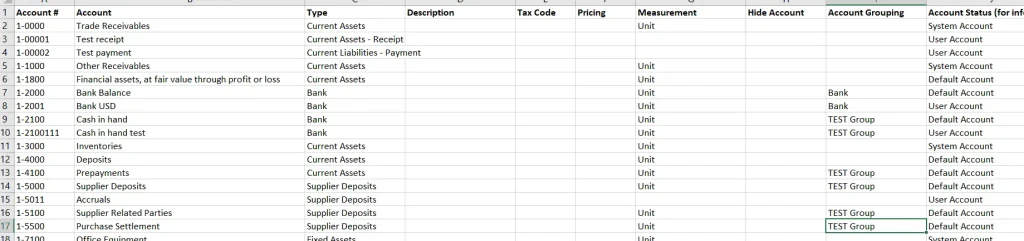
When you import the Chart of Accounts to update, the Account Grouping will be auto-created as shown below.
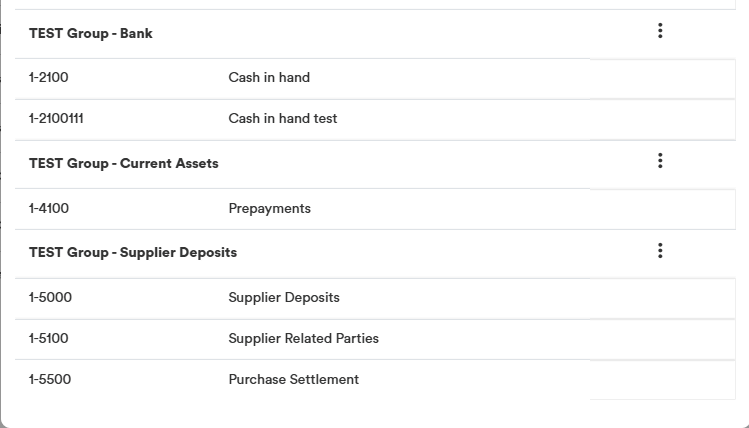
Chart of Accounts — Set Up Your Own
Some accountants prefer to use their own chart of accounts instead of the system default.
You can delete all default accounts and set up your own list using the top-right button, “Delete Default Accounts.”
After that, import the chart of accounts you previously exported from another company in AI Account. The new company will then have the same chart of accounts as the source company. For export/import instructions, see the previous Export/Import Chart of Accounts section.
You can delete all user accounts at any time if you’d like to start fresh.
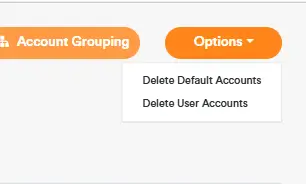
Chart of Accounts Measurement
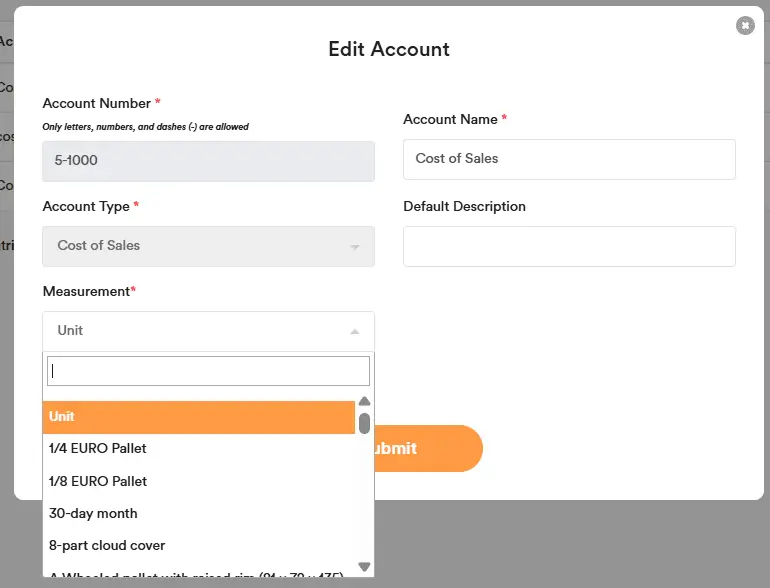
For Account Type = Income, Expense, or Cost of Sales:
- You can set the Measurement (default: Unit).
- When you use these accounts in Sales or Expense transactions, the selected measurement appears next to the account name.
- To show the measurement on tax invoices, tick “Display Quantity and Unit Price in Exported Quotes and Sales Invoices” in Invoice Settings.
- This setup is suitable for recording inventory on a periodic basis.
Measurement Setup
Go to Measurement, then click ‘Add New Measurement’ in the top-right corner to add your own measurement type.
Untick Show Measurement if you don’t want the measurement to be displayed.
“Unit” is the default measurement across all sections in general; it can’t be hidden.
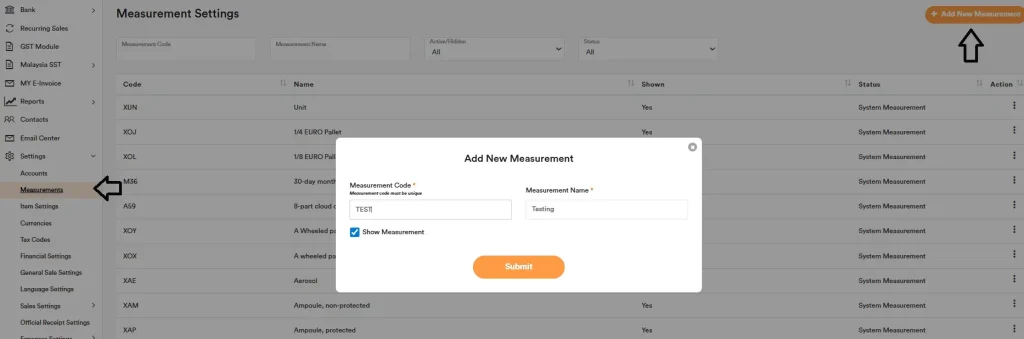
In the options at the top-right corner, you can choose either “Show all System Measurements” or “Hide all System Measurements except for ‘Unit’”, depending on your needs.

If you’re using the e-invoice feature, go to the E-Invoice → Measurement tab, and assign your custom measurement to the default government measurement you want submitted to the government.
Items Setup
With AI Account, you can track the specific products and services used on each sales transaction line by using the Items feature.
This lets you manage multiple items — such as Consulting Services, Valuation Services, etc. — while posting them all to a single Chart of Account (e.g., Sales Income). You don’t need to create a separate account for each service. This is ideal when you have thousands of service types and it’s not practical to create individual accounts for each.
Items – Basic Setup
There are two item types: Sales items and Expense items.
You can set a prefix number for the Item Code at ‘Item Settings’.
You can set your preferred Item Display Format in Item Settings, such as choosing not to show the Item Code.

To add an item, click ‘Add Item’ in the top-right corner.
The following fields are optional: Account, Description, Quantity, and Price.
- If you fill them in, these values will be used as defaults when the item is selected during sales or expense entry.
- For Sales Items, select an account that is used in sales transactions only (e.g., Sales Income).
- For Expense Items, select an account that is used in expense transactions only (e.g., Accounting Fees).
Example: If you create an item with all details completed, those details will automatically populate when you select the item on a sales record.
If you enable Default Tax, the tax will also be applied automatically — no manual selection required.
Items – Export and Import
Go to ‘Items Settings’ and click the Import button in the top-right.
Download the Template File, prepare the data, then upload and import it.
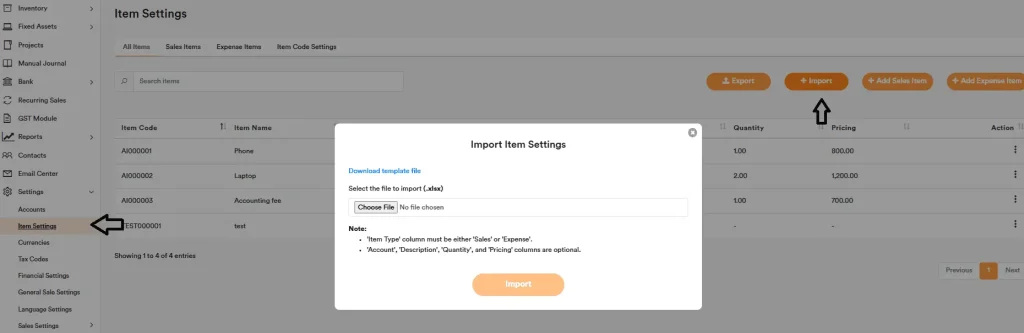
You can export the full Items to Excel using the ‘Export’ button, make your changes in Excel, and then import the file back into the system to update the Items list.
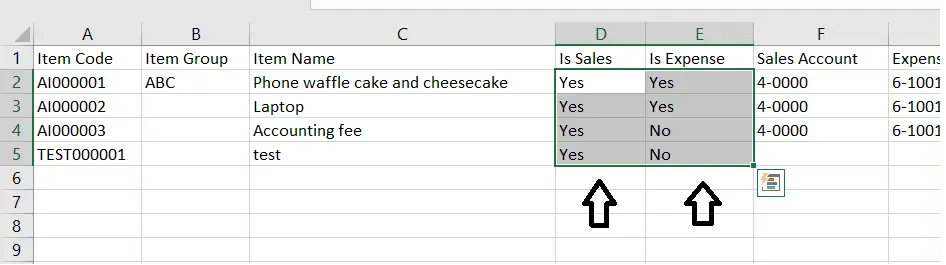
In Excel, if you set “Is Sales” to Yes, that item will appear in the Sales transaction selection. If you set “Is Expense” to Yes, that item will appear in the Expenses transaction selection.
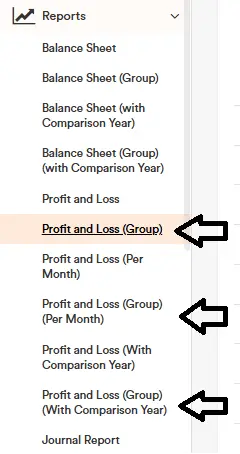
Items – Reports
You can see the item breakdown in the following report.
- Profit and Loss (Group)
- Profit and Loss (Group) (Per Month)
- Profit and Loss (Group) (With Comparison Year)
Opening Balance Recording
You can use Manual Journal entry to record opening balance. Example, the cut off is 1 Jan 2022, you are recommended to key in the opening balance on 31 Dec 2021. So when you generate the prior year balance sheet report on 31 Dec 2021, it can reflect the number accurately.
Watch the video below to learn how to enter your company’s opening balances using a manual journal.
Opening Balance Recording (Video)
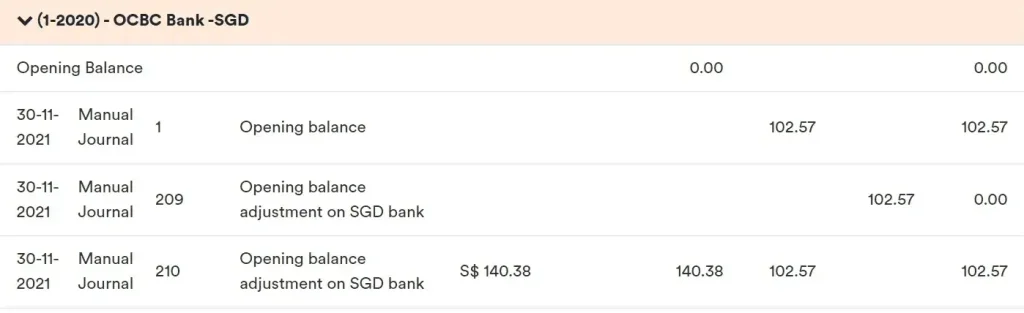
For foreign currency opening balances, you can record each in a separate manual journal, as each manual journal can record only one type of currency. Alternatively, you can record them in one manual journal and adjust it with another journal, as shown below.
Opening Balance Recording (Fixed Assets Module)
Fixed Assets — how to bring in opening balances (simple example)
Some clients want to import fixed assets with full details. You can do this in the Fixed Assets module.
Example (numbers): Cost = $1,000, Accumulated Depreciation = $200. Opening balance date = 1 Jan 2025.
Step 1 — Add the asset
Enter the asset with its original purchase date and original cost ($1,000).
Step 2 — Set depreciation
Depreciation start date: use your opening balance date (e.g., 1 Jan 2025).
Remaining useful life: set the years left from the opening balance date (total life minus the years already used).
Step 3 — Bring in accumulated depreciation ($200)
From the top-right menu, select ‘Add Depreciation Manually’ to record prior depreciation. Use a date before the opening balance (e.g., 31 Dec 2024), then post::
Dr Depreciation expenses $200
Cr Accumulated Depreciation $200

Step 4 — If the asset was already paid in a previous year
You may also record the payment (credit bank) using the appropriate past date.
Effect of Steps 1–4 (illustration):
Fixed Asset + $1,000
Accumulated Depreciation – $200
Bank Balance – $1,000
Depreciation Expense + $200
Compare to your assumed actual opening balances (example as at 1 Jan 2025):
Bank Balance + $2,000
Fixed Asset + $1,000
Accumulated Depreciation – $200
Retained Earnings – $2,800
Step 5 — Bring the bank to the true opening amount with one manual journal
To move bank from –$1,000 (after you re-entered the old payment) to the actual opening +$2,000, post manual journal entry on 31 December 2024:
Dr Bank + $3,000
Cr Retained Earnings – $3,000
This single entry aligns the books so the final opening balances tally on 1 Jan 2025.
Note: The $200 prior-year depreciation you posted (dated 31 Dec 2024) closes into Retained Earnings at year-end, which is why it’s not shown as an “Expense” line in the opening trial balance—its effect is already included in the –$2,800.
Opening Balance Recording (Account Receivables (Sales Module))
Sales (AR): bring in opening receivables with invoice details (unpaid)
Scenario / Dates
Opening balance date: 1 Jan 2025
Customer: ABC Pte Ltd
Invoice no.: INV-1001
Invoice date: 15 Dec 2024
Due date: 14 Jan 2025
Amount: $1,000 (no tax in this simple example)
Steps – Create the historical invoice (don’t mark as paid)
Go to ‘All Sales’ → ‘Add New Sale’

Enter the invoice with its original invoice date (15 Dec 2024), due date, invoice no., customer name, item/description, and amount $1,000. Click ‘Submit’
This preserves the correct ageing and keeps Account Receivables (AR) outstanding at opening.
What accounting entry this creates (on 15 Dec 2024)
Dr Trade Receivables $1,000
Cr Sales Revenue $1,000
Why this won’t inflate the new year’s revenue
Because the invoice is dated before your opening balance date (15 Dec 2024), the revenue sits in the prior year and gets closed into Retained Earnings at 31 Dec 2024.
On 1 Jan 2025, you start with the receivable outstanding, but no new revenue in the current year.
How your opening trial balance looks (as at 1 Jan 2025)
Trade Receivables +$1,000 (debit)
Retained Earnings –$1,000 (credit)
(That’s the balancing figure: Debits $1,000 = Credits $1,000.)
When the customer pays (in 2025)
Dr Bank $1,000
Cr Trade Receivables $1,000
That clears the outstanding receivable with no impact on prior-year revenue.
Opening Balance Recording (Account Payables (Expenses Module))
Expenses (AP): bring in opening payables with bill details (unpaid)
Scenario / Dates
Opening balance date: 1 Jan 2025
Supplier: XYZ Supplies Pte Ltd
Bill no.: BILL-2001
Bill date: 20 Dec 2024
Due date: 20 Jan 2025
Amount: $800 (no tax in this simple example)
Steps – Create the historical bill (don’t mark as paid)
Go to ‘All Expenses’ → ‘Add New Expense’

Enter the original bill date (20 Dec 2024), due date, bill no., supplier name, item/description, and amount $800. Click Submit
This preserves correct ageing and keeps AP outstanding at opening.
What accounting entry this creates (on 20 Dec 2024)
Dr Expense $800
Cr Trade Payables $800
Why this won’t inflate the new year’s expenses
The bill is dated before your opening balance date (20 Dec 2024).
That expense belongs to the prior year and is closed into Retained Earnings at 31 Dec 2024.
On 1 Jan 2025, you start with the payable outstanding, but no new expense in the current year from this bill.
Opening trial balance (as at 1 Jan 2025)
Trade Payables –$800 (credit)
Retained Earnings +$800 (debit)
(Debits = Credits: $800 = $800.)
When you pay the supplier (in 2025)
Dr Trade Payables $800
Cr Bank $800
That clears the payable; no impact on current-year expense from this historical bill.
Opening Balance Recording (Inventory Module – perpetual method)
Inventory (Opening Stock): one clean way to bring it in
Goal: Show the remaining stock on hand at the start of your new year without messing up current-year P&L.
Key dates & names
Opening balance date: 1 Jan 2025
Transaction you’ll enter: a single purchase bill dated 31 Dec 2024
Supplier: “Opening Balance Supplier” (a dummy supplier you create for this purpose)
Example numbers
Item: Widget A
Quantity: 100 units
Unit cost: $10
Total cost: $1,000 (no tax in this base example)
Step 1 – Go to ‘Inventory List’ → ‘Add New Inventory’
Add your items (or click Import to upload a list). The items you create here will be available to select when you enter inventory purchase later.
Step 2 – Enter one historical bill for the remaining stock (31 Dec 2024)
Go to Inventory Purchase → Add New Inventory Purchase
Supplier: Opening Balance Supplier
Bill date: 31 Dec 2024
Line: Widget A, Qty 100, Unit cost $10 → $1,000
What it posts (perpetual inventory):
Dr Inventory $1,000
Cr Trade Payables $1,000
Why 31 Dec 2024? This keeps the purchase in last year, so you start 1 Jan 2025 with stock on the balance sheet (no new expense in the current year).
Step 3 – Choose how to “pay” that bill (two options)
Option A — Pay from Bank on 31 Dec 2024 (your original flow)
Record a payment on 31 Dec 2024:
Dr Trade Payables $1,000
Cr Bank $1,000
Opening (1 Jan 2025):
Inventory +$1,000
Bank is $1,000 lower (because you just recorded that prior-year payment)
Final alignment (same day, 1 Jan 2025):
Compare your ledger’s Bank to the actual closing bank (per statement at 31 Dec 2024).
If your ledger Bank is short by $1,000 (example: ledger shows $1,000; statement says $2,000), post one opening journal to align:
Dr Bank $1,000
Cr Retained Earnings $1,000
Now your opening balance sheet tallies.
Option B — Use an Opening Balance Clearing (contra/suspense) account
To avoid touching Bank before you finalise, mark the bill Paid on 31 Dec 2024 to the Clearing account instead of Bank:
Dr Trade Payables $1,000
Cr Opening Balance Clearing $1,000 (Newly created bank type account)
Opening (1 Jan 2025):
Inventory +$1,000
Opening Balance Clearing –$1,000 (credit)
Bank unchanged (you’ll set Bank to the actual opening per statement)
Final alignment (1 Jan 2025):
Once you confirm all real opening balances, clear the suspense to equity with one entry:
Dr Opening Balance Clearing $1,000
Cr Retained Earnings $1,000
The result is the same clean opening as Option A, but you never touched the Bank during setup.
Step 4 – How this affects opening Retained Earnings
On opening day (1 Jan 2025), P&L accounts are zeroed (they closed into Retained Earnings at 31 Dec 2024). Your Retained Earnings (opening) is simply the balancing figure so that:
Retained Earnings = Total Assets – Total Liabilities – Share Capital – Other Reserves
In Option A, you may need a Bank ↔ Retained Earnings top-up entry so Bank matches your statement.
In Option B, you’ll clear Opening Balance Clearing ↔ Retained Earnings to finish the balancing.
Final Tips
If you have many SKUs, put all opening quantities on one bill (multiple lines), dated 31 Dec 2024, to “seed” on-hand stock.
Keep supporting docs (stock count sheets, valuation method notes like FIFO/Weighted Avg) for your audit trail.
Opening Balance Recording (Inventory Module – periodic method)
If you use periodic inventory, bring in opening stock with one manual journal—no need to enter items one by one or create a supplier bill. Date it 31 Dec 2024:
Dr Inventory (Opening Stock) $X
Cr Opening Balance Equity / Retained Earnings $X
Fuller tip (Periodic inventory)
Using periodic inventory? Record the total opening stock with a single manual journal (no purchase bills per SKU required). First total up your closing stock value as at 31 Dec 2024 (qty × cost, per your count/valuation). Then post:
Dr Inventory (Opening Stock) $X
Cr Opening Balance Equity / Retained Earnings $X
If you prefer, credit an Opening Balance Clearing account and later clear it to Retained Earnings when you finalise all opening balances.
For step-by-step workflows on inventory recording, refer to Inventory Recording.
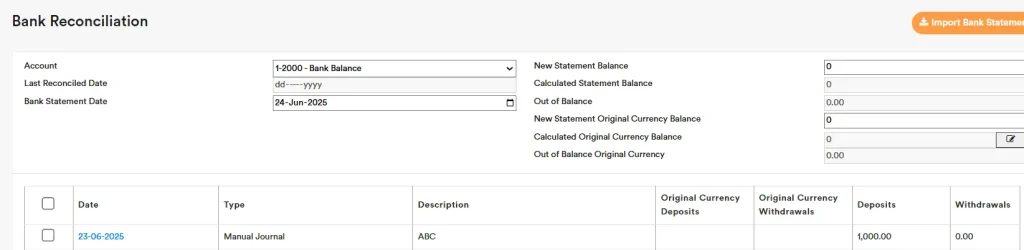
Opening Balance Recording (Bank Reconciliation)
You may have unreconciled items carried forward from the previous month’s bank reconciliation. You can record them as usual sales and receipts transactions, or via manual journal entries.
For example, I record the sales and receipt entries for the unreconciled item (an unpresented cheque).
Next sample, post another manual journal entry for the second unreconciled item.
Then, post a manual journal entry for the opening balance (excluding the unreconciled items).
After that, go to Bank Reconciliation and perform the reconciliation as at 31 December 2024. Assuming the two unreconciled items remain outstanding, the bank statement balance should be 1,000.
Once you click Reconcile, leave the unreconciled items to be carried forward and cleared in the subsequent period.
Opening Balance Recording (Retained Earnings)
Final step: set the true opening Retained Earnings so the balance sheet balances
After you’ve re-created all historical items (e.g., unpaid invoices/bills, prior-year payments/receipts, manual depreciation dated before the opening date), you must net everything off and bring Retained Earnings to the correct opening figure. This is normal and ensures the balance sheet balances on 1 Jan 2025.
What to do:
Step 1 – Confirm your true opening balances from your prior-year trial balance and statements (as at 31 Dec 2024):
Bank closing balance
Trade Receivables (outstanding invoices)
Trade Payables (outstanding bills)
Fixed assets and accumulated depreciation
Any other assets/liabilities (tax, loans, etc.)
Share capital (if any)
Step 2 – Compare vs what’s now in your ledger after you re-entered the history.
If Bank (or any other balance) doesn’t match the true opening, plan a single opening-date journal to fix it.
Step 3 – Post one balancing journal on 31 December 2024 to set Retained Earnings to the required amount.
If you need to increase Bank to the true opening:
Dr Bank / Cr Retained Earnings (for the difference)
If you need to reduce Bank to the true opening:
Dr Retained Earnings / Cr Bank (for the difference)
Retained Earnings is the balancing figure after all prior-year revenue/expense effects have closed out. In short:
Retained Earnings (opening) = Total Assets – Total Liabilities – Share Capital – Other Reserves (credits shown as negative if you use that sign style).
Migration Tool
Access the tool: https://convert.aiaccount.com/migration/
What it does
Converts accounting data from another system into AI Account import files — chart of accounts, contacts, opening balances, and historical transactions. The tool walks you through the process and tells you what to do at each step.
Privacy: The tool runs entirely in your browser. Your data is never uploaded to any server.
Two migration modes
Full Migration — Brings the complete transactional history into AI Account. Use when the client needs searchable historical records.
Opening Balance Only — Brings only closing balances and outstanding AR/AP into AI Account as the starting position. Faster, simpler, and sufficient for most fresh-year migrations.
You choose the mode in Step 1. Discuss with your client what level of history they need.
Before you start
You need three things:
- A modern web browser (Chrome)
- Exports from the source accounting system — the tool tells you exactly which files after you pick the software in Step 1
- AI Account’s Chart of Accounts template
How the wizard works
The tool has 8 steps. You can move forward and back at any time. Your work auto-saves in the browser so you can save and resume sessions.
- Step 1 — Setup: pick source software, migration mode, and company country
- Step 2 — Files: upload the files the tool lists for your selection
- Step 3 — Columns: confirm the auto-detected column mapping
- Step 4 — Accounts: match source accounts to AI Account chart
- Step 5 — Transactions: confirm how source transaction types map to AI Account templates
- Step 6 — Review: resolve any warnings before downloading
- Step 7 — Download: get the Excel files ready for import
- Step 8 — Validate: After the import, generate the report from AI Account to validate that the import is in good order.
The tool explains each step on-screen as you reach it.
How account matching works (Step 4)
The tool tries to auto-match source accounts to AI Account using four tiers, in order:
- Exact name match
- Software-specific aliases (terminology unique to your source system)
- Generic accounting aliases (e.g. “Sales” / “Revenue” / “Turnover” all map to the same target account)
- Fuzzy name similarity (handles typos and word-order differences)
You can always override any suggestion. For unmatched accounts, either pick one from the dropdown, click “Create new” for a single account, or use “Auto-create new for unmapped” to bulk-propose new accounts.
How Opening Balance mode works
Instead of replaying transactions, the tool generates:
- A balanced Opening Manual Journal setting account opening positions from the source Balance Sheet
- Opening Sales Invoices for outstanding customer balances from the Aged Receivables Detail
- Opening Bills for outstanding supplier balances from the Aged Payables Detail
The opening invoices and bills appear in AI Account’s standard AR/AP aging reports as normal documents, so collection and payment workflows work immediately.
For Full Migration, the tool check that:
- Trial Balance in AI Account matches the Trial Balance in the source system at migration date
- Total AR in AI Account matches total AR in the source system
- Total AP in AI Account matches total AP in the source system
- Bank balances in AI Account match bank balances in the source system
- Transaction counts per account match expectations
For Opening Balance Only, check that:
- Each account’s opening balance in AI Account matches the closing balance in the source Balance Sheet
- Total opening AR in AI Account matches total outstanding in the source Aged Receivables
- Total opening AP in AI Account matches total outstanding in the source Aged Payables
- Contact list is complete
If anything doesn’t tally, check Step 6 in the tool for warnings you may have skipped, re-export the source files without filters, or contact us with the specific reconciliation difference.
Important notes
- Data privacy: Files never leave your computer. Keep your own backups — nothing is stored on our end.
- Session persistence: Your progress can be saved and resumed after.
- Shared computers: Click “Reset” before leaving the device.
- One client at a time: Complete one migration end to end before starting another.
Need help?
Contact: info@aiaccount.com
For requests to add new source accounting software, tell us which system and we will work on it.
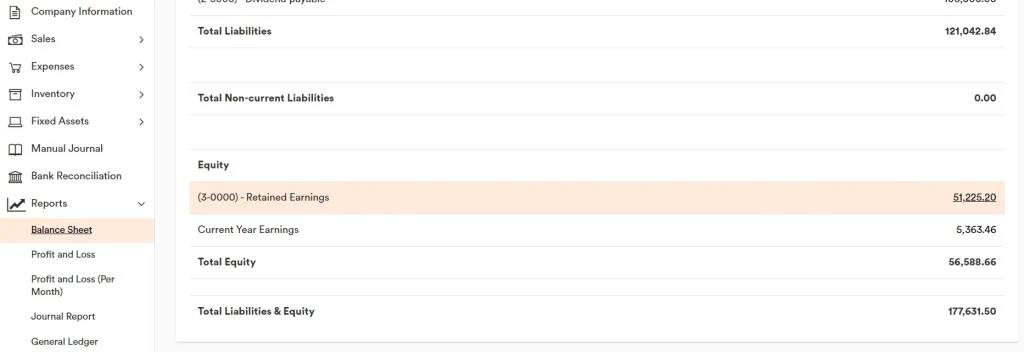
Retained Earnings
(3-0000) Retained Earnings are generated based on the period you select in Financial Settings (Incorporation Date), Balance Sheet Start Date and End Date by default.
You can select the period you want to generate a prior year balance sheet or previous month balance sheet. Example, if your company year end is 31 Dec 2022, you can generate the previous year balance sheet by indicating the start date as 1 Jan 2021 and End date is 31 Dec 2021.
Example, if you select Balance Sheet Start Date and End Date, start from 1 Jan 2022 to 31 Aug 2022, then the Balance Sheet “Current Year Earnings” will be for the period from (Start Date) 1 Jan 2022 to (End Date) 31 Aug 2022, “(3-0000) Retained Earnings” in Balance Sheet will be cover the period “Incorporation Date” to Balance Sheet one day before the “Start Date”.
When you click on the “Current Year Earnings”, it will show the relevant profit and loss period that can match the number.
When you click on the “(3-0000) Retained Earnings”, it will show the “General Ledgers (Retained Earnings)” report that can match the number.
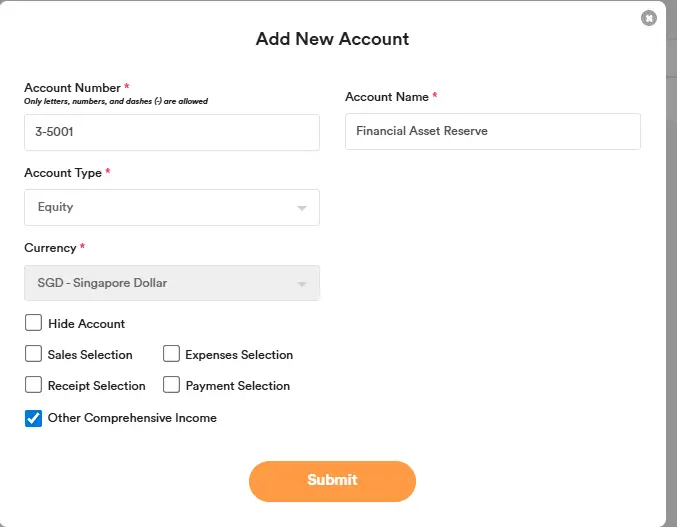
Other Comprehensive Income
You can now mark certain Equity accounts as ‘Other Comprehensive Income’ (OCI), so they can be used correctly in Manual Journals only and shown in a dedicated OCI report.
Important rules
- You can only tick OCI when creating a new account.
- Once ticked and saved, the OCI checkbox becomes locked.
- You cannot change the OCI tick later.
When you select an OCI account in Manual Journal, the Contact / OCI column will show a dropdown with these options:
- May reclassify to P&L – Gain/Loss
- May reclassify to P&L – Reclassification
- Not reclassified to P&L – Gain/Loss
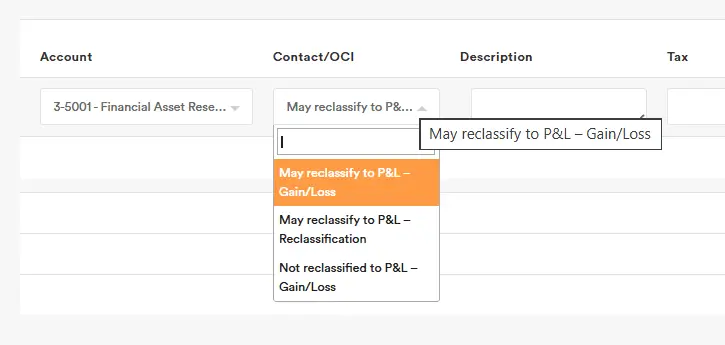
OCI entries will appear in the General Ledger, and a summary will be shown in the Other Comprehensive Income Report.

Import of Data
Our software supports data import for the following items using import templates:
- Contacts Import Template
- Sales Invoice Import Template
- Sales Receipt Import Template
- Expenses Bill Import Template
- Expenses Payment Import Template
- Inventory List Template
- Inventory Sales Invoice Import Template
- Inventory Receipt Import Template
- Inventory Purchase Bill Import Template
- Inventory Payment Import Template
- Fixed Assets Import Template
- Manual Journal Import Template
You can use these templates to import historical data from your previous accounting software, ERP system, or POS system. They are also suitable for importing the latest data or for day-to-day data entry — saving you time and eliminating the need to key in data manually one by one.
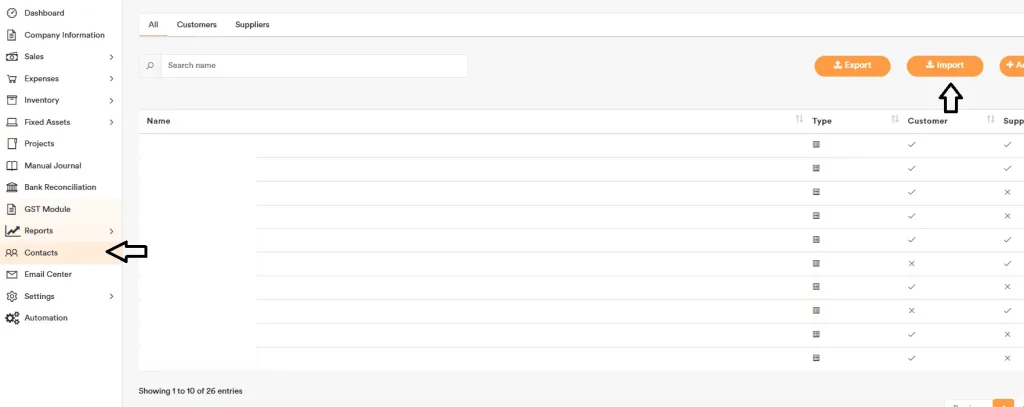
Import of Contacts
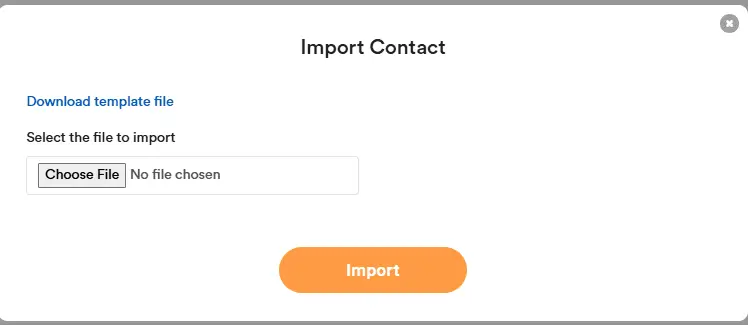
Go to Contacts and click the Import button in the top-right corner.
Download the Template File, prepare the data, then upload and import it.
To update existing contacts, click the Export button to download the contacts in Excel format.
Fill in or update the necessary details in the Excel file.
Use the Import button again to upload the updated Excel file. The changes will be reflected in the AI Account software.
Import of Sales and Expenses transactions
When importing sales and expenses transactions, if the customer or supplier contact is not available, it will be automatically created based on the name input from your Excel import into the system.
For sales, you may optionally import the Remark column. In each import of sales or inventory sales transaction, the remark can only be entered on the first line of the invoice. Multiple remarks across different lines are not allowed, as each invoice supports only one remark field.
In the import template, any column labeled “For info only” is optional and can be omitted. If such a column is included, the information will be used to cross-check the system’s calculated amount during import.
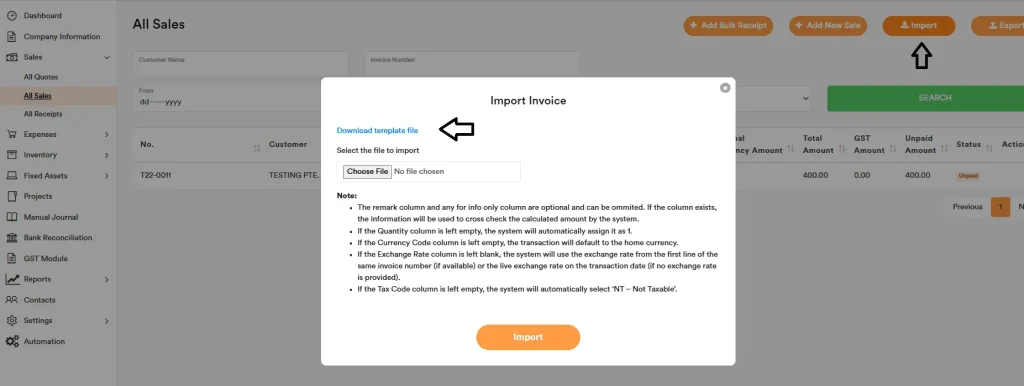
Example: Importing Sales.
Go to ‘All Sales’, click ‘Import’, then click ‘Download template file’ to get the CSV template. Open the CSV and fill in the required details, then save it. Back in the software, click ‘Choose File’ to select your completed CSV and click ‘Import’. All valid sales will be imported. If any required fields are missing or invalid, a warning box will list what to fix. If you’re unsure, email us at info@aiaccount.com for assistance.
Import of Transactions in Foreign Currency
You can enter the Currency Code in the import template if you wish to import transactions in a foreign currency.
To find the correct Currency Code, please refer to the “Currencies” section at Settings.
If the Currency Code column is left blank, the transaction will default to the home currency. If you select the home currency as the Currency Code, the exchange rate will automatically be set to 1 in the system.
If the Exchange Rate column is left blank, the system will use the exchange rate from the first line of the same invoice number (if available) or the live exchange rate on the transaction date (if no exchange rate is provided).
When invoicing and recording payment in the same foreign currency, the system will automatically calculate the exchange gain or loss. Any difference between the exchange rate at the time of invoicing and at the time of payment will be posted as a foreign exchange gain or loss.
If you make a local currency payment and the amount exceeds the foreign currency invoice (after conversion), the difference will be posted as an exchange gain or loss. If the payment is less than the converted invoice amount, it will be recorded as a partial payment of the invoice.
Import of Inventory
When importing inventory items with different purchase costs, it is important to use separate item codes for each cost level. This is because the import process handles inventory by batch, and the system does not automatically adjust the cost of sales that occur between purchases.
For example, if you import Item A at $10 and later import the same Item A at $15 under the same item code, but sales take place in between those two imports, the system may not correctly calculate the average cost. The sales would have already reduced the earlier stock at $10, and adding new stock at $15 later will distort the average cost calculation. This leads to inaccurate cost of goods sold (COGS) and profit margins.
To avoid this issue, it is best to assign separate item codes for each different cost.
Alternatively, if you want to use the same item code, you must enter the transactions manually into the system in chronological order—ensuring that purchase and sales entries reflect the actual timeline. This approach helps maintain accurate inventory valuation and average cost calculation.
Import of Manual Journal
Click Import (top right).
Download the template file as shown in the screenshot.
Fill in the template using the guidelines below, then import it.
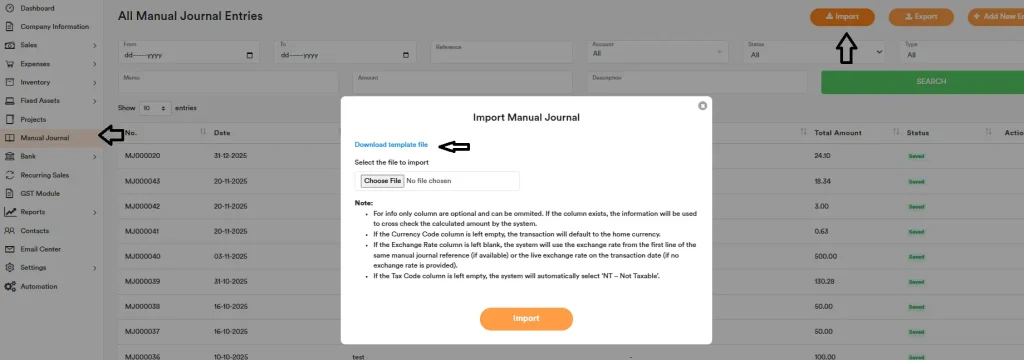
Column Guide
Account #
- Enter the chart of account number.
- You can use it with or without dashes (e.g. 10000 and 1-0000 are treated as the same account).
Contact
- Required only for accounts that need a contact, such as:
- Trade receivables / trade payables
- Other receivables / other payables
- Supplier deposits / customer deposits
- Enter the customer or supplier name. The system will match an existing contact or create a new one.
Manual Journal Date
- The date of the manual journal entry.
- For one journal, all related lines must have the same date so the system knows they belong to the same entry.
References
- A reference for the journal (e.g. “accounting 1”).
- For one journal, every line must have the same Reference.
- Unique references are required for each manual journal during import.
- You can use the same reference and differentiate each manual journal by assigning a unique Journal Number. Please remember that every line within the same manual journal entry must use the same Journal Number.
Memo
- Optional. Leave blank if you don’t need it.
- If you use a memo, every line belonging to the same journal must have the same Memo.
Currency Code
- Currency of the journal (e.g. SGD, USD).
- All lines for the same journal must have the same Currency Code.
Exchange Rate
- Exchange rate for the selected currency. You can leave this blank and the system will automatically use the exchange rate based on the transaction date.
- All lines for the same journal must use the same Exchange Rate.
Debit Amount (Original Currency)
- Debit amount before GST in the original currency.
Credit Amount (Original Currency)
- Credit amount before GST in the original currency.
Tax Code
- Select the tax code (e.g. NT).
- When a tax code is selected, the system uses it to calculate/check GST and totals.
GST Amount (for info only)
- GST amount based on the tax code.
- Used by the system to cross-check your tax selection and amounts.
Inc-Tax Amount (for info only)
- Amount including tax (original amount + GST).
- Also used for system validation.
Description (Optional)
- You can enter a different description for each line.
Journal Number (Optional)
- You can enter a Journal Number if you want. If you leave it blank, the system will automatically assign one based on the prefix number settings. Please remember that every line within the same manual journal entry must fill up with the same Journal Number.
Important: Debits and Credits Must Balance
Each manual journal entry must balance:
Total Debit = Total Credit (including tax).
Example:
Line 1: Debit 1,000 with tax code 7% → GST 70 → Inc-Tax 1,070
Line 2: Credit 1,070 with tax code NT (no tax)
This way, the journal balances: Total Debit = 1,000 + 70 (GST) = 1,070 Total Credit = 1,070

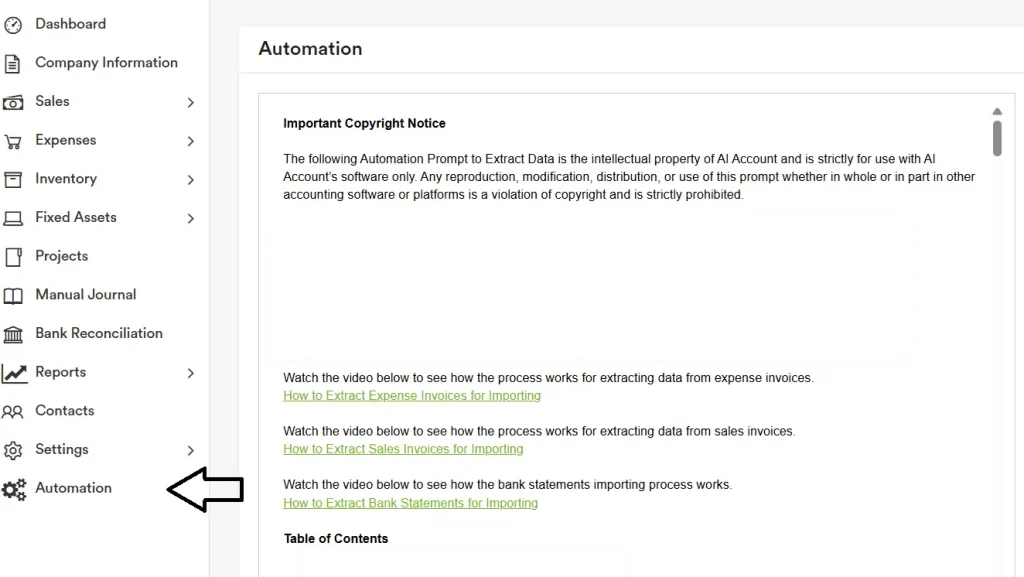
Automation for Data Importation
You can access the “Automation” section for step-by-step guides on how to automate key tasks, including scanning bank statements for automatic bank reconciliation, importing opening balances, and extracting sales and expense invoices from PDFs for seamless data import into our software.
Instructional videos are also available to demonstrate how the OCR and data import automation processes work.
Transaction Processing
Sales Quotes
You can create Quotes (Quotations) for either normal sales or inventory sales, as shown in the extracted image below.
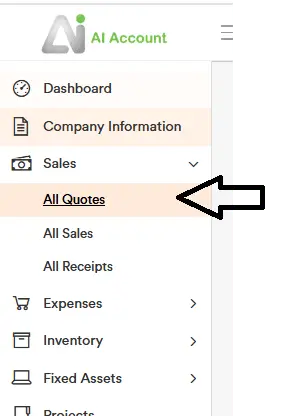
You can then convert a Quote into an actual sale by clicking the “Create Invoice” button within the respective Quote transaction.

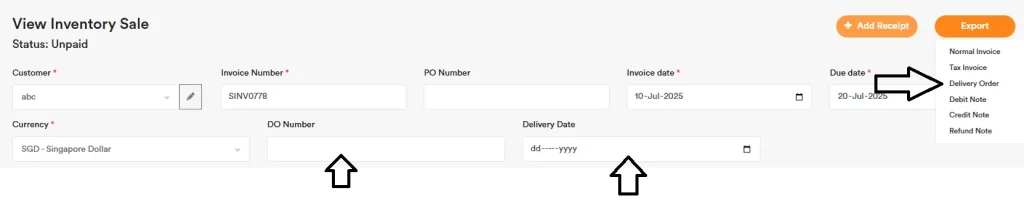
Delivery Order
You need to fill in the delivery address under the contact details to display it on the Delivery Order when exporting the PDF. If your customer has multiple delivery addresses, you can create multiple branch addresses, as shown here.
You can generate a Delivery Order for the inventory sales you’ve made. Remember to fill in the DO Number and Delivery Date so that this information appears on the generated Delivery Order. You need to fill in the delivery address under the contact details to display it on the Delivery Order when exporting the PDF. If your customer has multiple delivery addresses, you can create multiple branch addresses, as shown here.
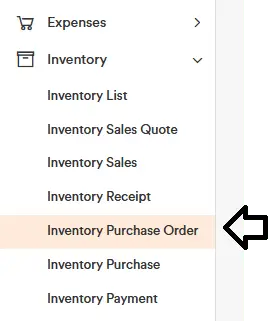
Purchase Order
You can create a Purchase Order for either normal expenses or inventory purchases, as shown in the extracted image below.
You can then convert a Purchase Order into an actual purchase by clicking the “Create Bill” button within the respective Purchase Order transaction.

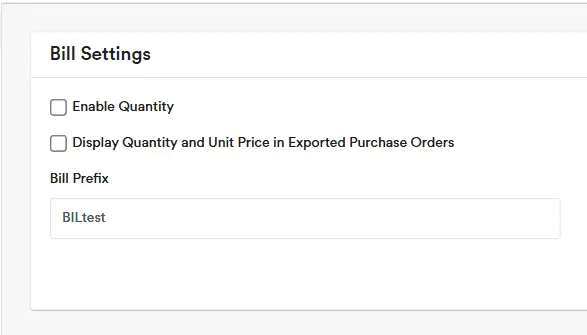
To include quantity in your exported purchase order, go to ‘Bill Settings’, tick “Display Quantity and Unit Price in Exported Purchase Orders” and click Save. The exported PDF reports for Purchase Order will then show the quantity and unit price.
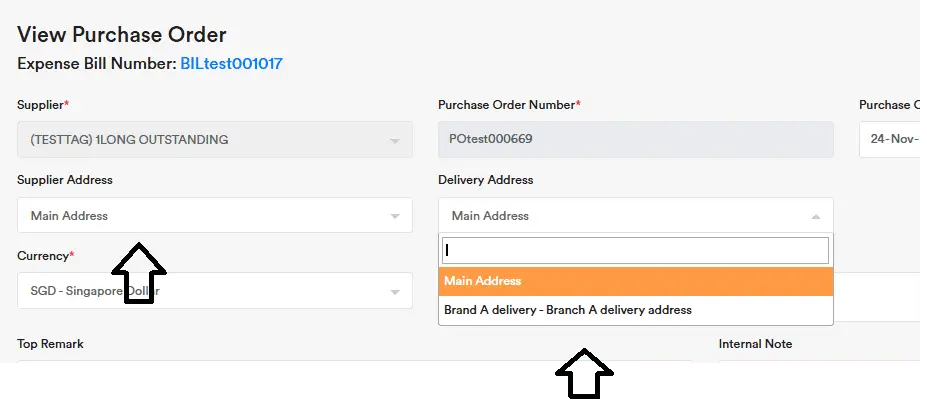
You can select the Address field in Contacts when creating your purchase order.
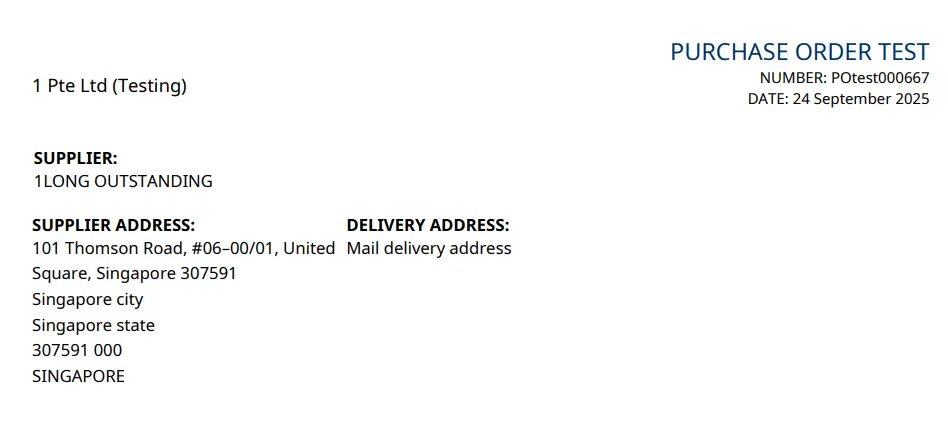
It will appear in the Purchase Order export as shown below.
If you don’t want to display the Supplier Address and only want to show the Delivery Address, go to the relevant contact and add an additional address entry and leave it blank like below. Then, select that address when creating the purchase order.

After that, the exported purchase order will show only the Delivery Address.
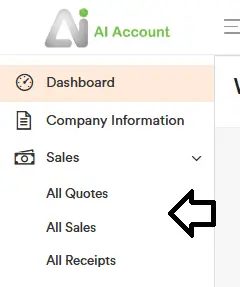
Sales Recording
You can go to All Quotes or All Sales to start creating your quotes and sales transactions with quantity.
You can amend the tax invoice report output format in Invoice Settings.
Download or Print Multiple Sales Invoices
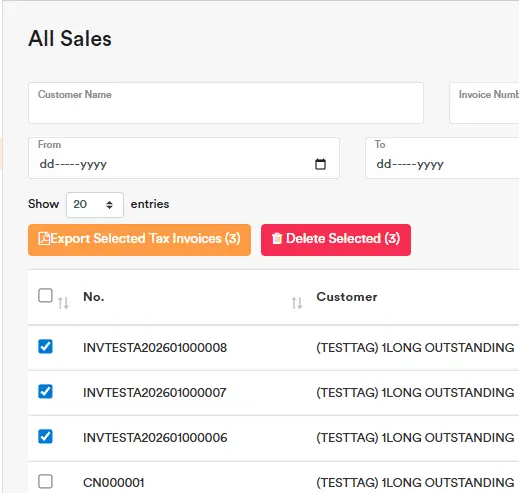
You can select multiple invoices and click Export Selected Tax Invoices to export them all at once as a separate PDF file. You can then print the PDF.
You can amend the tax invoice report output format in Invoice Settings.
Sales Receipt Recording
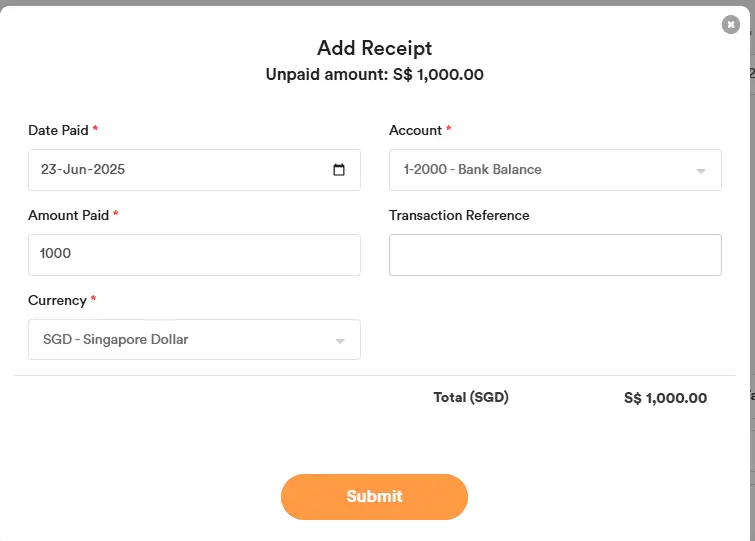
You can view the sales overview and, under Action, select ‘Add Receipt’ to record a receipt payment for a sales invoice.
To add payments for multiple invoices, click the Add Bulk Receipt button at the top.
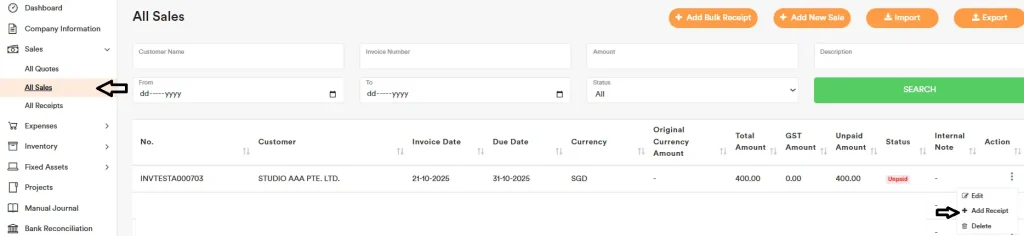
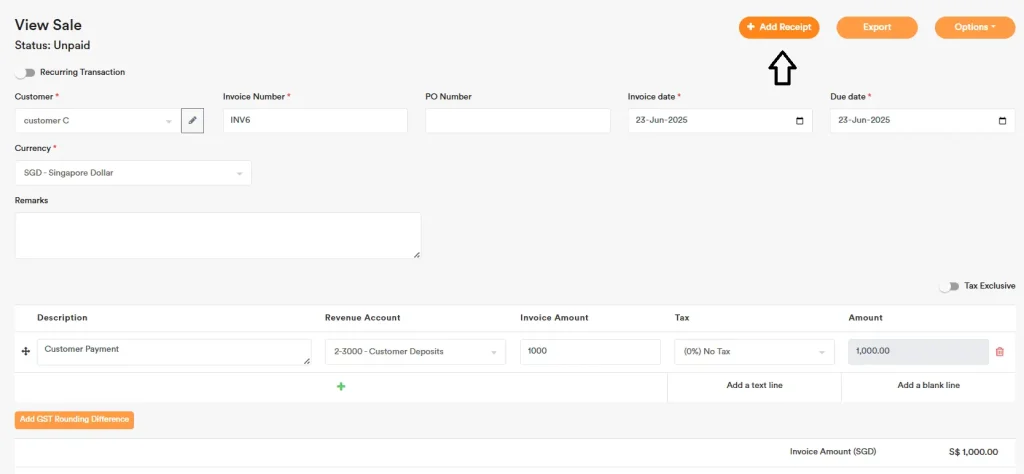
Alternatively, open the sales transaction and click the Add Receipt button in the top-right.

You can also go to the All Receipts tab and click the Import button (top-right) to upload receipts in bulk via a CSV file.

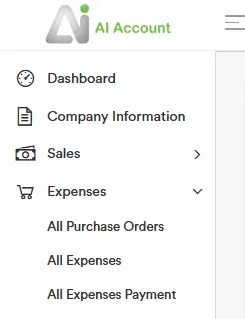
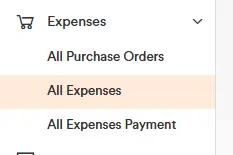
Expenses Recording
You can go to All Purchase Orders or All Expenses to start creating your purchase order and expenses transactions with quantity.
You can amend the expenses report output format in Bill Settings.
Expenses Payment Recording
You can view the expenses overview and, under Action, select ‘Add Payment’ to record a payment for an expenses invoice.
To add payments for multiple invoices, click the Add Bulk Payment button at the top.
Alternatively, open the expenses transaction and click the Add Expense Payment button in the top-right.

You can also go to the All Expenses Payment tab and click the Import button (top-right) to upload payments in bulk via a CSV file.

Overpayment Recording
In the AI Account, we have controls to prevent overpaying an invoice.
For example, if an invoice has an outstanding balance of $109 and you try to pay $200, the system will display a warning (Amount paid cannot be greater than remaining unpaid amount.) and you won’t be able to proceed.

To record the overpayment, you need to add a line item on the invoice for the difference (e.g., Overpayment Deposit). You can post this to the Customer Deposit account. Then you can record the receipt for the full $200.
Alternatively, you may:
- Create a separate invoice (or document) to apply the excess payment, or
- Use a Bank Entry to record the difference as a separate payment.
We do not allow overpayments to be recorded directly against Trade Receivables, as this could cause the Trade Receivables balance to become negative, which is misleading. Instead, any excess payment should be recorded to a Customer Deposit (or similar liability) account and applied later.
You can use the Customer Deposit account to hold the overpayment and apply it to future unpaid invoices during payment. When making the payment, select Customer Deposit instead of the Bank account.
Credit Note or Debit Note
Sales Recording (CN & DN)
For a Debit Note, you can create it by selecting the Type = Debit Note, then choosing the customer contact. After that, you can select the related sales invoice associated with this debit note. Enter the Debit Note number in the Invoice Number field.

For a Credit Note / Refund Note, you can create the negative sales by selecting the Type = Credit Note / Refund Note, then choosing the customer contact. After that, you can select the related sales invoice associated with this credit note / refund note.
Tick Credit Apply to automatically apply the Credit Note amount to the invoice and offset it. Click Submit — the Credit Note will be applied automatically and the invoice balance will be reduced accordingly.

You will then see the invoice’s unpaid amount decrease by $5,000, and the Credit Note status will show as Paid.

Purchase Recording (CN & DN)
For a Debit Note, you can create it by selecting the Type = Debit Note, then choosing the supplier contact. After that, you can select the related purchase invoice associated with this debit note. Enter the Debit Note number in the Bill Number field.
For a Credit Note / Refund Note, you can create the negative expense and selecting the Type = Credit Note / Refund Note, then choosing the supplier contact. After that, you can select the related purchase invoice associated with this credit note / refund note.
Tick Credit Apply to automatically apply the Credit Note amount to the bill and offset it. Click Submit — the Credit Note will be applied automatically and the bill balance will be reduced accordingly.

You will then see the expense bill’s unpaid amount decrease by $54.50, and the Credit Note status will show as Paid.

Sales Recording (CN & DN) – Manual Recording Process
For a Debit Note, you can create it by selecting the Type = Debit Note, then choosing the customer contact. After that, you can select the related sales invoice associated with this debit note. Enter the Debit Note number in the Invoice Number field.

For a Credit Note / Refund Note, you can create the negative sales by selecting the Type = Credit Note / Refund Note, then choosing the customer contact. After that, you can select the related sales invoice associated with this credit note / refund note.
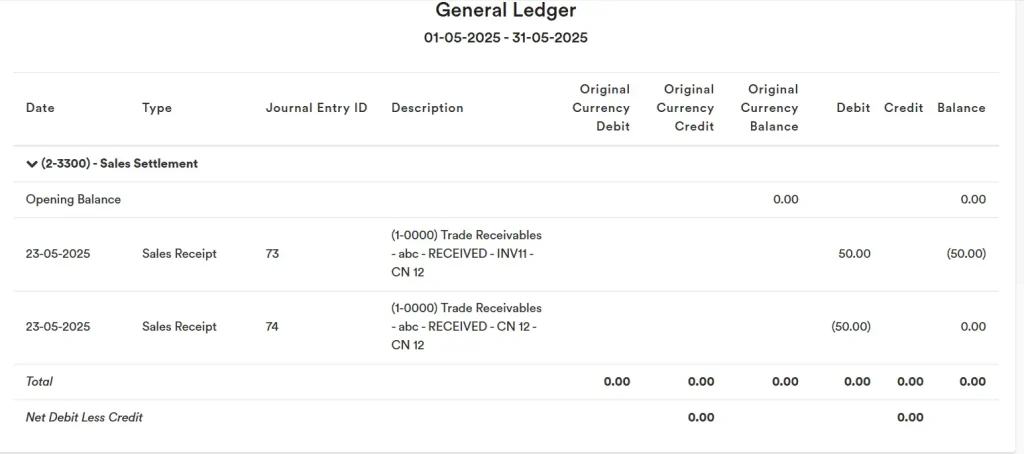
You can settle the credit note / refund note through the “2-3300 Sales Settlement” account. So both the invoices and credit note / refund note will offset their settlement in the “2-3300 Sales Settlement” account. Example:
1. Created the Sales Invoice.
2. Created the Credit Note (input like a normal Sales Invoice) below in the Sales section. The CN number can be entered in the “Invoice Number” field, and the amount should be negative since it is a credit note and will reduce the sales income previously invoiced to the client.

3. You can add the Receipt for the Sales Invoice and select the “2-3300 Sales Settlement” account. Select the amount to offset the Credit Note, and input the Credit Note number in the Transaction Reference field for easier tracking.
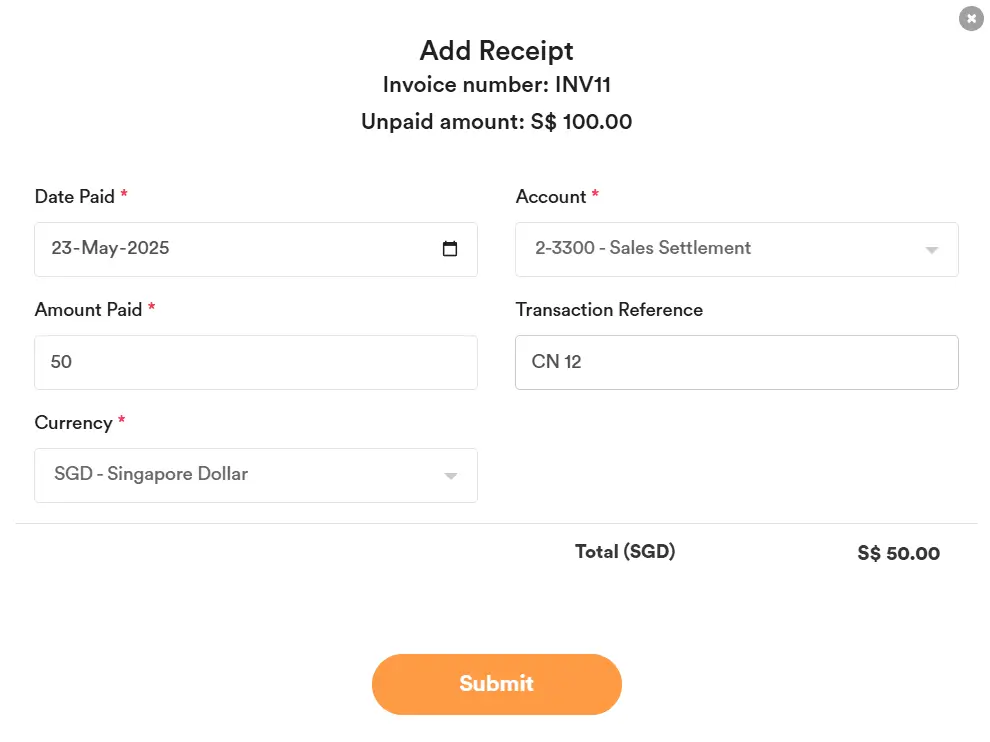
4. You can add the Receipt for the Credit Note and select the “2-3300 Sales Settlement” account. Select the amount to offset the Credit Note against the invoice, and input the Credit Note number in the Transaction Reference field for easier tracking.
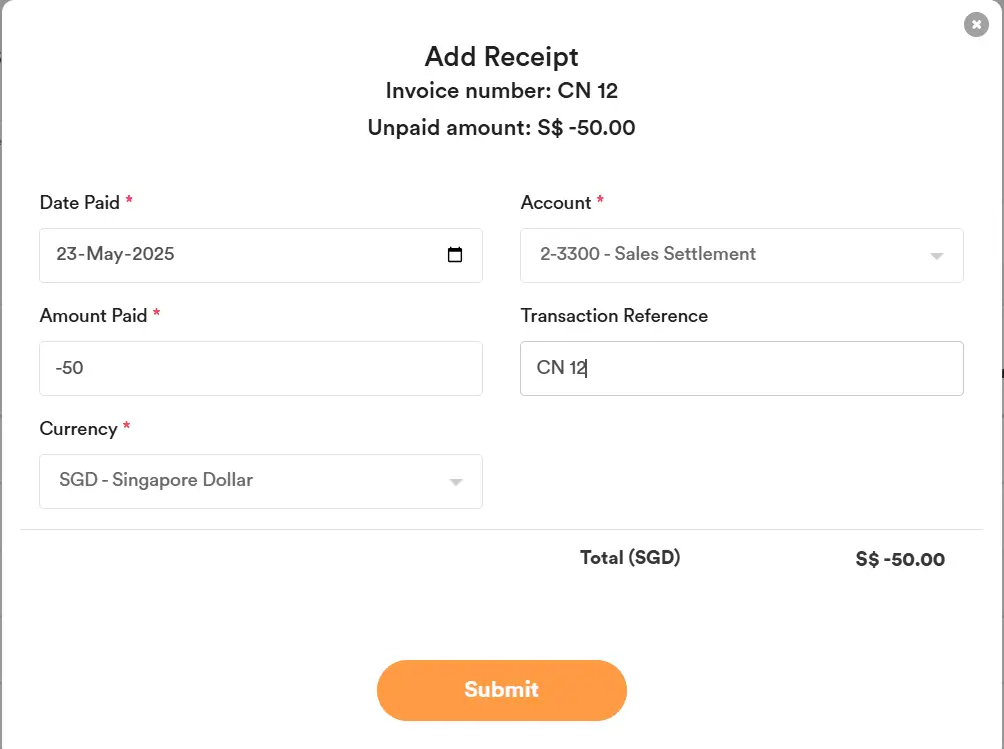
5. Thereafter, you can see the Invoice unpaid amount becomes $50 after offsetting the issued Credit Note.

6. The Sales Settlement account will show as below and net off to zero.
Purchase Recording (CN & DN) – Manual Recording Process
For a Debit Note, you can create it by selecting the Type = Debit Note, then choosing the supplier contact. After that, you can select the related purchase invoice associated with this debit note. Enter the Debit Note number in the Bill Number field.
For a Credit Note / Refund Note, you can create the negative expense and selecting the Type = Credit Note / Refund Note, then choosing the supplier contact. After that, you can select the related purchase invoice associated with this credit note / refund note.
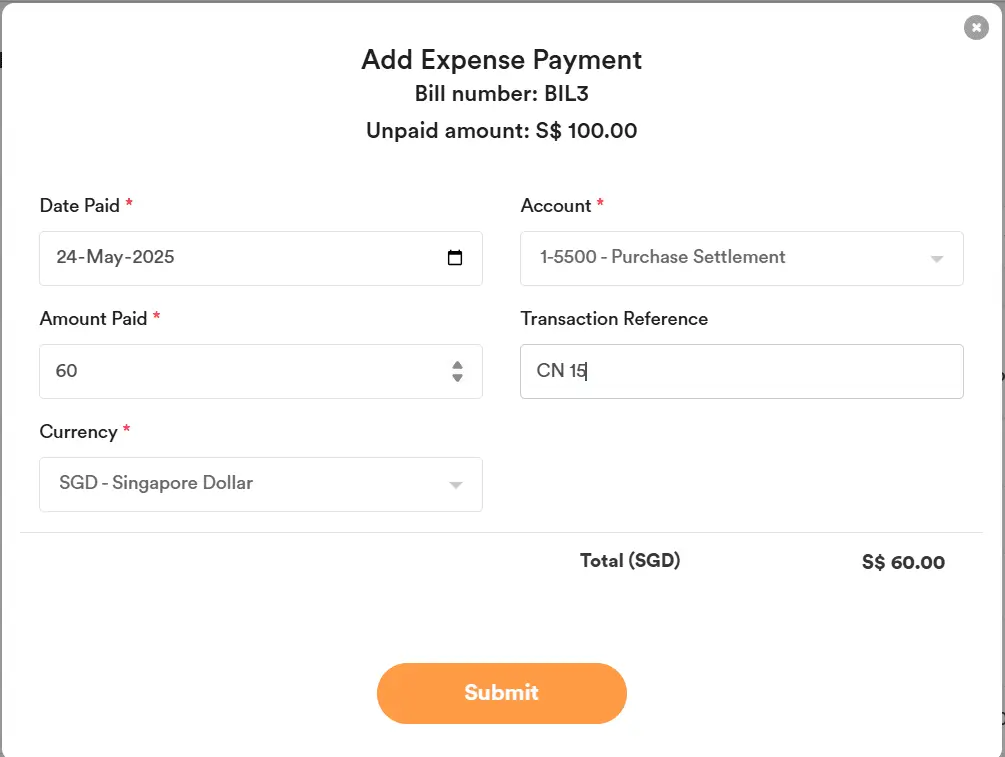
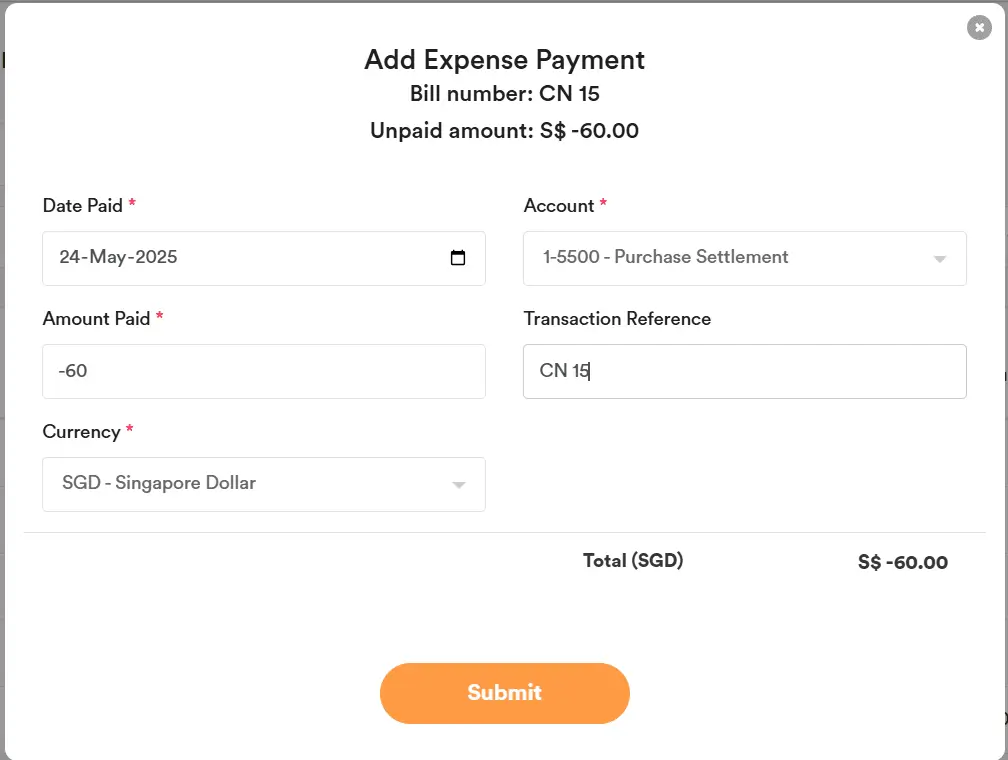
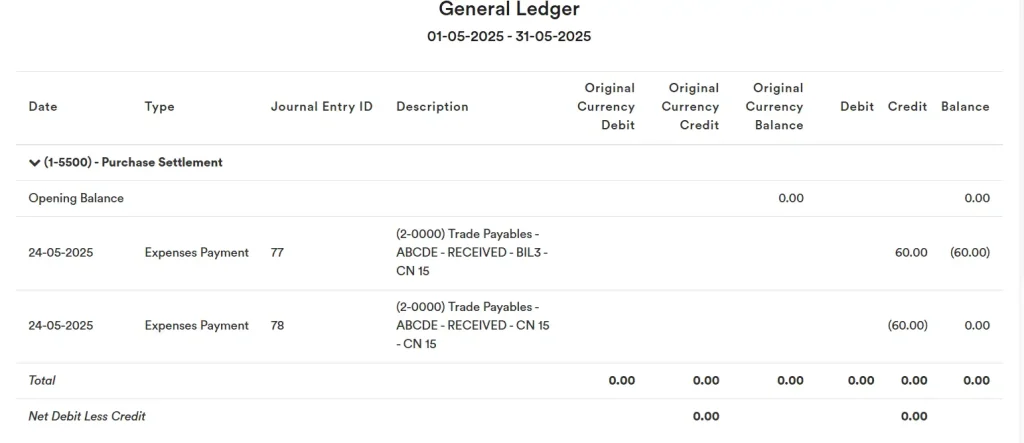
You can settle the credit note / refund note through the “1-5500 Purchase Settlement” account. So both the invoices and credit note / refund note will offset their settlement in the “1-5500 Purchase Settlement” account. Example:
1. Created the Expense.
2. Created the Credit Note (input like a normal Expenses Invoice) below in the Expenses section. The CN number can be entered in the “Bill Number” field, and the amount should be negative since it is a credit note and will reduce the expenses previously billed from the vendor.
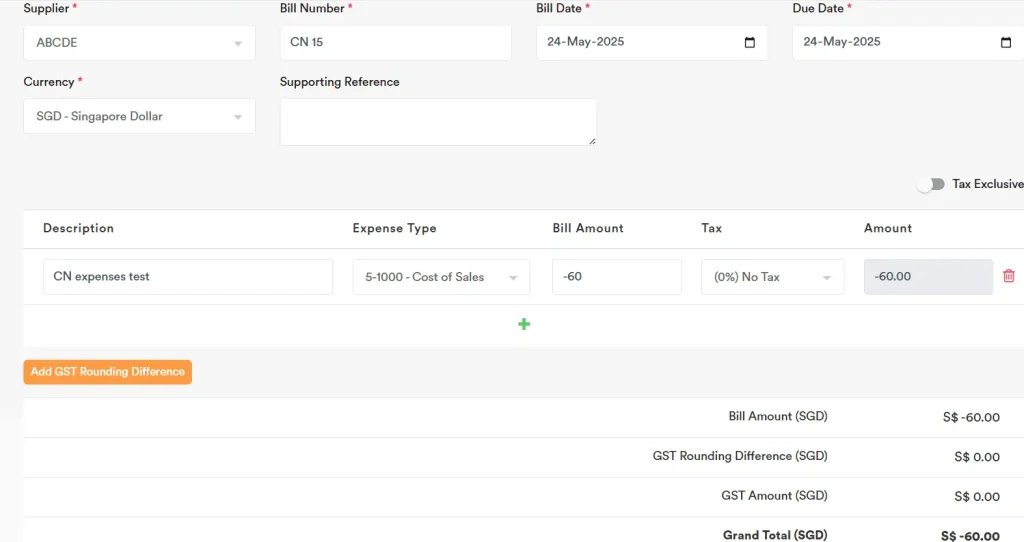
3. You can add the Payment for the Expenses Invoice and select the “1-5500 Purchase Settlement” account. Select the amount to offset the Credit Note, and input the Credit Note number in the Transaction Reference field for easier tracking.
4. You can add the Payment for the Credit Note and select the “1-5500 Purchase Settlement” account. Select the amount to offset the Credit Note against the invoice, and input the Credit Note number in the Transaction Reference field for easier tracking.
5. Thereafter, you can see the Invoice unpaid amount becomes $40 after offsetting the issued Credit Note.

6. The Purchase Settlement account will show as below and net off to zero.
Recurring Sales
You can create invoices automatically on a schedule (monthly, quarterly, etc.) from a chosen invoice template.
Create a recurring sale
1. Open the Recurring Sales module
2. Click Add New Recurring Sale (top-right).
3. Fill in the form
Name: An internal name (e.g., “Studio AAA – Support Retainer”).
Period: Choose Monthly, Quarterly, Half Yearly, Yearly.
Description: Optional note for your internal reference.
Invoice: Pick the existing invoice (in ‘All Sales’ module) to use as the template (its customer, currency, lines and taxes carry over).
Start Day (1–28): Day of the month/quarter to generate the invoice (e.g., 17).
Commencement Date: The first cycle’s reference date (e.g., 16-Oct-2025).
Ending Date (optional): Leave blank for ongoing; fill to stop on a specific date.
Billing Period (Optional): Enable to append a billing window to the last line (e.g., “17/10/2025 to 17/11/2025.”).
Billing Period – Text Display (Optional): Optional prefix (e.g., “Accounting software for period”).
Ignore Last Row Text (Optional): If the template’s last line is text-only line, tick this to skip that line when generating the invoice and avoid duplicating the billing-period text.
4. Click ‘Submit’ to activate. The entry will appear in the Recurring Sales list with Active status.
5. On the day after the job runs, you can open the record to see the generated invoice. Select the invoice number to open and verify it.
You can also see the Next Run Date beside the Start Day indicated below, so you’ll know when the recurring sales invoice will be generated next.
How the schedule works (examples)
Monthly, Start Day = 17
First invoice generates on 17 Oct 2025, then every 17th of the month (e.g., 17 Nov 2025, 17 Dec 2025, …).
Quarterly, Start Day = 17
First invoice generated on 17 Oct 2025, next on 17 Jan 2026, then 17 Apr 2026, etc.
If the selected Ending Date is reached, generation stops after that cycle.
What gets copied each cycle
Customer, addresses, currency, tax settings.
Line items, quantities, and unit prices from the chosen Invoice.
Remarks/Internal Note from the template invoice (edit the template if you want different wording).
Where to find generated invoices
Each invoice is created on the run day and appears under ‘All Sales’ (and is linked from the Recurring Sales record). Review/send at Email Center as per your normal process.
Edit, pause, or stop
Go to Recurring Sales, open the record:
1. Update fields (e.g., change Period, Start Day, Ending Date).
2. To permanently stop, set an Ending Date in the past or mark Set to Inactive.
Good templates = smooth automation
Before you create the recurrence:
- Build a clean invoice template with the correct customer, tax code, revenue account, and line items.
- Put any repeating billing-window text on the last line (or enable Billing Period so the system appends it for you). Tick Ignore Last Row Text to avoid duplication if applicable.
FAQs
What if the month doesn’t have my Start Day (e.g., 29/30/31)?
Use a day 1–28 to avoid skipped months.Data security is crucial in account software to protect sensitive financial information, comply with data privacy regulations, and prevent data breaches.
Can I change prices mid-contract?
Yes—update the invoice template or edit the Recurring Sale and it will apply to future runs.
When are recurring invoices generated?
The system runs once daily at 1:00 AM Singapore Time (GMT+8). Any Active Recurring Sale that meets the schedule will generate an invoice at that time (e.g., today’s date matches the Start Day, the Commencement Date is on/before today, and it hasn’t passed the Ending Date).
Recurring Expenses
Note: Recurring expenses work similarly to recurring sales. You can refer to the Recurring Sales section for details on how the logic works.
You can create expenses bills automatically on a schedule (monthly, quarterly, etc.) from a chosen expenses template.
Create a recurring expenses
- Open the Recurring Expenses module
- Click Add New Recurring Expenses (top-right).
- Fill in the form
Name: An internal name (e.g., “Rental Expenses Test”).
Period: Choose Monthly, Quarterly, Half Yearly, Yearly.
Description: Optional note for your internal reference.
Invoice: Pick the existing expenses (in ‘All Expenses’ module) to use as the template (its supplier, currency, lines and taxes carry over).
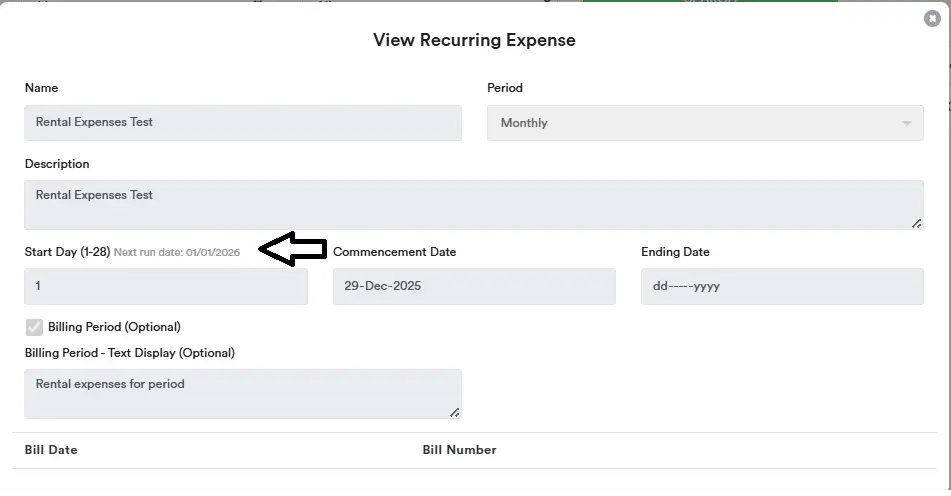
Start Day (1–28): Day of the month/quarter to generate the invoice (e.g., 17).
Commencement Date: The first cycle’s reference date (e.g., 29-Dec-2025).
Ending Date (optional): Leave blank for ongoing; fill to stop on a specific date.
Billing Period (Optional): Enable to append a billing window to the last line (e.g., “1/1/2026 to 1/2/2026.”).
Billing Period – Text Display (Optional): Optional prefix (e.g., “Rental expenses for period”).
Ignore Last Row Text (Optional): If the template’s last line is text-only line, tick this to skip that line when generating the expenses and avoid duplicating the billing-period text. - Click ‘Submit’ to activate. The entry will appear in the Recurring Expenses list with Active status.
5. On the day after the job runs, you can open the record to see the generated expenses. Select the expenses number to open and verify it. You can also see the Next Run Date beside the Start Day indicated below, so you’ll know when the recurring expenses will be generated next.
Cash Sales or Cash Expenses
To record cash sales or cash expenses, navigate to the “All Sales” or “All Expenses” section. When entering a new transaction, check the “Cash Sales” or “Cash Expenses” box at the bottom during the data entry, then select the appropriate bank or cash account.
Example: Go to ‘All Sales’ and click ‘Add New Sale’.

Enter the sales details.
At the bottom, tick ‘Cash Sales’.
Select the bank account that will receive the cash.
Enter a transaction reference if any.
Click Submit to save the cash sale.
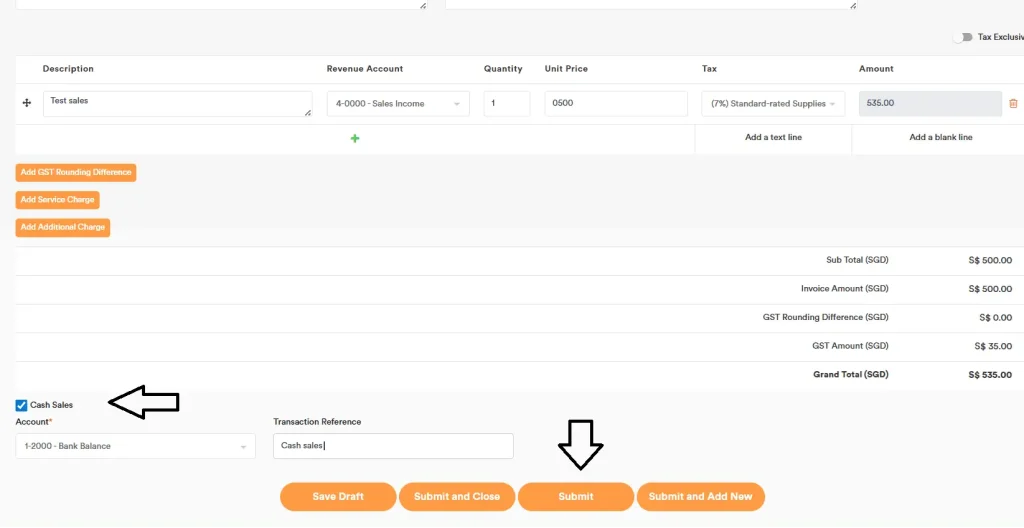
Use the similar steps for recording Cash Expenses at ‘All Expenses’ section.
Alternatively, use the Bank Entry section to record the cash sales and cash expenses transaction directly to the bank, without recording trade or other receivables/payables.
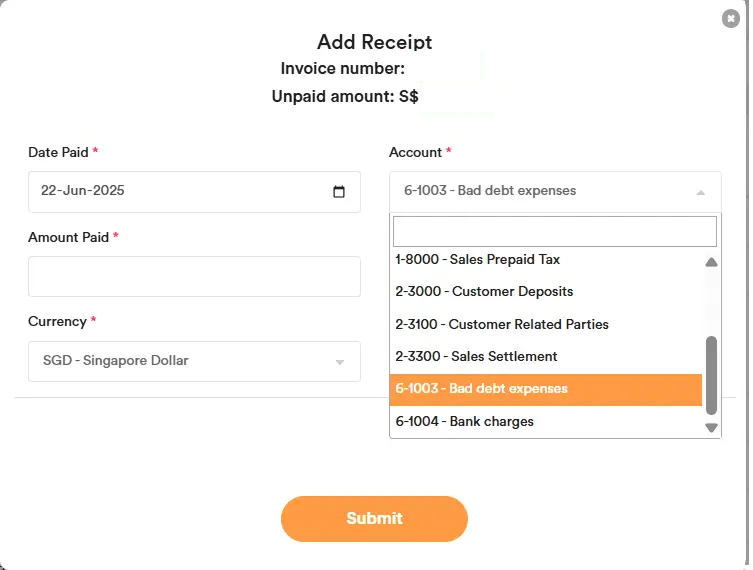
Bad Debt Recording
To write off trade and other receivables as bad debts, select the payment of the invoice and allocate it to the account “6-1003 – Bad Debt Expenses”. Thereafter, if GST was previously paid to the government, you can pass a manual journal entry to reverse the GST amount in order to claim it back from the government.
Example: Dr 2-4000 – GST Payables Cr 6-1003 – Bad debt expenses
Discount Recording
You can record the sales discount by following these steps:
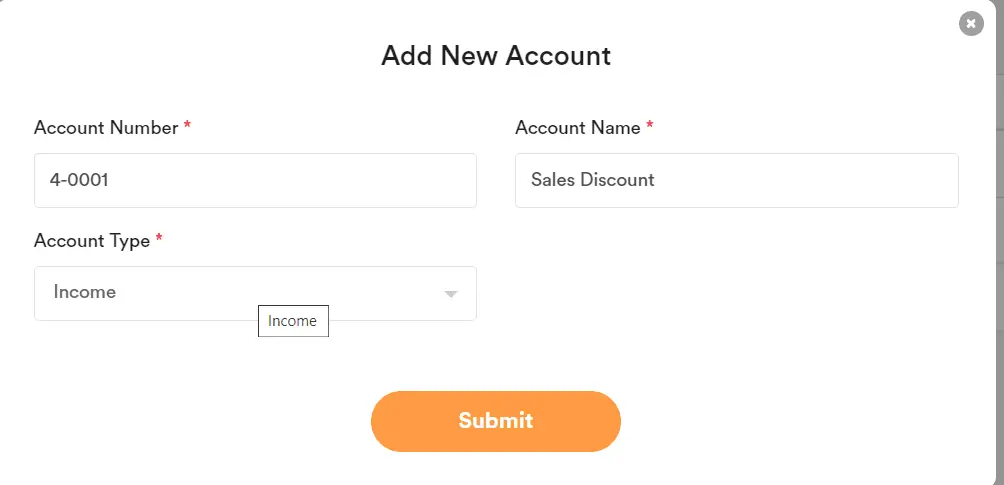
1. Add an account in the “Chart of Accounts” as shown below.
2. Select the Sales Discount option when issuing an invoice.
3. Input a negative amount for the Sales Discount.
For expense discounts, you can create a “Expense Discount” account with an “expense” Account Type for discount recording purposes.
There are a few options where you can record your sales discount.
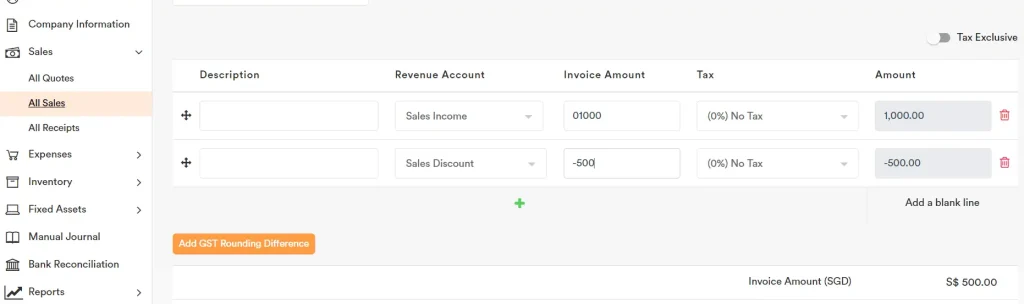
First, record it as a separate line like below
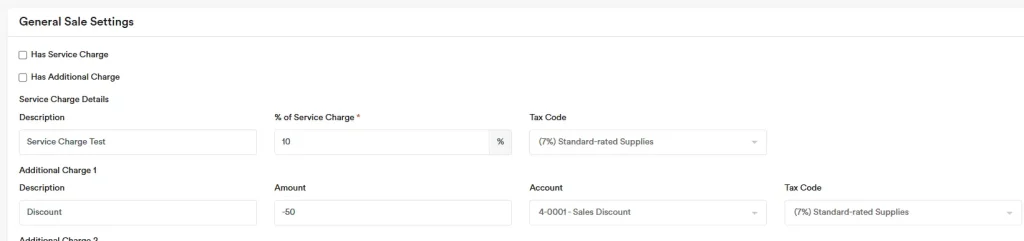
Second, you can record it as an Additional Charge so the discount shows after the subtotal. The steps are as follows:
1. Go to General Sale Settings,
2. Under Additional Charge 1, record it like below. For Description, enter “Discount” and a default amount (you can change this later when entering the sale, as each sale can have a different discount amount and %). For Account, select ‘Sales Discount’, and choose the tax code related to the discount.
3. When entering sales, click ‘Add Additional Charge’ to show the discount field.
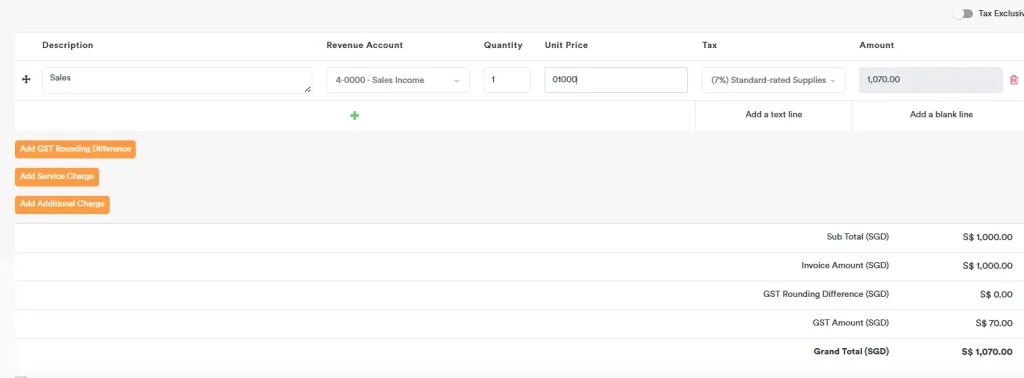
4. Input the details: description with %, and the amount as a negative. Then click Submit.
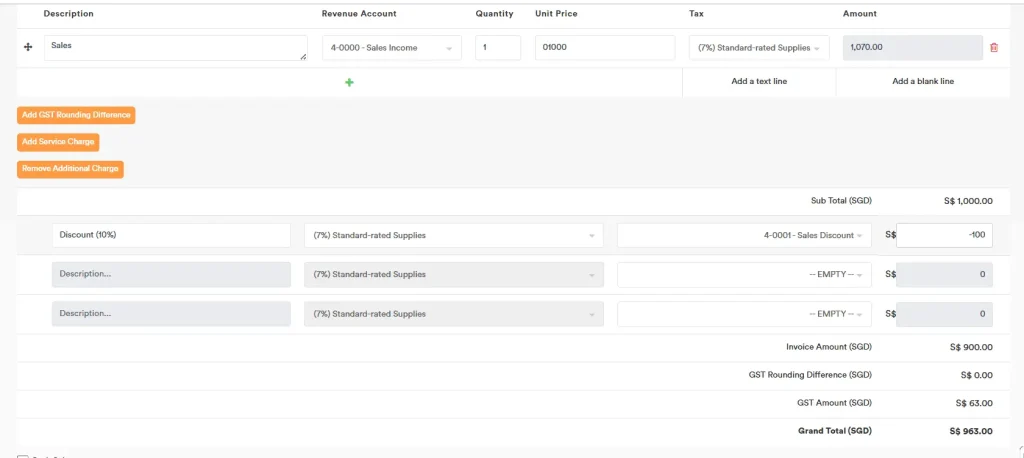
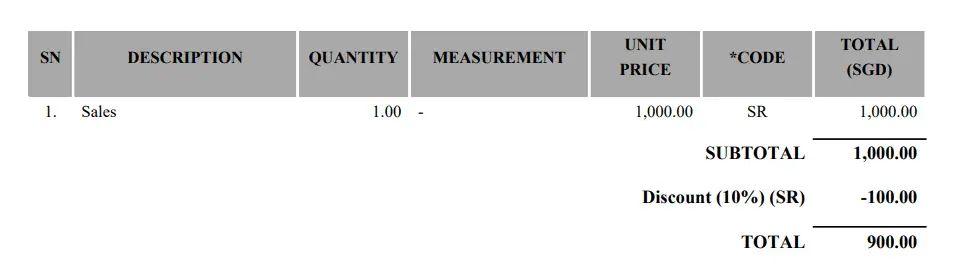
5. Then you can generate the PDF tax invoice and see the discount listed like below.
Dividend Recording
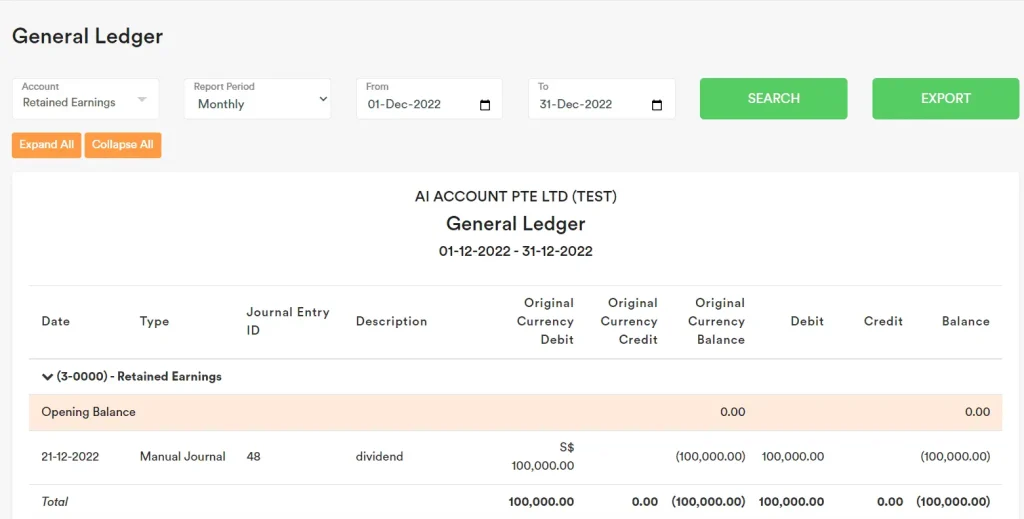
For record of dividend paid adjustment, you can use manual journal, example as follows.
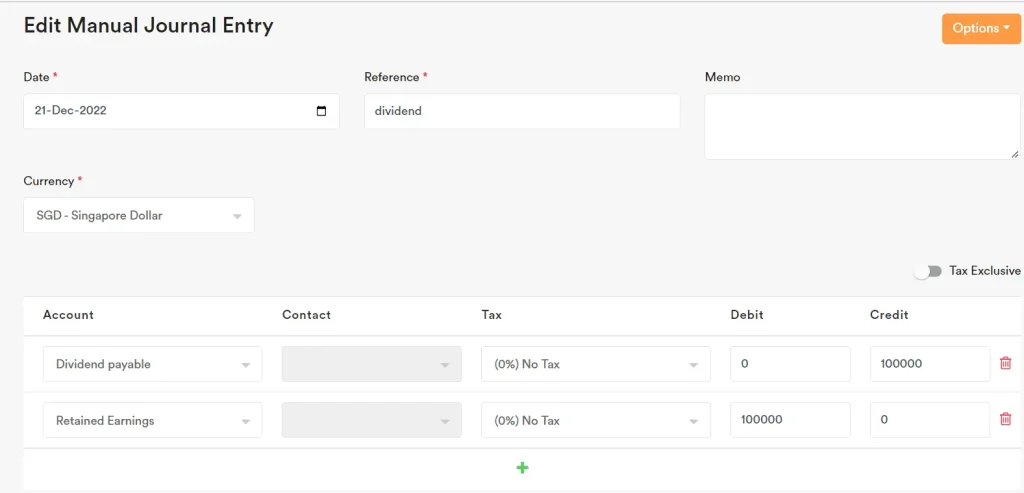
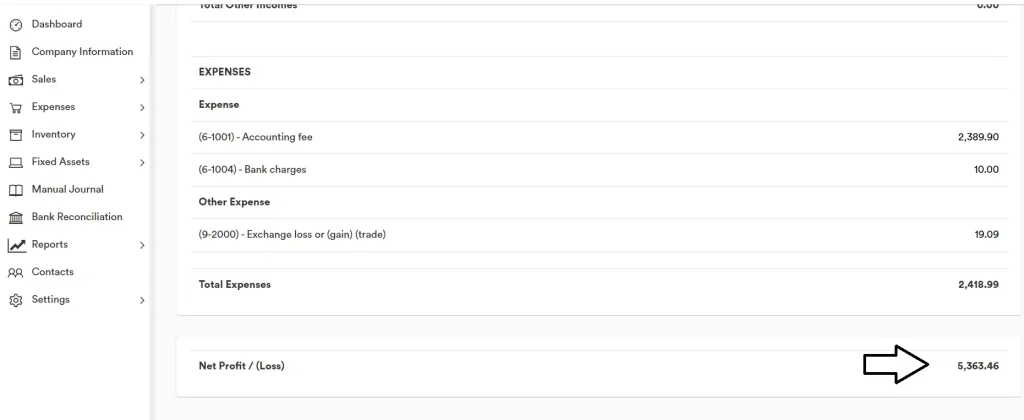
When you click the Retained Earnings at Balance Sheet

The system will bring you to the period of profit and loss which contribute to the retained earnings amount. For this situation, the Net Profit / (Loss) is not tally is due to the dividend adjustment of $100,000
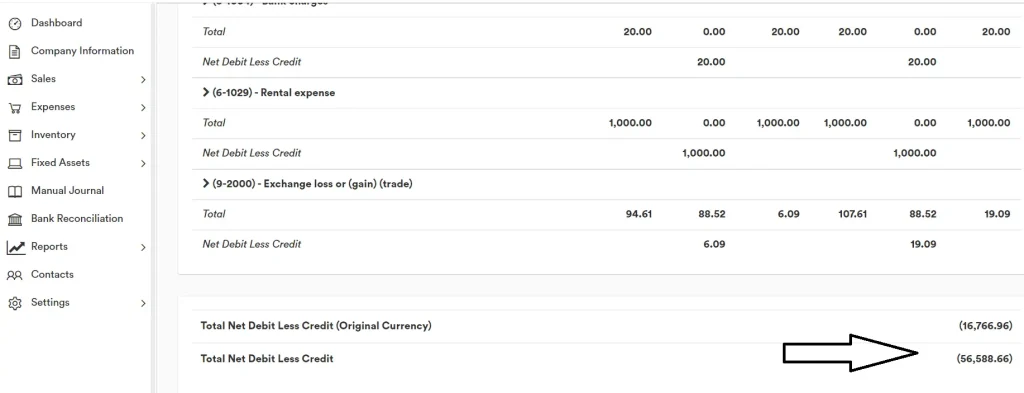
You can go to General Ledger to find the retained earnings adjustment to reconcile the different
Withholding Tax Recording
For sales payment and supplier payment, it is required to withhold tax in Indonesia usually. You can post the withholding tax entry when you make payment
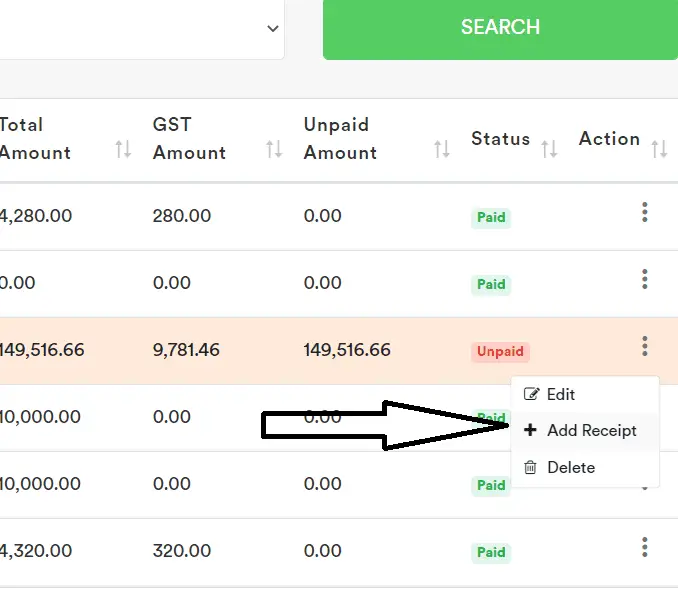
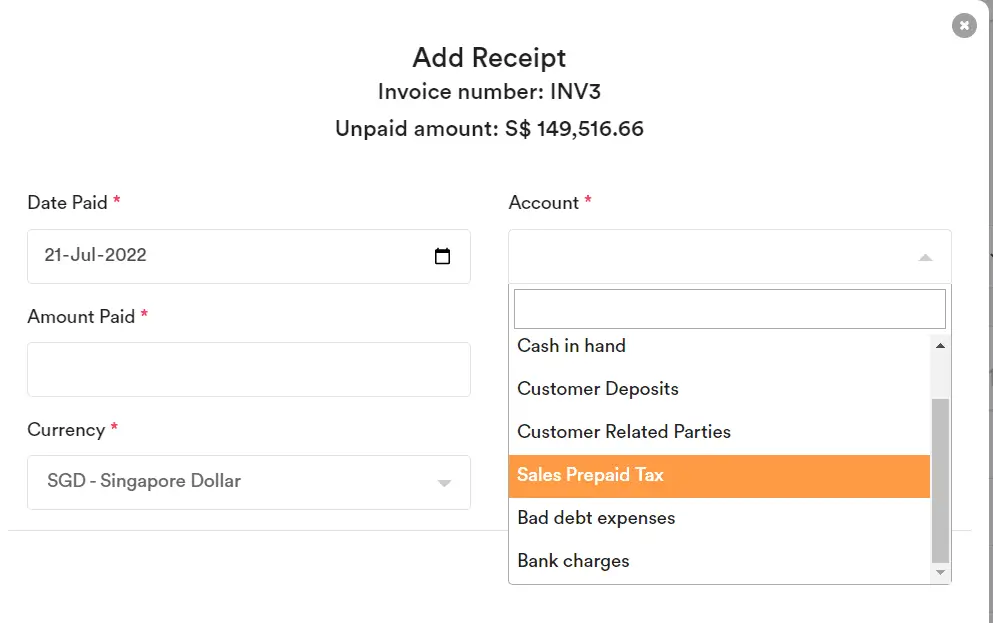
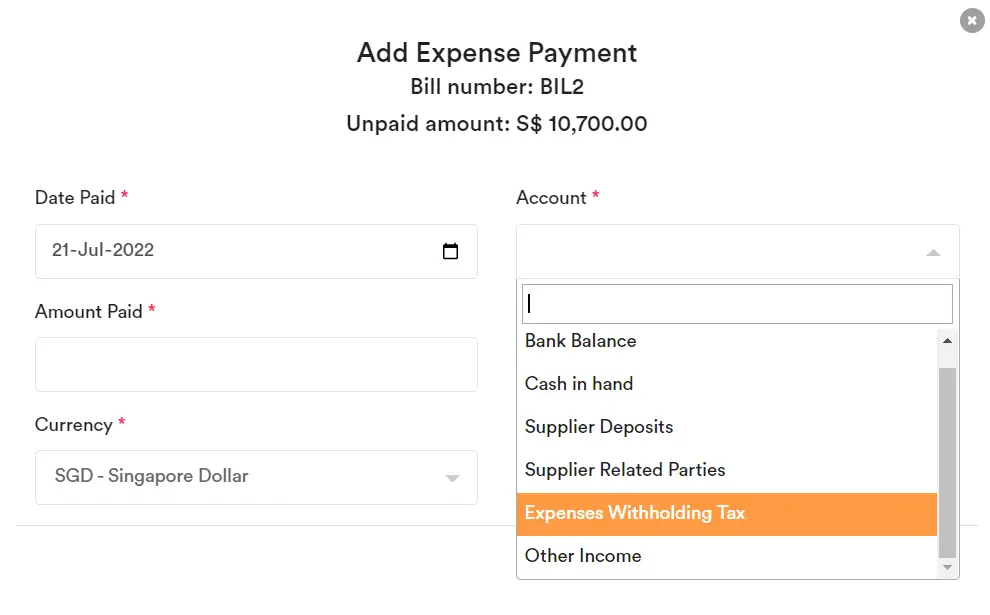
1. Select “Add Receipt” on the unpaid invoice
2. For Sales, you can select “Sales Prepaid Tax” to record the Prepaid Tax to government (withholding tax by customer, remind to get supporting documents from your customer)
3. For Expenses, you can select “Expenses Withholding Tax” to record the Withholding tax that pay to government (withholding tax pay to government for the expenses vendor invoice, remind to send the supporting documents to your supplier)
Cancel Records
You may choose to retain a record and cancel it instead of deleting it. This helps keep the numbering continuous and makes it clear that a particular invoice was cancelled. When you cancel a record, the transaction will not be posted as a double-entry.
After cancelling, you can convert the record back to Normal status if needed.
Only transactions with Saved or Unpaid status can be cancelled. Transactions that are partially paid or fully paid cannot be cancelled.
You can cancel records from the following sections:
- All Quotes
- All Sales
- All Purchase Orders
- All Expenses
- Inventory Sales Quote
- All Inventory Sales
- All Inventory Purchase Order
- All Inventory Purchases
- All Manual Journal Entries
- All Bank Entries
After you cancel, the record will show a Cancelled status (as shown below).

Delete Records
Sales Transactions
- Go to All Sales.
- In the Action column, click ‘Delete’.
- If a payment/receipt is linked to the transaction, it will be deleted together with the sales transaction.
Receipts
- Go to the All Receipts tab.
- In the Action column, click ‘Delete’.
- After the receipt is deleted, you can edit the related sales invoice.
Other Sections
Deletion works the same way in other modules. For example, in Manual Journal, use Action → Delete.
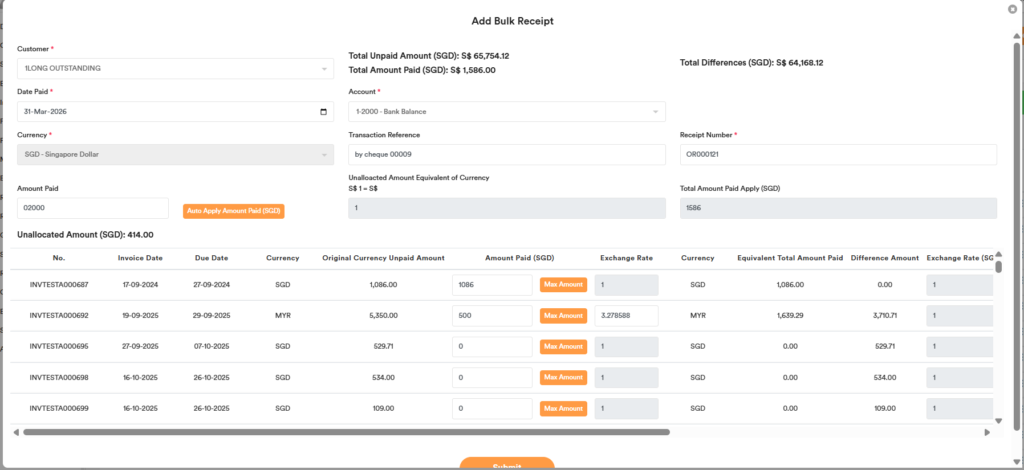
Payments for Multiple Invoices Recording
Your customer made a payment to you for multiple invoices. There are few ways to record this.
First method: You can record payments for multiple invoices at once using the “+ Add Bulk Receipt” or “+ Add Bulk Payment” button.

First, select the customer or supplier contact name. All outstanding invoices for that customer or supplier will then appear below. Next, enter the date, select the account where you received or made the payment, and enter a transaction reference to help track it during bank reconciliation.
Enter the total amount paid. You can choose to click the button ‘Auto Apply Amount Paid’ to automatically apply the payment amount to each invoice, or you can enter the amount for each invoice manually.
If there is an overpayment and the full amount not be applied to the invoices, the remaining balance will be recorded as a negative unallocated amount under receivables or payables.
The bulk receipt or payment function is available under the Sales, Expenses, Inventory Sales, and Inventory Purchases sections.
You can use bulk receipt or bulk payment for any currency you have.
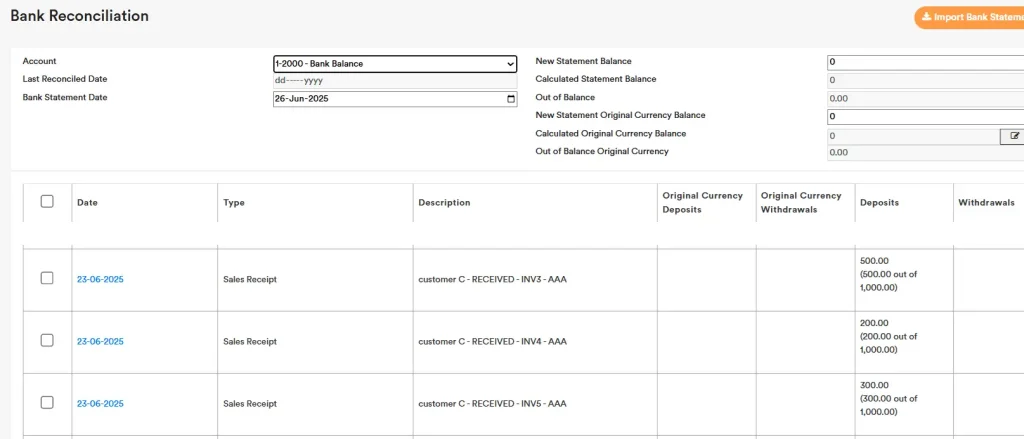
Alternatively, you can add the payment separately for each invoice. For example, if the client paid you $1,000 for the three invoices, you can click “Add Receipt” on each invoice individually. This will show as three separate payments in the bank reconciliation, with a total of $1,000.

In the bank reconciliation, you can see the combined total of receipts with the same date and reference.
Second method: You can record the full payment as a customer deposit and later apply it to the individual invoices. Here’s how:
- Create a new invoice and select the account “2-3000 Customer Deposits.”
- Enter a separate invoice number (for payment tracking purposes) and the amount received from the client (e.g., $1,000), then click “Submit.
- Then, click “+ Add Receipt” to record the payment received for this deposit invoice.
Enter the details and click Submit. The customer will now have a $1,000 deposit that can be used to offset the three invoices.
Next, go to each invoice, click “Add Receipt,” and select “2-3000 Customer Deposits” to apply the deposit towards the invoice and click Submit.
Once all invoices are settled, they will show as fully paid.

In the bank reconciliation, you will see only one payment entry. You can also check the aging report to confirm that the customer has no outstanding balance.
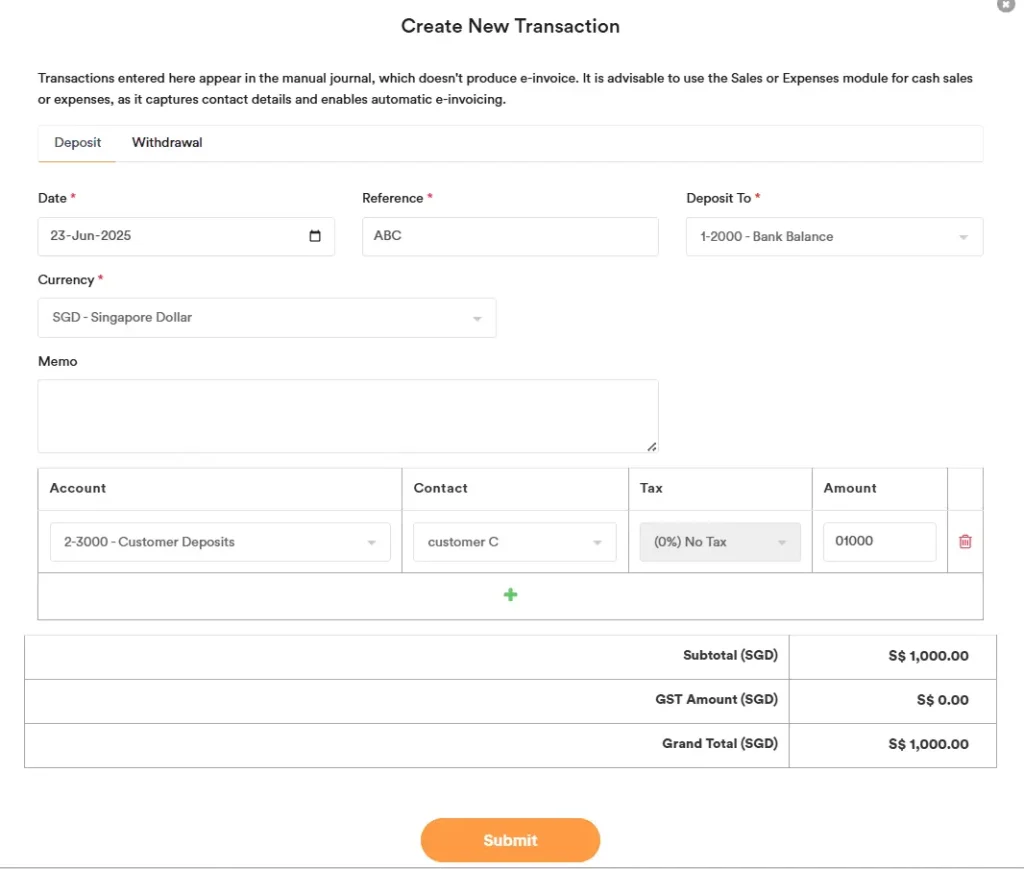
Third Method: You can record the full payment as a customer deposit via direct bank transaction and later apply it to the individual invoices. Here’s how:
- Go to “Bank Reconciliation” and click “New Transaction”.
- Select the bank account where the payment was received.
- For the Account, choose “2-3000 Customer Deposits”.
- Select the customer’s name under Contact.
- Enter the customer’s name and deposit details in the Reference field. (The reference will appear later in the bank reconciliation.)
- Click Submit.
The customer will now have a deposit of $1,000, which can be used to offset the outstanding invoices.
Next, go to each invoice, click “Add Receipt,” and select “2-3000 Customer Deposits” to apply the deposit towards the invoice and click Submit.

Once all invoices are settled, they will show as fully paid.

In the bank reconciliation, you will see only one payment entry. You can also check the aging report to confirm that the customer has no outstanding balance.
Bank charges imposed by bank when receipt of payments from customers
When a client makes payment for an outstanding invoice and there is a shortfall of balances due to bank charges imposed by the bank, you can select Account “Bank charges” during the Add Receipt recording.
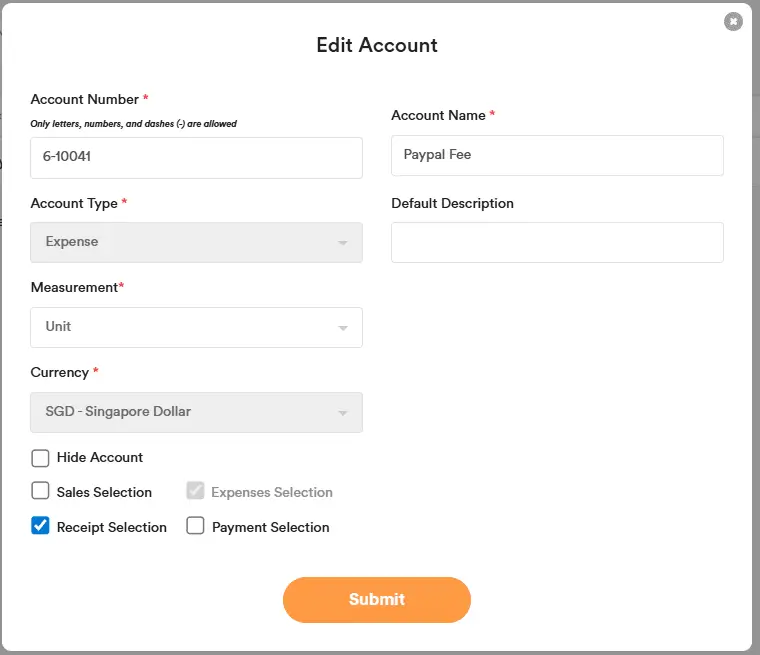
If a client pays you via PayPal and you want to record the PayPal fee, you can create a bank charge account by following these steps:
- Go to Accounts.
- Click Add New Account.
- Enter the details as follows:
- Account Number: Based on your preferences
- Account Name: PayPal Fee
- Account Type: Expense
- Tick “Receipt Selection”
- Click Submit.
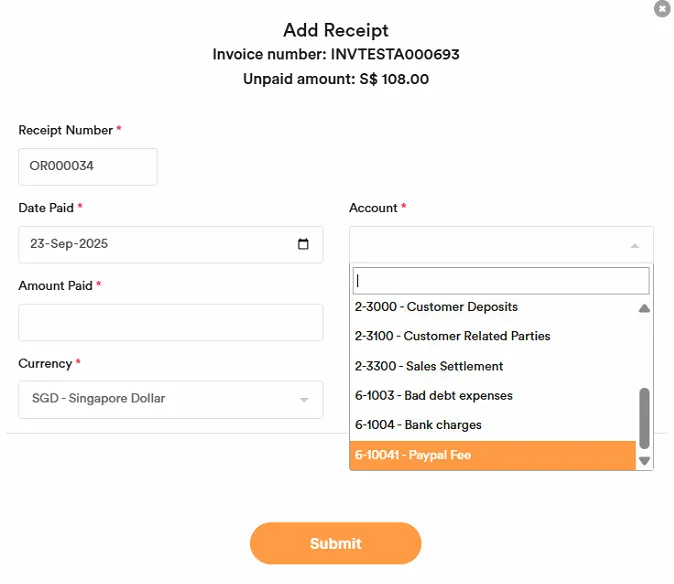
You can then select the PayPal Fee account when entering a receipt for a customer, as shown below.
Other transactions (e.g. interest income)
For received interest income or incurred interest expenses etc, you can input the details via a manual journal entry.
Contra Sales and Expenses
If you have sales and expense transactions with the same company and want to offset them, you can use either the Purchase Settlement account or the Sales Settlement account.
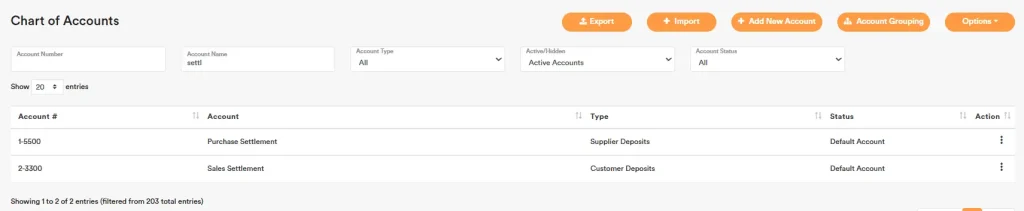
Example: Using the Sales Settlement account to perform the offset
Edit the Sales Settlement account. Tick Expense Selection and Payment Selection. Click Submit.
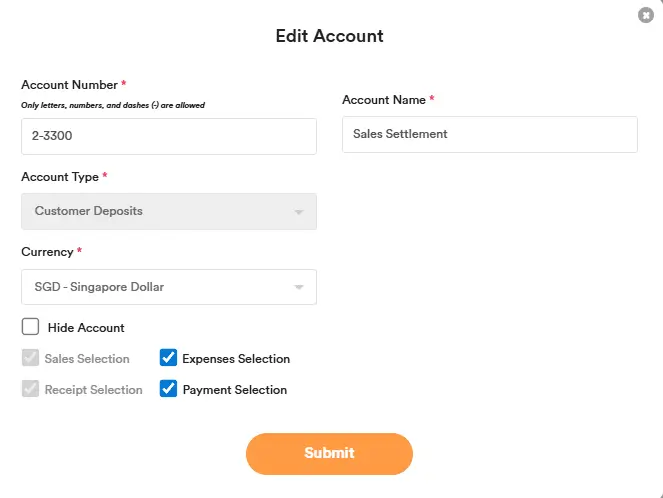
Next: Go to Expenses → click Add Payment → select the Sales Settlement account.
You may enter a transaction reference to record the contra details for easier internal tracking.
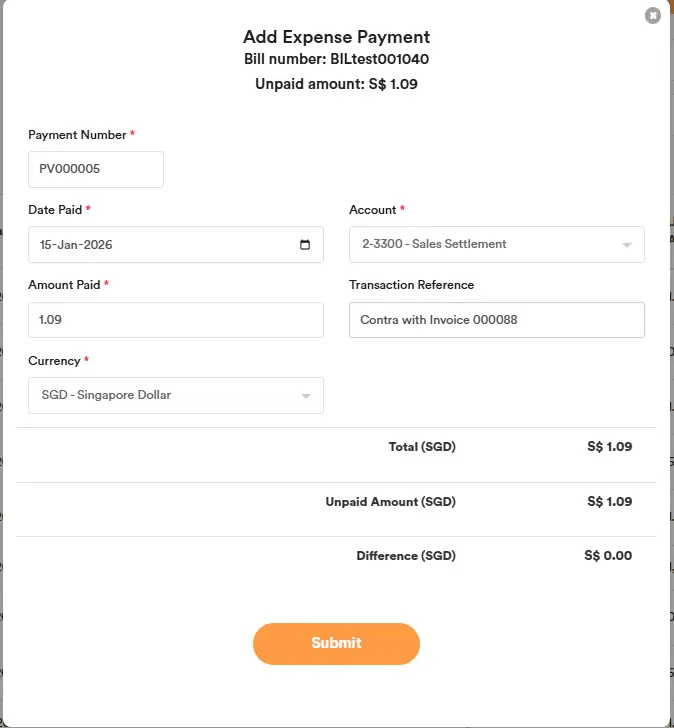
Go to Sales → click Add Receipt → select the same Sales Settlement account and enter the same amount you want to offset.
You may enter the same transaction reference to record the contra details for easier internal tracking.
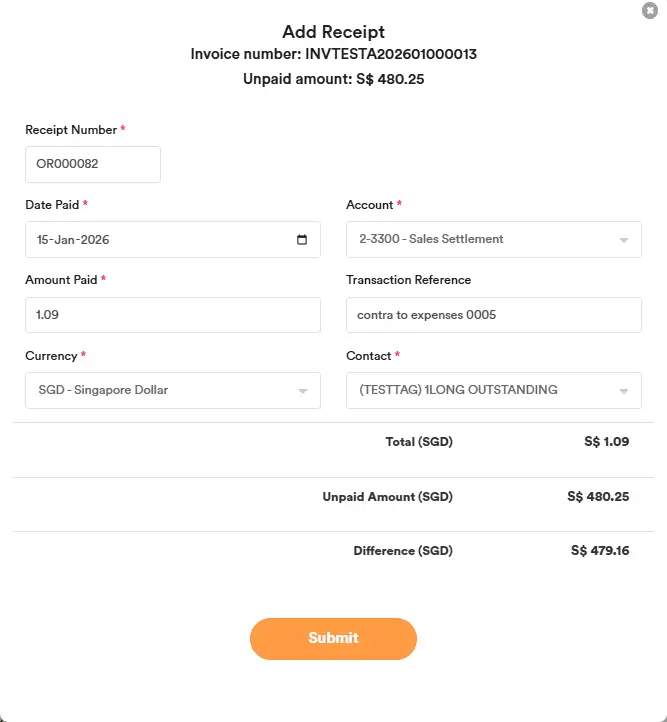
Finally, in the General Ledger (Contact), you will be able to see the offset details—showing that the contra has been completed via the Sales Settlement account.

Inventory Recording
Tip: Don’t mix methods for the same items/period. Choose Inventory Module (perpetual) or All Sales/All Expenses with end-of-period journals (periodic), so you don’t double count.
How the Inventory Module Works (perpetual method)
In AI Account, the Inventory module uses a perpetual method with moving average cost. That means:
- When you buy stock, the amount is recorded as an asset (Inventory) on the Balance Sheet. It is not an expense yet.
- When you sell items, the system automatically moves the relevant portion of Inventory into Cost of Goods Sold (COGS). That’s when your expense appears in the Profit & Loss.
Why you won’t see “Opening Inventory” and “Closing Inventory” lines in the P&L:
Because COGS is recognized automatically at the moment of sale, the P&L simply shows COGS. Your opening/closing inventory balances live on the Balance Sheet, not as lines inside the P&L.
Simple example (moving average):
Buy 10 units @ $5 → Inventory = $50
Later buy 10 units @ $6 → Total units 20; average cost = $5.50
Sell 15 units → COGS = 15 × $5.50 = $82.50; Inventory left = 5 × $5.50 = $27.50
Your P&L shows revenue and COGS $82.50 (no opening/closing lines). The $27.50 sits in Inventory on the Balance Sheet.
To record inventory purchases and sales, follow these steps:
1. + Add New Inventory
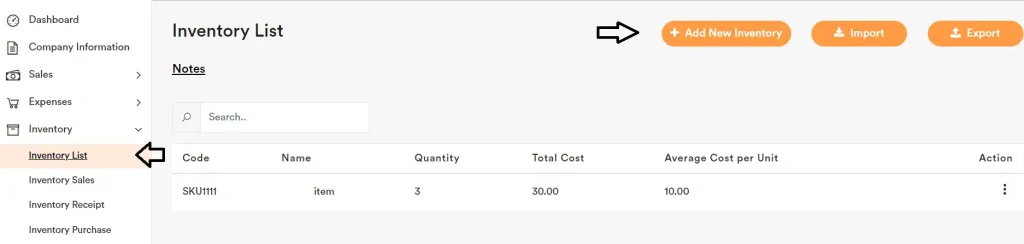
2. Record Inventory Purchase Double entry: Dr Inventory / Cr Accounts Payable
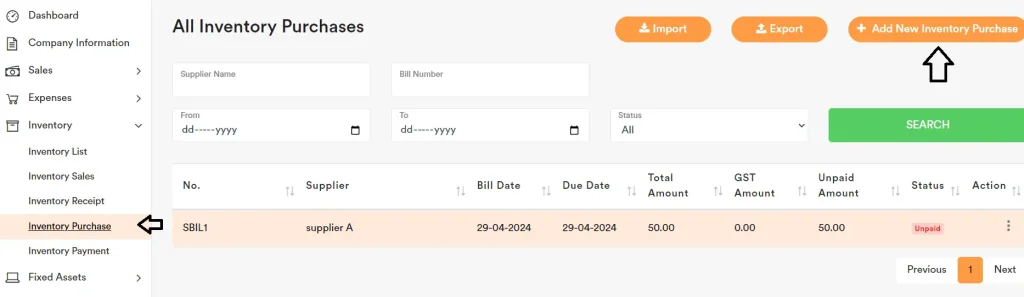
3. Record Inventory Sales Double entry (two parts): Dr Accounts Receivable / Cr Sales (Revenue) Dr Cost of Goods Sold / Cr Inventory (system uses the average cost at that date)

The double entry will be automatically generated, transferring the inventory to cost of sales when sales are recorded.
Please note that inventory entries must be recorded in chronological order. Purchases should be entered first, followed by sales. This is crucial because sales entries calculate the average inventory cost based on prior purchase records. If the entries are not entered in the correct sequence (oldest first), the cost of sales will be recorded incorrectly.
This is because the cost of sales is determined based on the average cost of inventory at the time the sales are recorded. Any backdated or misordered entries can distort the calculated average and lead to inaccurate accounting results.
Alternative You Can Record Without the Inventory Module (periodic method)
Tips: For the periodic method with manual entries, create separate Inventories, Cost of Goods Sold, and Sales accounts in the Chart of Accounts. System accounts are for the inventory module only and you cannot post manual journals to them.
You can use the three default accounts below, or create separate accounts as needed.
1-30001 Inventories (Manual)
4-10001 Sales Inventories (Manual)
5-20001 Cost of Goods Sold (Manual)
If you prefer not to track stock item-by-item, you can use All Sales and All Expenses only. In this method, all purchases are expensed to COGS immediately, then you adjust at period end to bring closing stock onto the Balance Sheet.
Day-to-day entries
Purchases in All Expenses: map to Cost of Sales/COGS
Entry: Dr COGS / Cr Accounts Payable
Sales in All Sales:
Entry: Dr Accounts Receivable / Cr Sales (Revenue)
Manual journals at month-/year-end
Bring in Closing Inventory (move part of COGS back to Inventory):
Dr Inventory (Balance Sheet)
Cr Cost of Sales (P&L)
Amount: the value of stock on hand at period end (from your count/valuation).
Reverse to create Opening Inventory on the first day of the next period:
Dr Cost of Sales (P&L)
Cr Inventory (Balance Sheet)
Other manual moves (when needed)
Increase Inventory (correction/extra stock): Dr Inventory / Cr COGS
Decrease Inventory (write-down/shrinkage): Dr COGS / Cr Inventory
Write-off to a dedicated account: Dr Inventory Write-off (expense) / Cr Inventory
Document your stock counts if you use the periodic method; your journal amounts should tie to those counts.
Optional: Use a monthly Manual Journal Template (Periodic method)
To speed up month-end (and avoid re-keying), set up manual journal import templates for your inventory adjustments. Each month you only change the date and amount, then import.
A) Create two templates
Beginning of Month (BOM) – Opening Inventory (Day 1 of new period)
Dr Opening Inventory – COS (Account Type = Cost of Sales)
Cr Inventory
Narration: “Opening inventory from prior period closing.”
End of Month (EOM) – Closing Inventory (Last day of period)
Dr Inventory
Cr Closing Inventory – COS (Account Type = Cost of Sales)
Narration: “Closing inventory per stock count.”
Tip: Last month’s Closing amount usually becomes this month’s Opening amount. Duplicate the EOM file, switch the date to the 1st, and swap the accounts/debit-credit for the BOM entry.
B) Monthly workflow (copy–edit–import)
End of month: perform stock count/valuation → determine Closing Inventory value.
Open EOM Closing template → update Date and Amount → Import.
Day 1 next month: duplicate the file as BOM Opening → update Date (1st of month) and Doc No → Import.
Reconcile: P&L shows ‘Opening Inventory – COS’ + Purchases – ‘Closing Inventory – COS’; Balance Sheet Inventory matches your count.
This keeps the classic “Opening/Closing Inventory” presentation on the P&L while making month-end a quick edit-and-import routine.
Inventory Chart of Accounts Setup
You can create your own inventory-related accounts by selecting “Inventory” for Current Assets accounts, “Inventory COGS” for Cost of Sales accounts, and “Inventory Sales” for Income accounts. These settings can only be selected when creating a new account and cannot be changed afterward.
Once the accounts are created, go to the Inventory List and assign them to the inventory item. When you record purchase or sales transactions for that item, the system will post the entries to the selected general ledger accounts. After transactions have been recorded for the inventory item, these 3 assigned accounts can no longer be edited.
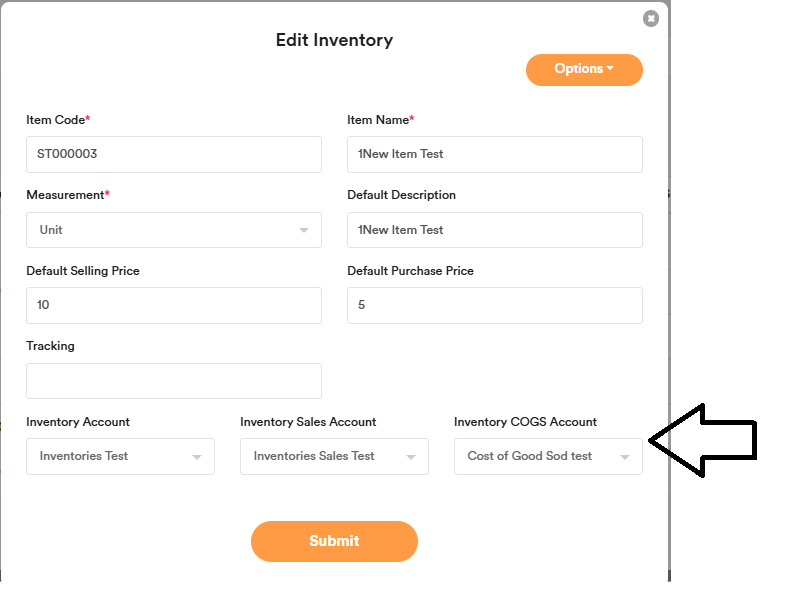
Inventory Code and Name
Inventory Code does not allow duplicate entries.
Inventory Name can be duplicated and can be used to track the same type of inventory.
Example
Code = 001; Name = iPhone; Default Description = iPhone 17 Pro
Code = 002; Name = iPhone; Default Description = iPhone 17 Pro Max
In the Reports section, you can filter the relevant fields and generate the inventory report you need.
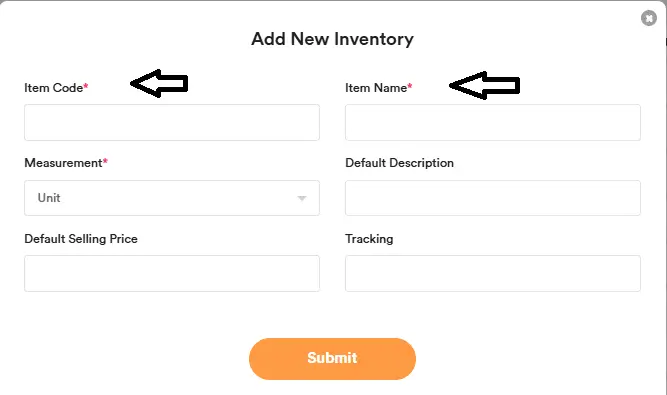
Inventory Tracking
Tracking is used for internal purposes, such as keeping track of where your inventory is stored. You can also leave this field blank if it’s not needed.
![]()
The tracking information will appear in the Inventory List, so you can export the list and use it for stock-taking at year-end, for example.
![]()
Inventory Price Rules (Setting Default Prices by Contact)
When you edit each Contact, you may see an extra tab called ‘Inventory Price Rules’. This tab lets you set special default prices for specific inventory items for that one contact (customer or supplier). It’s useful when the same item is sold or purchased at different agreed prices depending on who you’re dealing with.
Inside Inventory Price Rules, you can add a rule by selecting an Inventory item and entering a Default Selling Price and/or Default Purchase Price. Each inventory item can only be selected once per contact — after you pick an item, the system won’t allow you to pick the same item again in that same contact (to prevent duplicate/conflicting rules).
How it works during transactions: when a user creates an Inventory Sales or Inventory Sales Quote for that contact, the system will first check whether there is a Default Selling Price set for the selected inventory item in the contact’s Inventory Price Rules. If it exists, the system uses that price as the unit price. If there is no contact-based rule, the system falls back to the Default Selling Price set in the main Inventory List.
The same logic applies for purchasing. When creating purchase-related inventory transactions, the system first checks the contact’s Default Purchase Price for that item. If it’s set, it uses that price; if not, it uses the Default Purchase Price from the Inventory List.
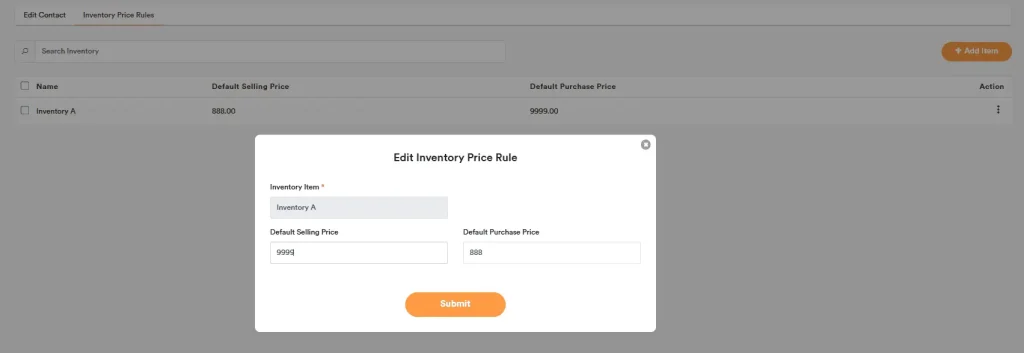
Inventory Adjustments Recording
You can adjust inventory quantity or cost in Inventory Purchase.
Example:
Current total cost: $228.47. Quantity: 9.
Steps to adjust:
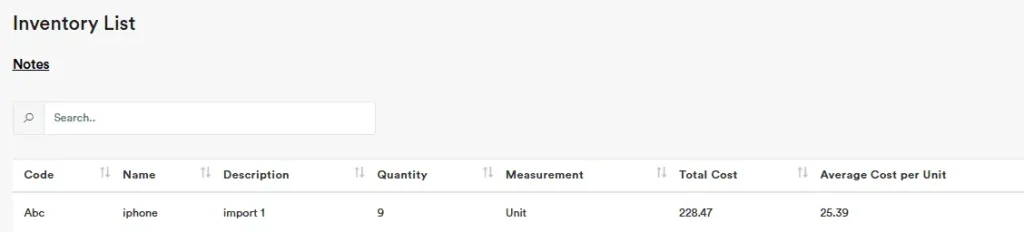
Go to Inventory Purchase and click New Inventory Purchase.

To write off one unit, enter -1 for quantity and the cost to write off. Set Tax to ‘No Tax’.
Add a Non-Inventory Item line for Inventory Adjustment Expense with the same amount and set Tax to ‘No Tax’.
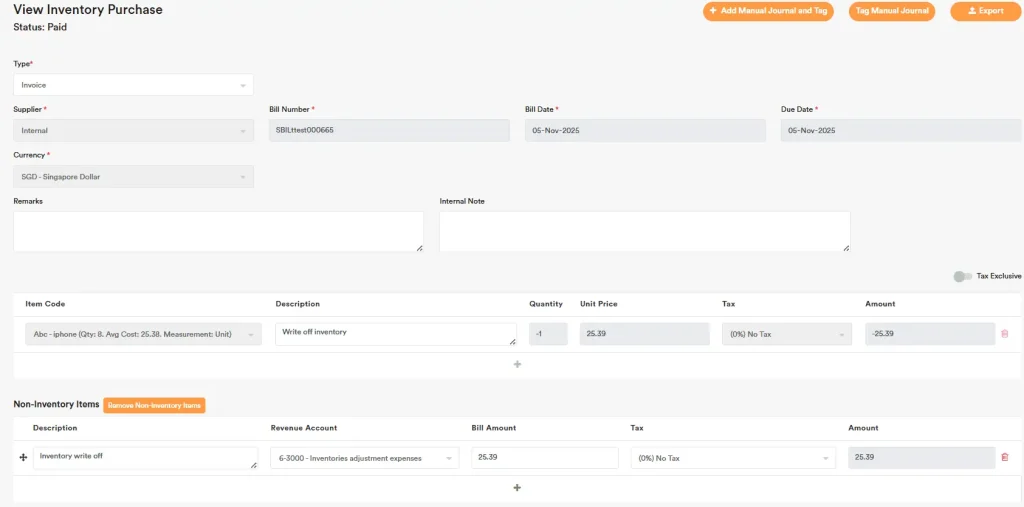
Resulting entry:
Dr Inventory Adjustment Expense
Cr Inventories

If you only need to adjust the quantity, set the amount to 0.
No trade payable will be created because the invoice total is 0, and it is considered paid.
Inventory Adjustments Recording – Cost Only
You can adjust inventory cost only through Inventory Purchase.
Example:
Current total cost: $470.10. Quantity: 8.
Steps to adjust:

To increase the total cost by $100:
You can enter “Inventory Cost Adjustment” as the Supplier for your internal tracking.
For Item Code, select the same item for which you want to adjust the cost.
On the first line, enter +1 for Quantity and the cost to increase ($100). Set Tax to “No Tax”.
On the next line, enter -1 for Quantity and the cost is zero. Set Tax to “No Tax”.
Add a Non-Inventory Item line for Inventory Adjustment Expense with the same amount (-$100) but in the opposite sign, and set Tax to “No Tax”.
To reduce the total cost instead, simply use the opposite signs.
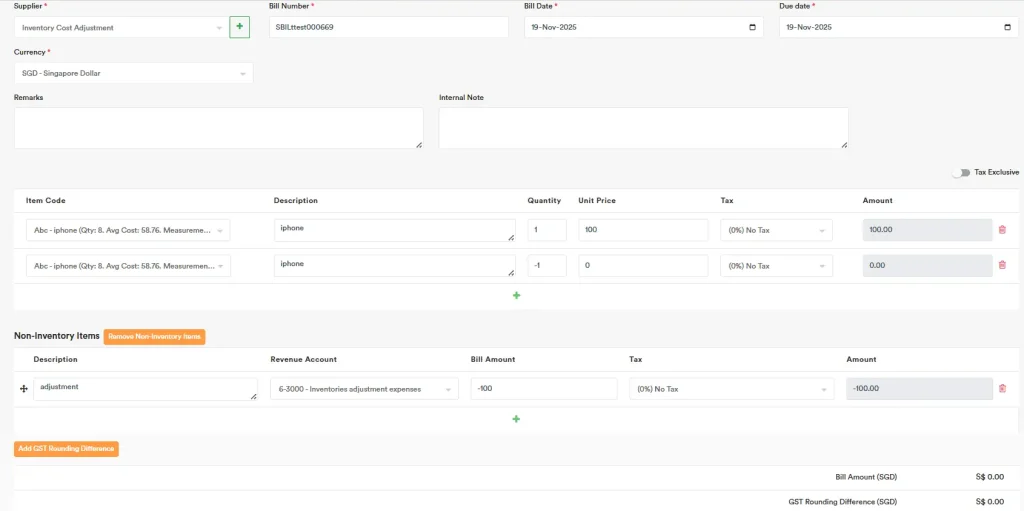
After this adjustment:
New total cost: $570.10
Quantity remains: 8

Resulting accounting entry:
Dr Inventories 100
Cr Inventory Adjustment Expense 100

No trade payable will be created because the invoice total is 0, and it is considered paid.
Inventory Raw Materials and WIP Recording
You can record inventory adjustments the same way as in the previous steps. For example, to combine raw materials (Phone Casing + Phone Battery) into a finished good (iPhone):

Go to Inventory Purchase and click New Inventory Purchase.
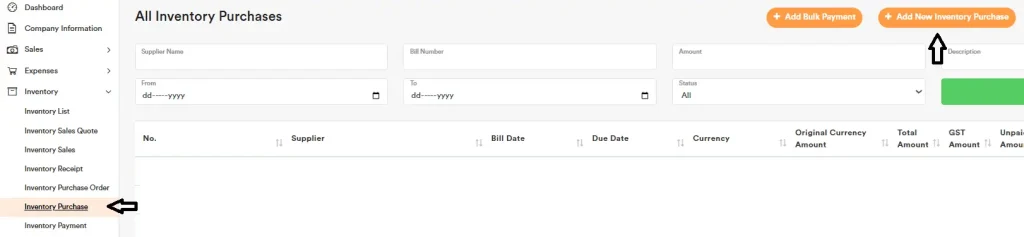
(Optional) Create a contact named “Convert Finished Goods” to track these entries.
Add the following lines:
- −1 Phone Casing at its average cost
- −1 Phone Battery at its average cost
- +1 iPhone at the total cost of the casing and battery
- Set Tax to No Tax, then click Submit.
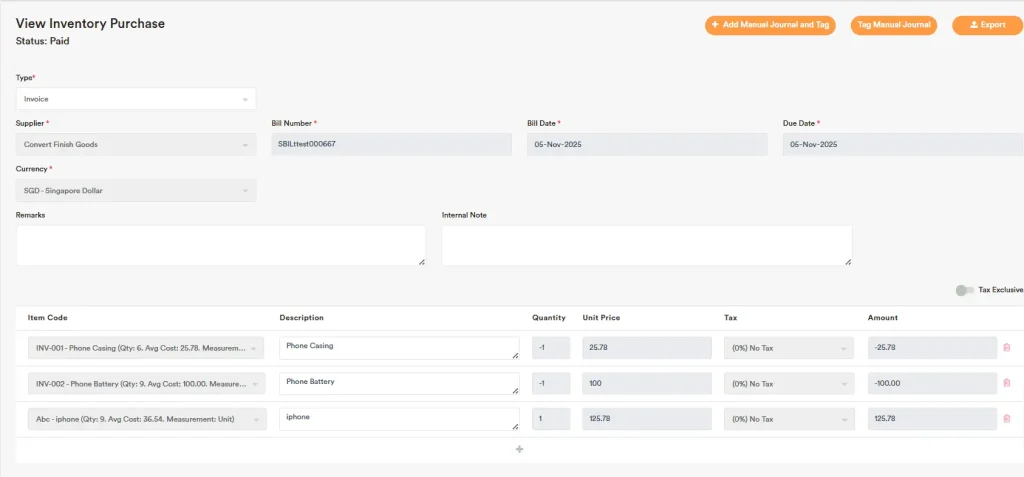
You’ll see that the quantities have been updated and the costs have been rolled up into the iPhone.

Tip: You can also add a non-inventory item line to transfer related expenses into inventory. Example:
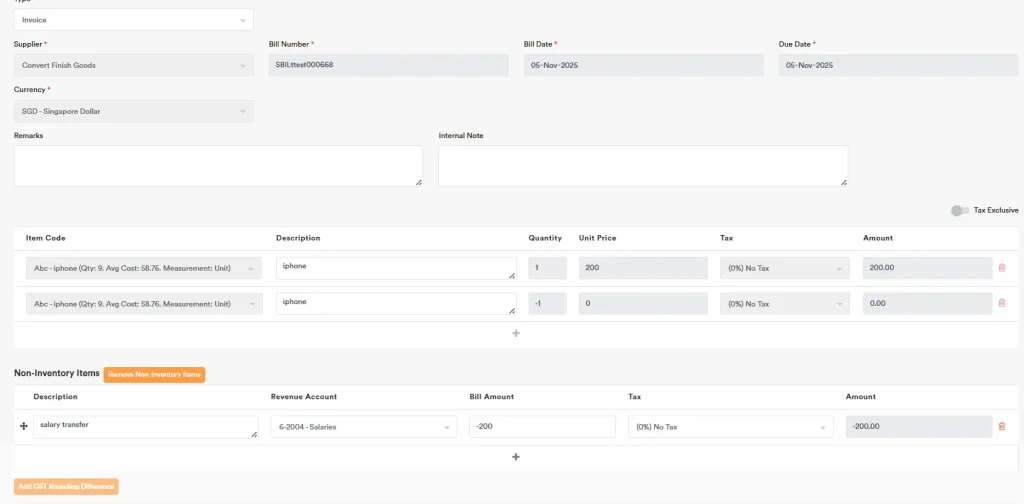
Contacts
Create Contacts – Customers / Suppliers
For any new Contact, you need to input Name, select the Type, Trade or Non-Trade and Status
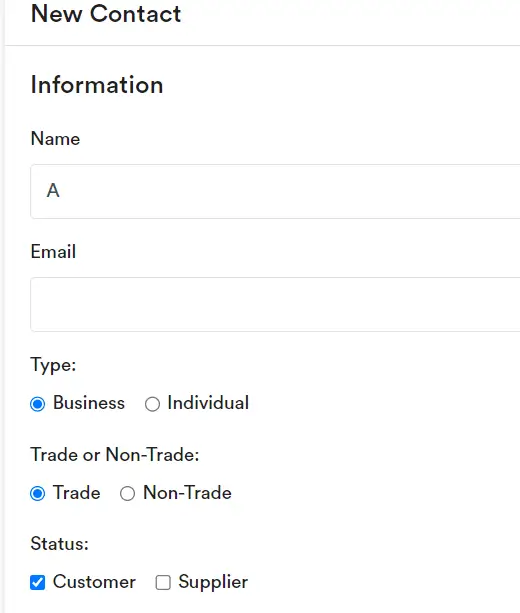
The Trade / Non-Trade selection will be used as the default when you create any sales or expense transaction.
For each sales or expense transaction, you can still choose either Trade or Non-Trade. For example, if you select Non-Trade in a sales transaction, the amount will be posted to Other Receivables, even if the contact is set as Trade.
For the Billing Address, the tax invoice (or a similar report) will display the full Billing Address as entered. The Country, State, City, and Postal Code inputs are additional fields used for e-invoicing purposes only and will not appear on the tax invoice. Under General Sales Settings, you can tick the Show City, State, Postal Code, or Country option to include these fields in the exported PDF if you want to.

You can create branch billing and delivery addresses under each Contact. After that, when entering a quote or sales transaction, you can select the branch address to appear on the generated export PDF invoice.
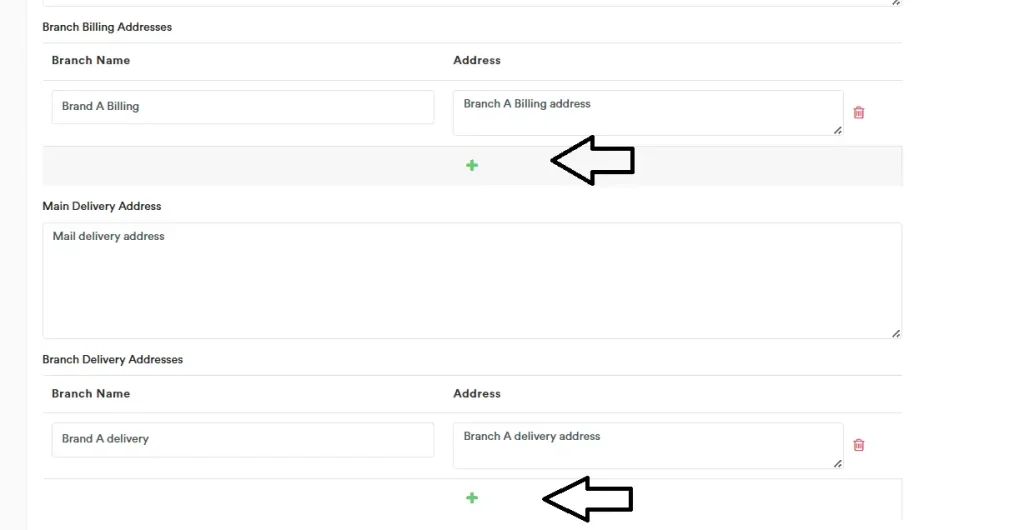
You can create an internal tag for your contact.

This tag will appear in brackets in front of the company name during selection.
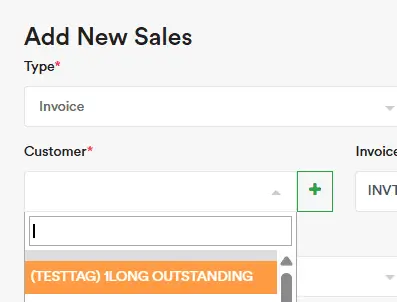
You can add multiple email addresses to a contact. When you email the contact from the Email Center, the message will be sent to all listed addresses. Separate multiple addresses with semicolons (e.g., abc@email.com; def@email.com).
In cases where only one address is allowed (e.g., Malaysia e-Invoice), we’ll use the first address you enter.
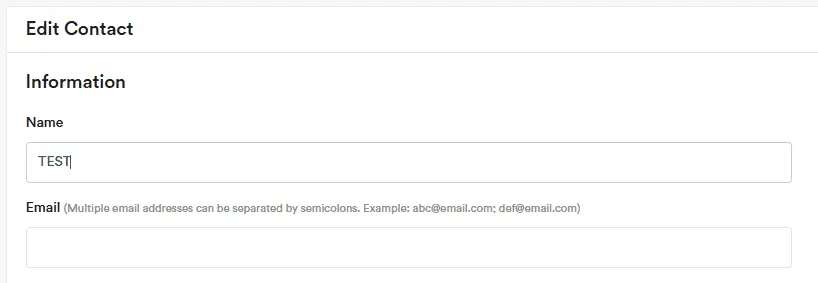
Create Contacts – Employees / Others
In Contacts, you can select ‘Employee’ or ‘Other’ Status. If you select either option, you can choose the contact to be used in the Manual Journal or Bank Entry section.
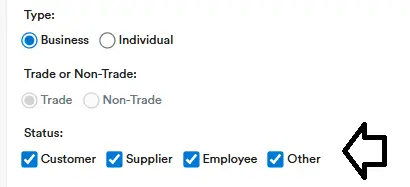
Create Contacts – Default Account Type (Expenses)
You can set a default expense account type for each contact at the field “Default Account Type (Expenses)”. For example, if you choose Accounting Fee, then when you create an expense and select that contact, the Expense Account field will automatically be set to Accounting Fee, as shown below.

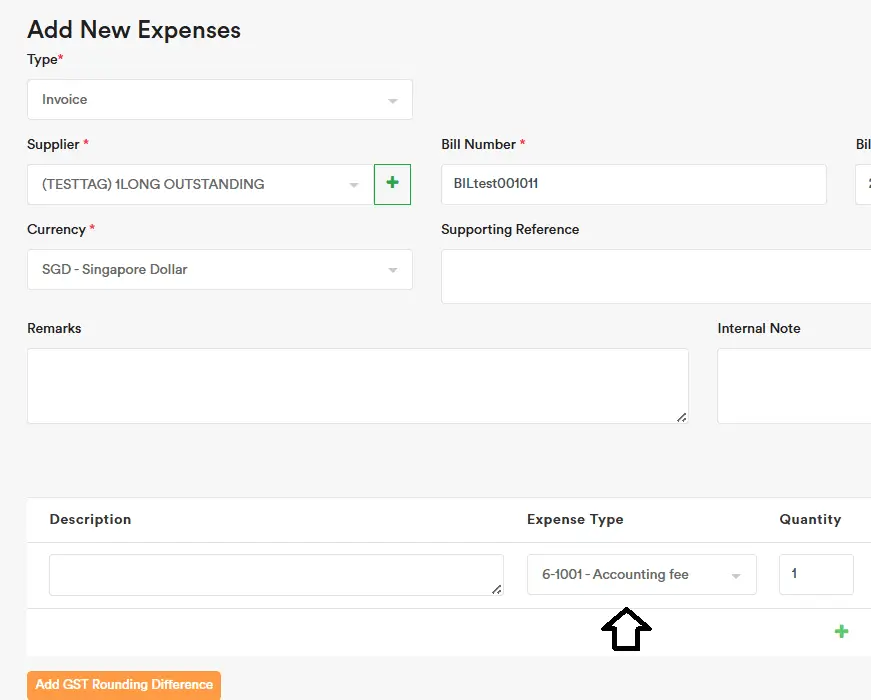
You can also import the “Default Account Type (Expenses)” using the Excel import — just fill in the account code as shown below.
Create Contacts – Default Sales and Quote Templates
For each contact, you can select a specific sales or quote template to link to that contact. By default, every newly created contact is linked to the Main Template.
Available templates (choose one to assign to each contact):
- Sales PDF Export Template
- Sales Inventory PDF Export Template
- Quotes PDF Export Template
- Inventory Sales Quote PDF Export Template
When you create a sale and select a contact, the template will automatically switch to the one you set for that contact. This ensures you can generate the correct quote / invoice template for each customer when needed.
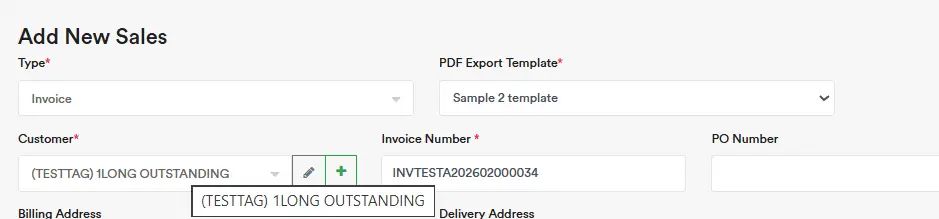
Merge Contacts
At Contacts, you can select multiple contacts and click “Merge Selected” to merge them. Please note that only contacts of the same type can be merged. For example, Trade contacts can only be merged with Trade contacts. Trade and Non-Trade contacts cannot be merged together.
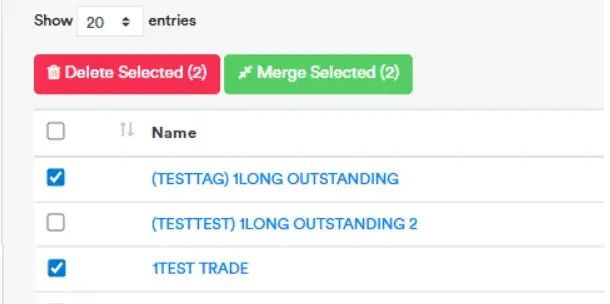
You must choose which contact will remain as the Main Contact. The other selected contacts will be deleted. This action cannot be undone once completed.
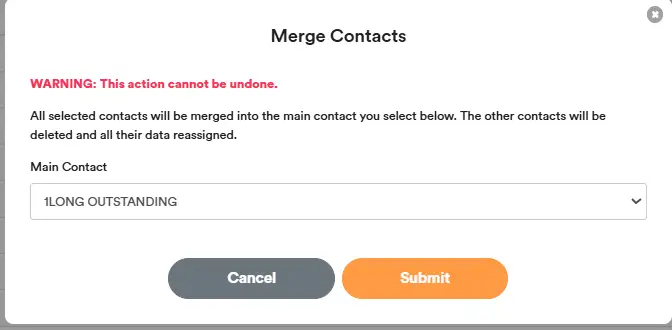
After you click Submit, a confirmation message will appear to show that the merge has been completed.

Customer/Supplier Deposits & Director Due To/From
Where a balance appears on the Balance Sheet is decided by the account type you choose (asset vs liability). If you post the opposite sign, the system won’t auto-swap sides—it will show a negative.
Which account type to use (and why):
- Customer Deposits = money your company owes (advances you received, or Due to Director). Lives in Current Liabilities. Works in Receipts/Payments and tracks by Contact.
- Supplier Deposits = money owed to your company (prepayments you made, or Due from Director). Lives in Current Assets. Works in Receipts/Payments and tracks by Contact.
- Trade Receivables/Payables (System Account) = normal invoices/bills. Don’t park deposits here or you’ll get negative balances.
- Other Receivables/Payables (System Account) = sundry/non-trade; don’t park deposits here or you’ll get negative balances.
Tick ‘Hide Account’ to hide the Customer Deposits and Supplier Deposits accounts if you’re not planning to use them.
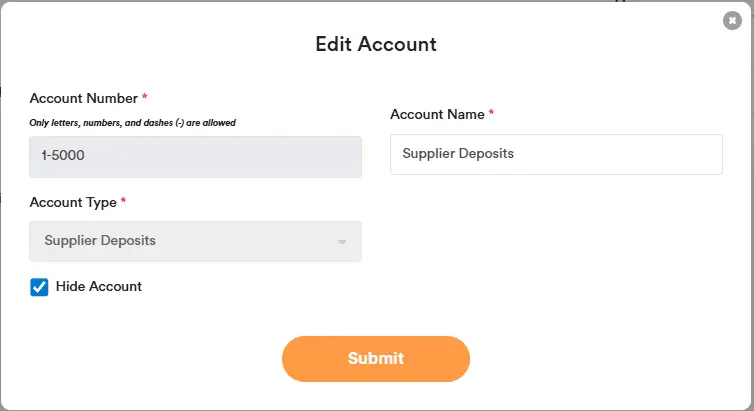
Amount due from/to Directors or related parties:
Generally, you can use the Default Account to record your related parties
(1-5100) – Supplier Related Parties
(2-3100) – Customer Related Parties
When you create the Director or Related Parties Name contact, tick Customer and Supplier (so they appear on both sides for Amount Due from or to Director).
If you don’t want to use the Default Account, you can create a separate account for Amount Due from/to Directors to better show it in the Balance Sheet report.
Example, create two accounts:
Amount Due to Director → set type = Customer Deposits (current liability).
Amount Due from Director → set type = Supplier Deposits (current asset).
Alternative simple setup (no Contact selection):
If Customer/Supplier Deposits are confusing, you can instead create
- ‘Amount Due from Director’ with account type ‘Current Assets’
- ‘Amount Due to Director’ with account type ‘Current Liabilities’.
In this case, you don’t select a Contact; each director should have a separate account (e.g., “Amount Due to Director – ABC”, “Amount Due to Director – CDF”).
Limitation: these accounts can be used only in the Manual Journal section (they won’t appear in Receipts/Payments).
Tips:
How to avoid negatives showing on the Balance Sheet:
- Posting an advance you received? Use Customer Deposits (current liability).
- Posting a prepayment you made? Use Supplier Deposits (current asset).
Need to pick a ‘Contact’ or use the Receipts/Payments function in the Sales and Expenses section? Use either the “Customer Deposits” or “Supplier Deposits” account types, not the generic Current Asset/Current Liability account type, which allows adjustment via manual journal entry only.
GST / SST / VAT
AI Account with Built-in GST, SST, and VAT Support.
Tax Codes
Go to Settings → Tax Codes, set up GST, VAT, or SST as required. You can also select “Sales Tax” or/and “Expenses Tax” type if you want the relevant tax codes to appear in the sales or expenses sections. You can add the tax code that is more relevant to your city or country if it is not shown in the default tax codes.
Important note: Do not use the same Tax Code for both Sales and Expenses, as this may prevent the e-invoice from being issued properly and can cause omissions in certain situations.
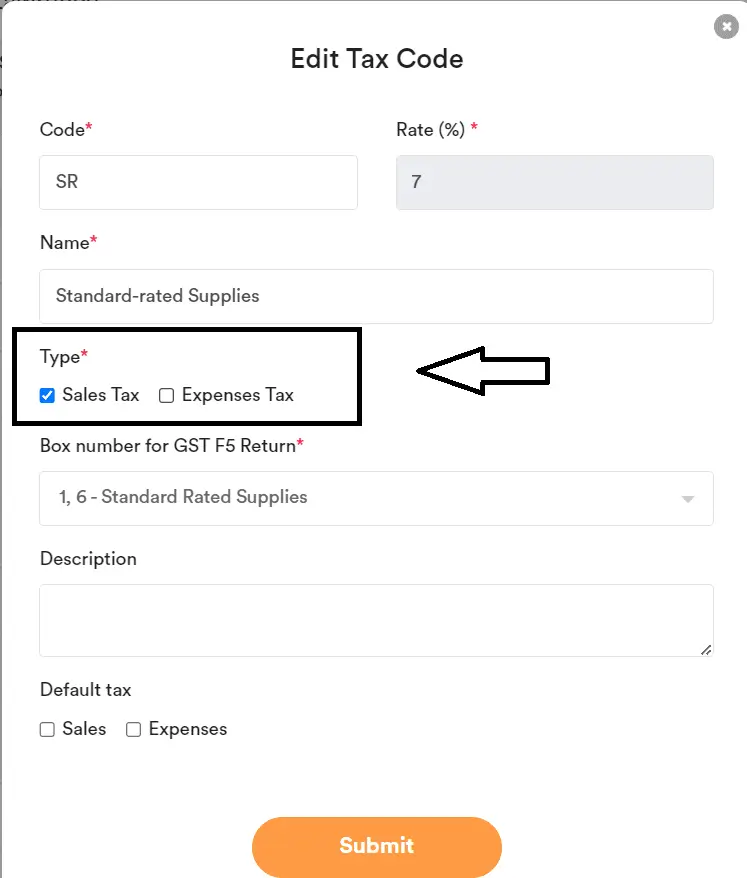
GST Calculation Method (Item vs Subtotal)
When a tax invoice has multiple lines of standard-rated items, there are 2 acceptable ways to calculate total GST (9%):
- Item-by-item method (Default): Apply 9% to each item’s value (excluding GST), round as needed, then sum the GST for all items.
- Subtotal method: Add up the values of all taxable items (excluding GST) first, then apply 9% to the taxable subtotal.
Because of rounding, the total GST from these two methods may differ slightly. Both methods are acceptable, but you must use the same method consistently.
Where to set this
Financial Settings → Calculation Method for GST/VAT/SST
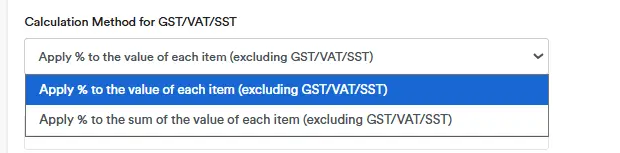
This affects how GST is calculated/shown (front-end logic).
If you choose “Apply % to the sum of the value of each item (excluding GST/VAT/SST)”
The system will automatically post the difference into GST Rounding Difference.
The system only runs this logic when all taxable lines use the same GST rate (%), and other lines are No Tax. The Rounding Differences box supports only one tax rate.
It calculates:
- Taxable Subtotal = Subtotal − No Tax items
- Expected GST = Taxable Subtotal × 9% (example tax rate)
- If Expected GST differs from the invoice GST, the variance goes to GST Rounding Difference.
Manual override: You can still edit/override the rounding differences values after the system finishes the calculation.
GST Default Tax Option – Exclusive & Inclusive
You can set the default tax setting to either Tax Exclusive or Tax Inclusive in the Financial Settings.

By default, it is set to Tax Exclusive. If you select Tax Inclusive, every new sales or expense transaction you create will have the Tax Inclusive option ticked by default. Existing transactions will not be affected.
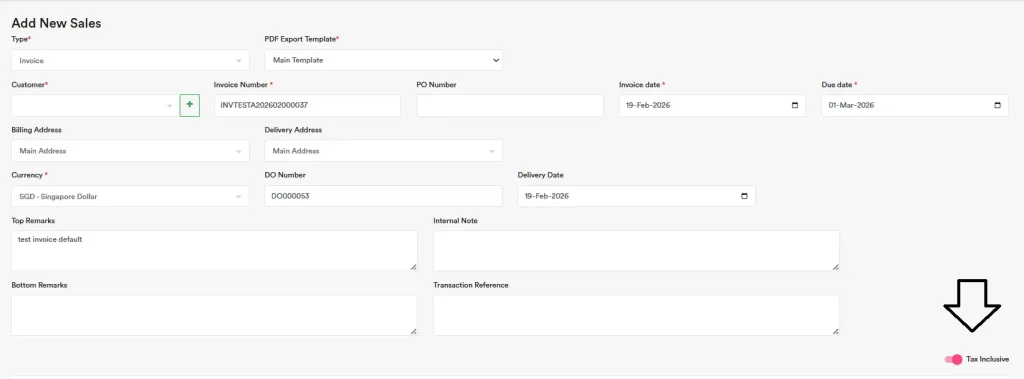
GST Accrual Basis vs Cash Basis
Our system automatically generates country-specific tax codes. Go to Settings → Tax Codes, choose Sales or Expenses, and enable the codes you want to use for data entry. Codes that aren’t enabled won’t appear when you enter transactions. At the top of the Tax Codes page, you’ll also find a note explaining how each tax code works.
The GST / SST / VAT payable amount is recorded under account code 2-4000 GST Payables. When you make a GST / SST / VAT payment, you can post the entry to this account.
Our software allows you to easily switch between accrual basis and cash basis without any complex settings. How it works is explained below:
GST on Accrual Basis
For companies reporting GST on an accrual basis, you can generate the details from the GST Report.
The 2-4000 GST Payables account reflects GST based on accrual accounting. After you make payment to the authorities, this account usually returns to zero.
GST on Cash Basis
For companies reporting GST on a cash basis, you can generate the details from the GST Report (Cash Basis).
In this report, only payments that have been received (i.e., receivables settled) will show sales and GST amounts.
Any manual journal entries related to GST are treated as settled and appear in this report.
Since the 2-4000 GST Payables account is still recorded based on accrual accounting, after payment it may still show a balance corresponding to unpaid receivables.
You can reconcile the difference using the example below:
The company has 2 invoices: one paid and one unpaid.

In the GST Report (Cash Basis), GST recorded for the paid invoice is $16.

In the Aging Report (Trade and Non-Trade Receivables), GST for the unpaid invoice is $80.

Adding the GST from both reports ($16 + $80) equals $96, which matches the GST Payables shown on the Balance Sheet.

This way, you can verify that your GST Payables account reconciles correctly between the cash basis and accrual basis.
GST rounding differences
You can click following button to add GST Rounding Difference

Thereafter input the Difference in positive or negative amount, and select the correct Tax Code so it can show in the correct category in the GST report. Example this sales is 7% Standard rated Supplies, therefore the rounding difference can select 7% Standard rated Supplies
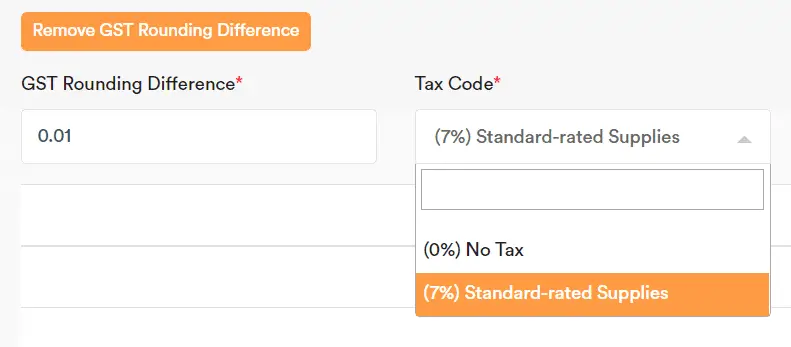
Then click submit to record the transaction

GST Treatment of Bad Debts under Accrual Basis Accounting
The sample below shows the gross amount displayed in the report. If you want to show only the input tax or output tax without the gross amount, you need to use a tax code that reflects only the output tax or only the input tax. Different countries may have different requirements, and you can check any specific country’s requirements in the Country section.
In some countries, if you make a sale and charge GST but the customer never pays you, you may claim back the GST previously paid to the government after meeting the required conditions. Below is an example of the double entries:
1. When you write off the bad debt (and claim back the GST):
You record the write-off and reduce trade receivables via “Add Receipt”:
Debit: 6-1003 Bad Debt Expense 1,090
Credit: 1-0000 Trade Receivables 1,090
(Assume total invoice was 1,090 including 90 GST)
Record the following manual journal entry to recognise that we need to claim a refund from the government:
Debit: 6-1003 Bad Debt Expense 1,000 (9% Standard rated Supplies) + GST 90
Credit: 6-1003 Bad Debt Expense 1,090 (0% No Tax)
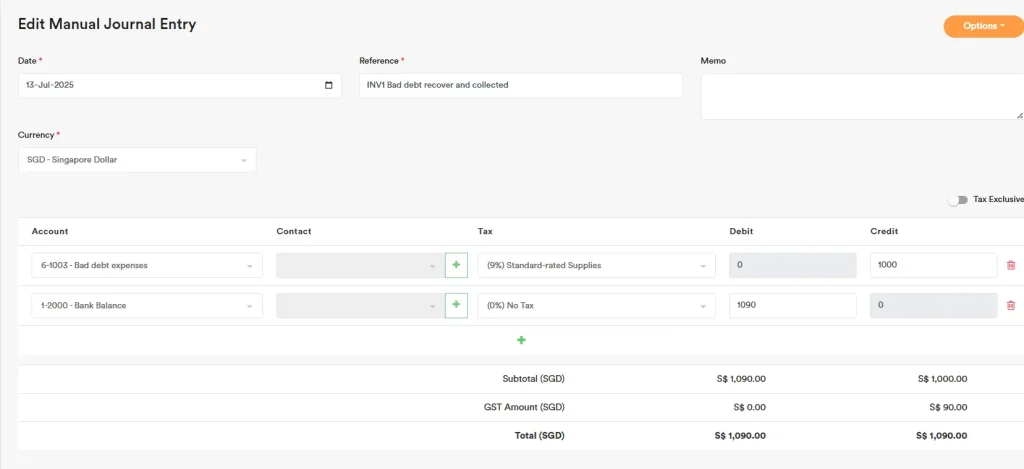
2. Later, when the government refunds the GST:
You record the cash received from the government:
Debit: X-XXXX Bank 90
Credit: 2-4000 GST Payables 90
3. If the customer pays you after the bad debt was written off:
You reverse the bad debt expense and repay the GST to the government:
Debit: X-XXXX Bank 1,090
Credit: 6-1003 Bad Debt Expense / 8-9000 Other Income (Bad Debt Recovery) (9% Standard rated Supplies) 1000 + GST 90
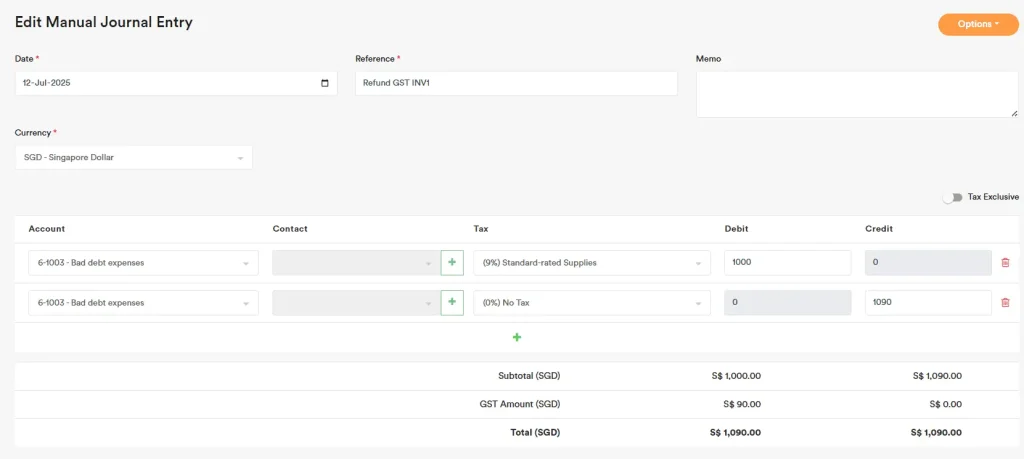
Then, you repay the GST portion to the government:
Debit: 2-4000 GST Payables 90
Credit: X-XXXX Bank 90
In the GST report, you will see details as shown below.
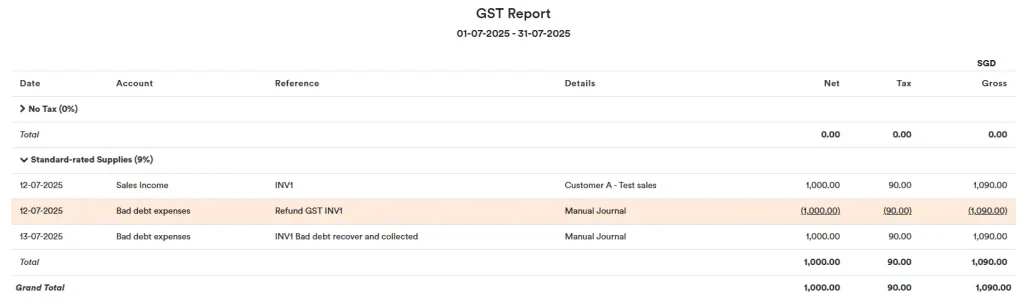
GST Treatment of Unpaid Creditors under Accrual Basis Accounting
The sample below shows the gross amount displayed in the report. If you want to show only the input tax or output tax without the gross amount, you need to use a tax code that reflects only the output tax or only the input tax. Different countries may have different requirements, and you can check any specific country’s requirements in the Country section.
In some countries, if you make a purchase and claim input GST but do not pay the creditor within 12 months, you are required to repay the previously claimed GST input tax to the government. Below is an example of the journal entries:
Record the following manual journal entry to recognise the obligation to repay the input tax to the government:
Debit: 6-6210 GST Expenses 1,090 (0% No Tax)
Credit: 6-6210 GST Expenses 1,000 (9% Standard rated Purchases) + GST 90
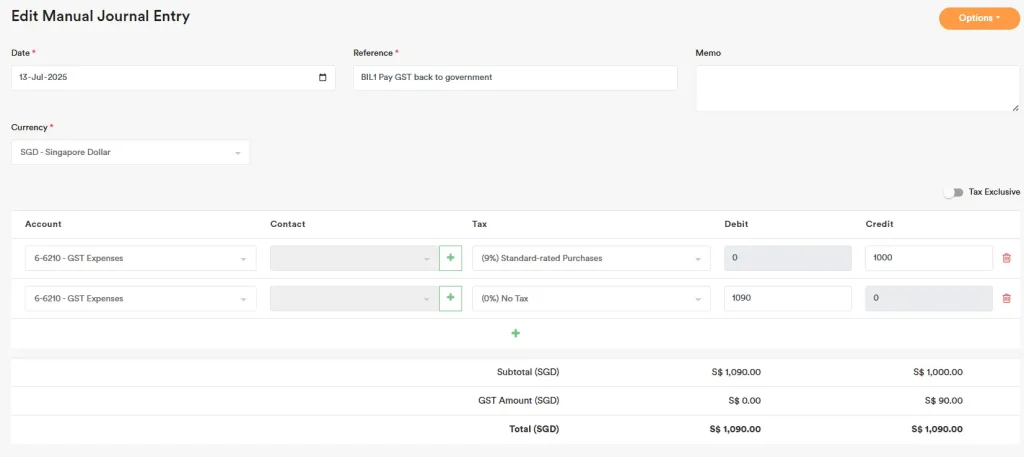
If you subsequently pay the supplier after reversing the GST (after 12 months), you can reclaim the input tax with the following entry:
Debit: 6-6210 GST Expenses 1,000 (9% Standard rated Purchases) + GST 90
Credit: 6-6210 GST Expenses 1,090 (0% No Tax)

In the GST report, you will see details as shown below.

GST Treatment of Bad Debts under Cash Basis Accounting
The sample below shows the gross amount displayed in the report. If you want to show only the input tax or output tax without the gross amount, you need to use a tax code that reflects only the output tax or only the input tax. Different countries may have different requirements, and you can check any specific country’s requirements in the Country section.
In some countries, if you make a sale but the customer does not pay you within 12 months, you are still required to pay the tax (e.g., SST) to the government — even though you record tax on a cash basis. Below is an example of the double entries:
 What happens?
 At invoice date → No SST is payable yet because you are on a cash basis.
 After 12 months from invoice date → Even though the customer hasn’t paid, you must still pay the SST to the government.
 You keep the receivable from the customer on your books, but the SST is paid from your own funds.
 If the customer pays you later → No additional SST is payable because it was already paid at the 12-month point.
 Journal Entries
Scenario 1: After 12 months — pay SST even though not collected:
You can post a manual journal entry as shown below. The entry will be treated as paid in the manual journal, so the SST amount will appear in the GST Report (Cash Basis).
Debit: 2-4000 GST Payables 900 (0% No Tax)
Debit: 4-0000 Sales Income 10,000 (0% No Tax)
Credit: 4-0000 Sales Income 10,000 (9% Standard rated Supplies (Assumption)) + GST 900

You can settle the GST using the manual journal entry below.
Debit: 2-4000 GST Payables 900
Credit: X-XXXX Bank 900
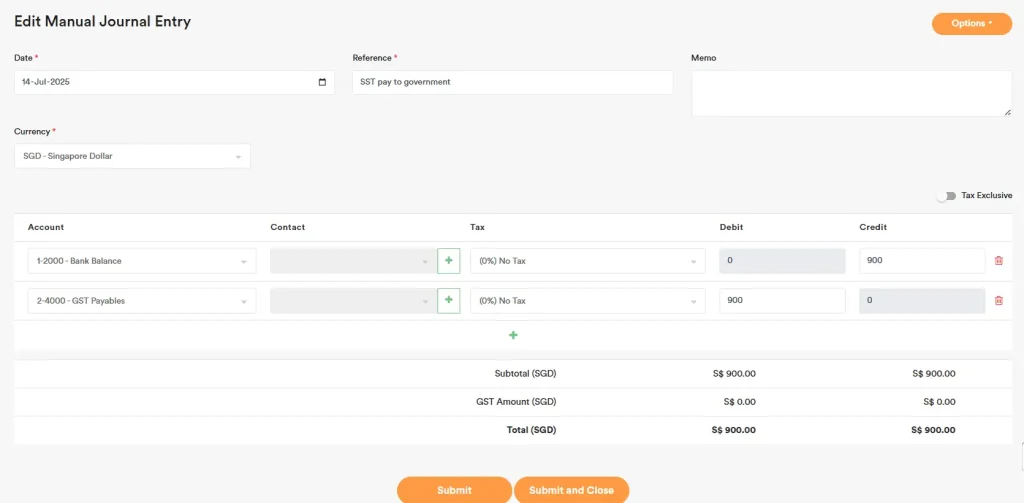
In the GST report Cash Basis, you will see details as shown below.
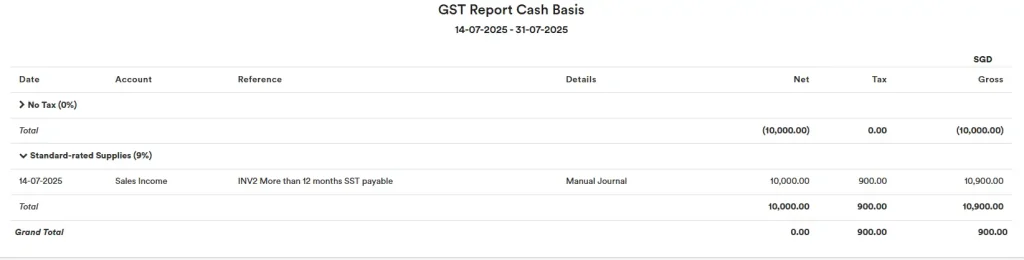
Scenario 1.1: When customer eventually pays:
No further SST is payable because you already paid it at the 12-month mark.
You simply record the cash received and clear the trade receivable via “Add Receipt”
Then post the manual journal entry below to ensure the SST payable is not paid twice to the government and is properly reflected in the GST Report (Cash Basis). Since the trade receivable has now been paid and will appear in the GST Report (Cash Basis), but you have already paid this amount to the government earlier, you need to reverse it now to offset and show a zero balance.
Debit: 4-0000 Sales Income 10,000 (9% Standard rated Supplies (Assumption)) + GST 900
Credit: 2-4000 GST Payables 900 (0% No Tax)
Credit: 4-0000 Sales Income 10,000 (0% No Tax)
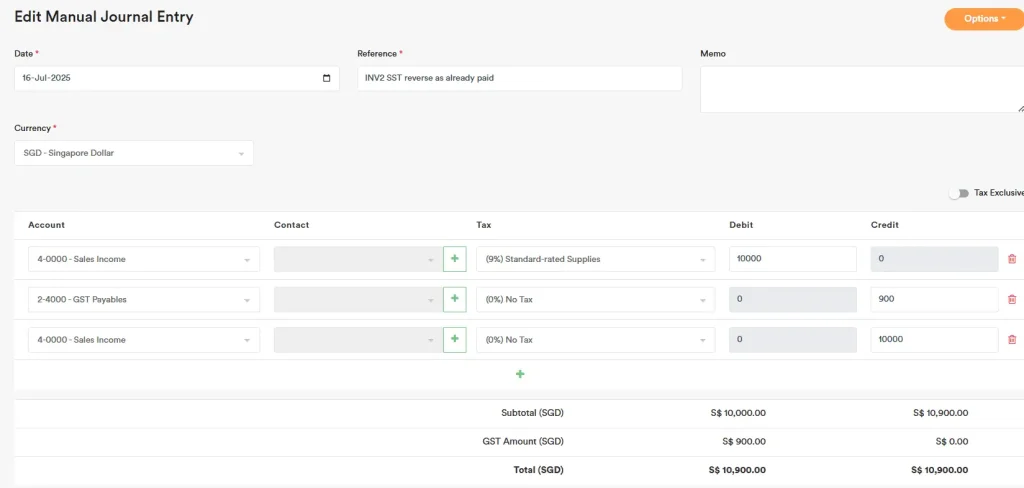
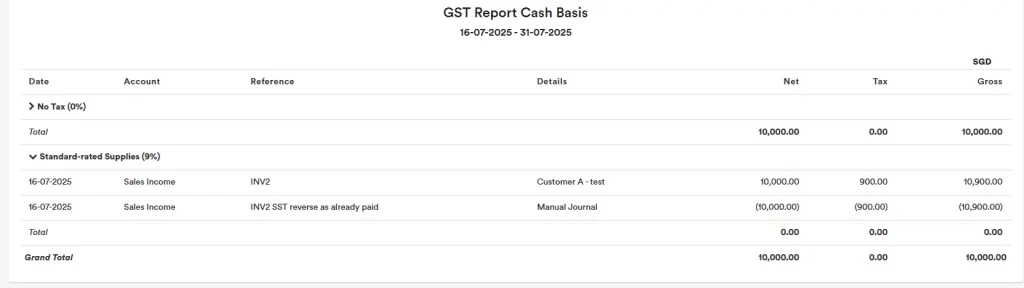
Scenario 1.2: When you write off the bad debt as customer not paid (and claim back the SST paid):
You record the write-off and reduce trade receivables via “Add Receipt”:
Debit: 6-1003 Bad Debt Expense 10,900
Credit: 1-0000 Trade Receivables 10,900
(Assume total invoice was 10,900 including 900 SST)
When you write off an amount as bad debt, the system treats it as paid and includes it in the GST Report Cash Basis. To recognize that we need to claim a refund from the government and to reverse the system’s assumption that the trade receivable was paid, record the following manual journal entry:
Debit: 6-1003 Bad Debt Expense 10,000 (9% Standard rated Supplies) + SST 900
Credit: 6-1003 Bad Debt Expense 10,900 (0% No Tax)
Credit: 2-4000 GST Payables 900 (0% No Tax)
Credit: 4-0000 Sales Income 10,000 (0% No Tax)
Debit: 4-0000 Sales Income 10,000 (9% Standard rated Supplies (Assumption)) + GST 900

In the General Ledger, it appears as shown below, showing an SST refund of 900 from the government.
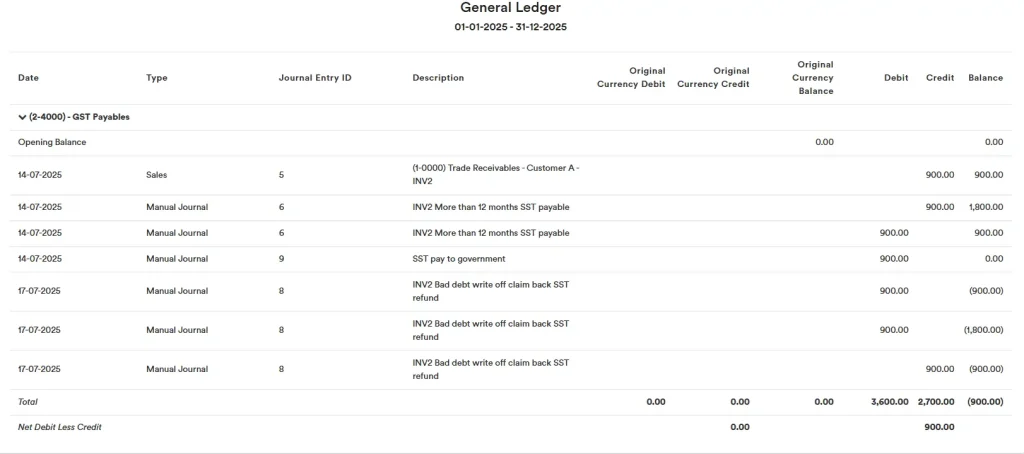
In the GST Report (Cash Basis), on the day the amount is written off as bad debt, it will show the recoverable SST from the government as follows:
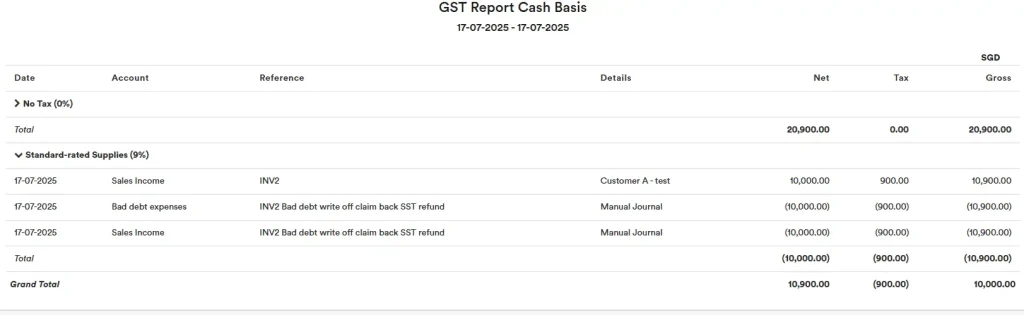
Later, when the government refunds the SST:
You record the cash received from the government:
Debit: X-XXXX Bank 900
Credit: 2-4000 GST Payables 900
Scenario 2: The customer was wound up before 12 months. You wrote off the debtor within 12 months, and no service tax needs to be paid.
You record the write-off and reduce trade receivables via “Add Receipt”:
Debit: 6-1003 Bad Debt Expense 10,900
Credit: 1-0000 Trade Receivables 10,900
(Assume total invoice was 10,900 including 900 SST)
When you write off an amount as bad debt, the system treats it as paid and includes it in the GST Report Cash Basis. To reverse the system’s assumption that the trade receivable was paid, record the following manual journal entry:
Debit: 6-1003 Bad Debt Expense 10,000 (9% Standard rated Supplies) + SST 900
Credit: 6-1003 Bad Debt Expense 10,900 (0% No Tax)
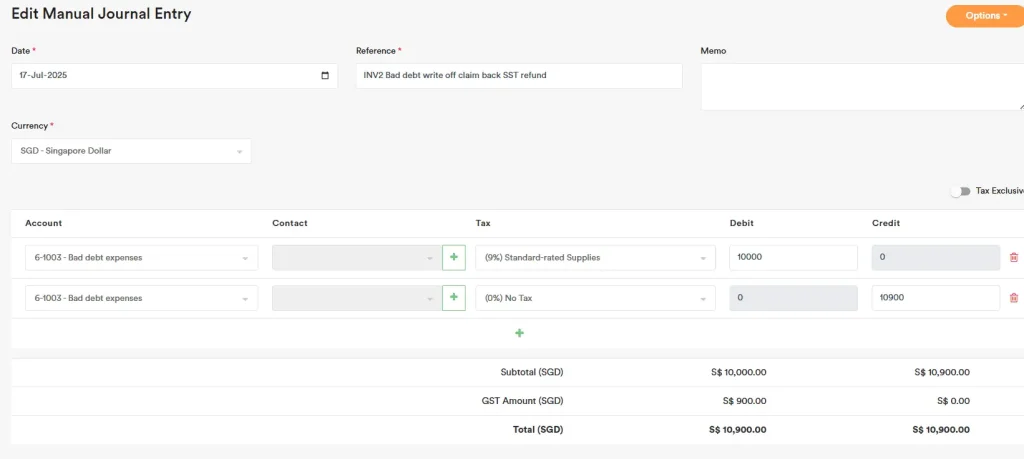
In the GST Report (Cash Basis), on the day the amount is written off as bad debt, it will show the SST as follows:
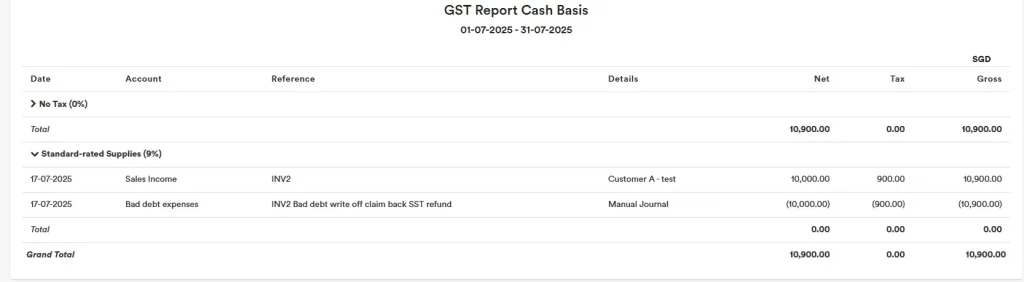
GST Recording When Functional Currency Differs from GST Currency
In some countries—such as Singapore—GST must be reported in SGD. This means that even if your company’s functional currency is USD, you must also record the SGD equivalent for each transaction. The same applies to input tax on expenses: record the exact SGD amount for GST reporting.
How to set this up in AI Account
Enable GST currency display: Go to Financial Settings, tick “Show GST Currency?”, and click Save.
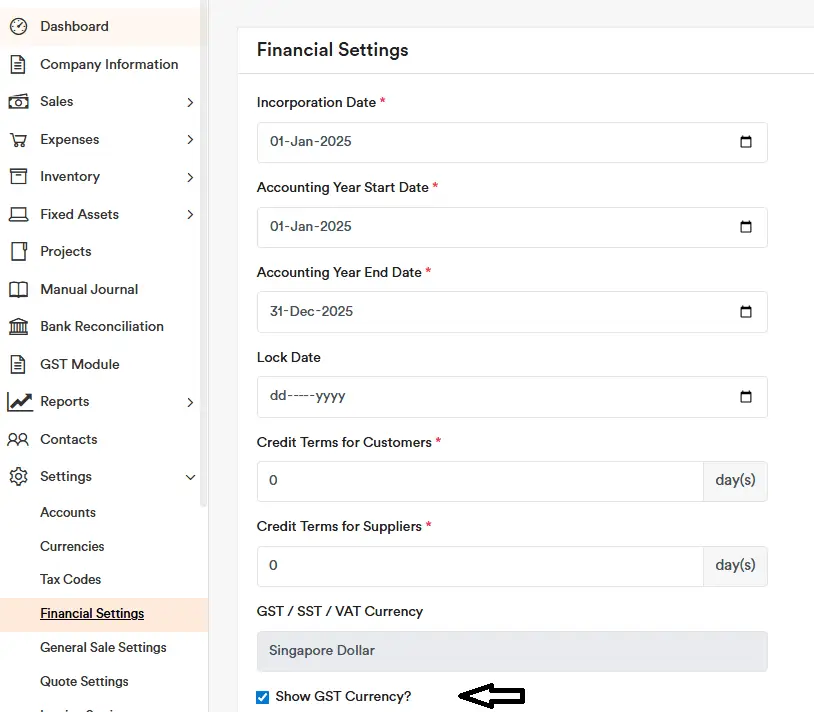
Record transactions: In Sales and Expenses, a GST exchange rate field will appear. Use the system-populated rate or enter your preferred rate. The system will calculate the SGD amount to be used for GST reporting.
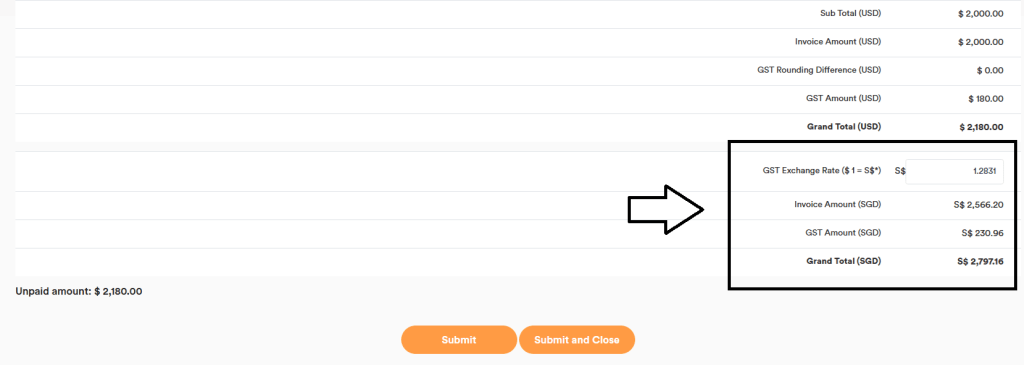
Generate the report: When you run the GST Report, the SGD amounts will be shown and can be used for your GST submission.
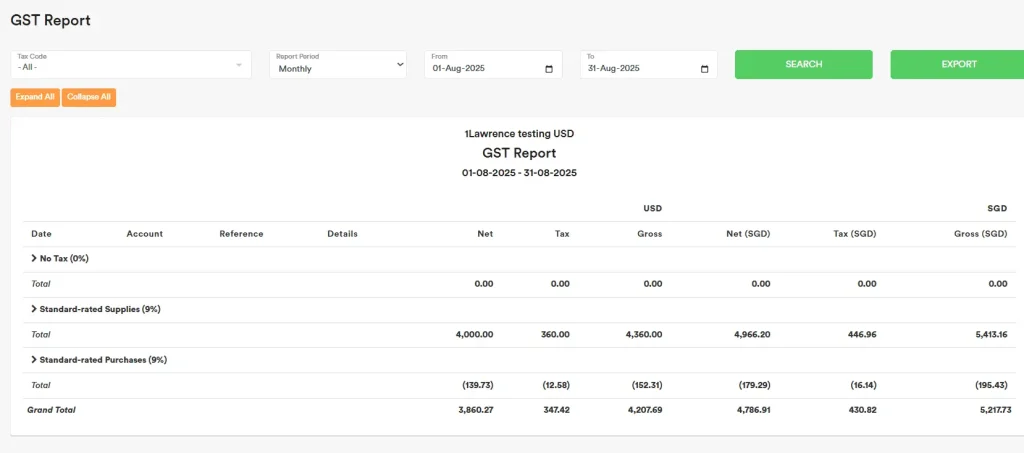
GST Module – Batch Bad-Debt / Unpaid-Creditor Adjustments
Use the GST Module to create batch manual journals to:
- Write off debtor invoices unpaid for more than 12 months (365 days) and claim back the GST/SST/VAT, and
- Reverse (pay back) previously claimed GST for unpaid creditor invoices older than 12 months.
Different countries have different rules. Ready-made templates are available per country, and you can create your own in Manual Journal Template Setup.
Steps
Click ‘GST Module’ from the menu.
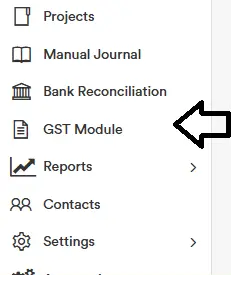
Set the aging filter
- Choose Invoice Date or Due Date.
- Set Older than to 365 days.
- Enter today’s date as the “As at” date.
- Click Search.
- The system lists all invoices that are unpaid for more than 365 days as of today.

Select invoices
Tick the invoices you want to process (e.g., to write off and claim back GST/SST/VAT).
Important: Select invoices with the same GST rate only. Do not mix different GST rates in one batch, or the system will throw an error and the manual journal will not balance. Also separate trade and non-trade items: post trade invoices to Trade Receivables and non-trade items to Other Receivables; do not combine them in the same batch.

Create the journals
Click ‘Create Tag Manual Journal’.
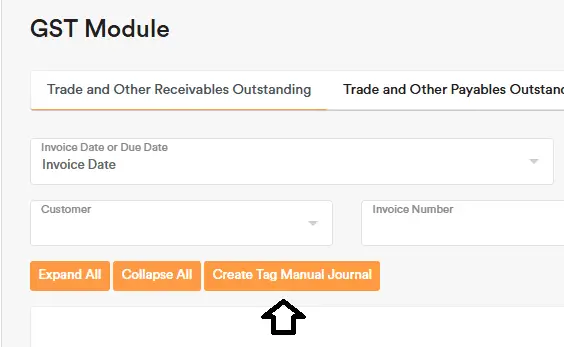
Choose a template
Select the relevant template (e.g., “Bad debt write off”).
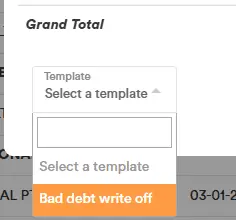
Preview and submit
Review the auto-generated adjustment. If everything looks correct, click Submit.
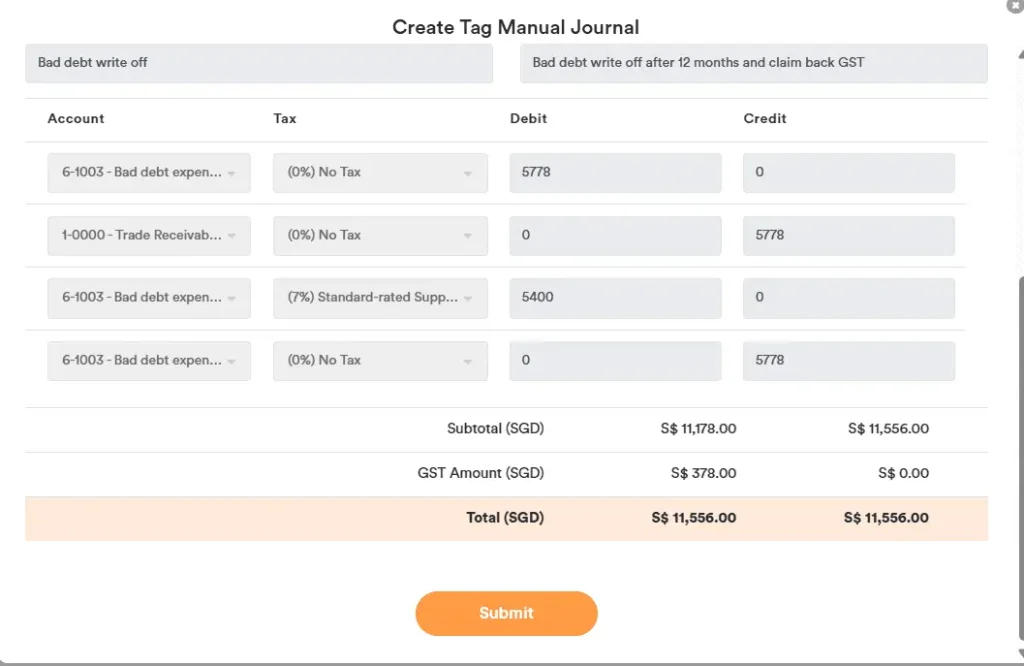
Confirm tags & reports
Refresh to see the manual journal tag attached to each processed invoice.
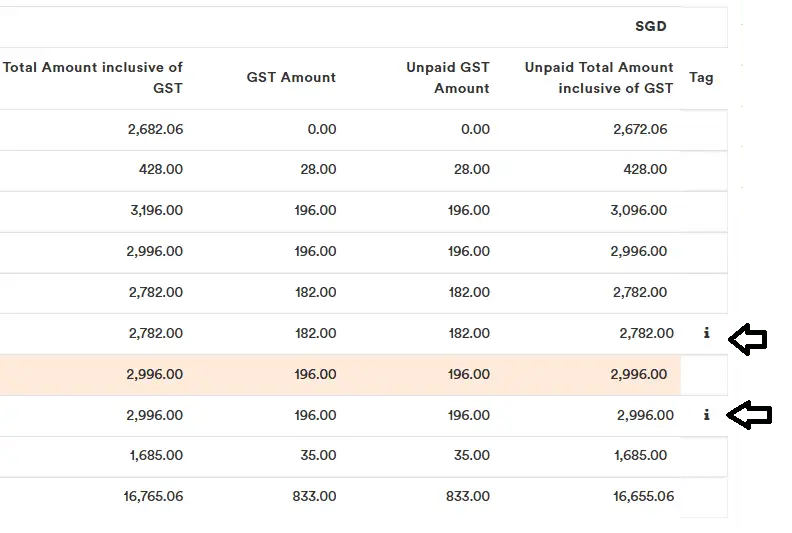
Open your GST report to see the GST refundable (for debtors) or GST to repay (for creditors), based on the journals created.

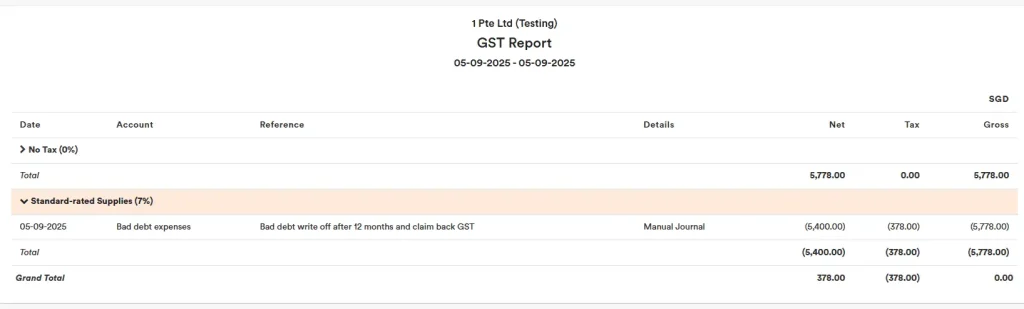
Unpaid creditors (input tax to repay)
Use the same steps for unpaid creditor invoices older than 12 months. Select the appropriate template so the system reverses (pays back) any input tax previously claimed.
Notes:
- Country rules differ. Always pick the template for your jurisdiction, or create one in Manual Journal Template Setup to match local requirements.
- Batch = faster. Handle many invoices at once—no need to post journals one by one.
- Audit trail. Tags on invoices make it easy to trace which journals were generated from the GST Module.
- Rate-by-batch tip. If you have invoices with multiple GST rates, run separate batches for each rate to keep journals balanced.
- Separate trade and non-trade items: post trade invoices to Trade Receivables and non-trade items to Other Receivables; do not combine them in the same batch.
GST Module – Deferred GST Payables Adjustments
For companies reporting GST or SST on a cash basis, the GST Report (Cash Basis) shows tax based on payments received, instead of the invoice date.
However, the GST Payables account in the Balance Sheet is normally recorded on an accrual basis when the invoice is created. Because of this, there may be a timing difference between the GST Report (Cash Basis) and the GST Payables balance.
The Deferred GST Payables Adjustments function helps users record this timing difference more clearly. It allows unpaid GST or SST amounts for selected tax codes to be adjusted from GST Payables to Deferred GST Payables, so the GST Payables balance can better reflect the amount payable on a cash basis.
This function is useful for tax codes that need to be reported on a cash basis, such as selected Malaysia SST tax codes.
Deferred GST Payables Settings
In Deferred GST Payables Settings, you can choose which tax codes should be included in the cash basis adjustment.
Under Tax Code Cash Basis Adjustment, the system will list the available tax codes with their code, name, and rate. Tick Cash Basis Adjustment for the tax codes that need to be adjusted from GST Payables to Deferred GST Payables.
For example, you may tick the Malaysia SST-related tax codes if these taxes need to be reported on a cash basis. Once selected, these tax codes will be available in the Deferred GST Payables Adjustments tab for adjustment.
You can also choose whether to exclude documents that have been outstanding for more than 12 months:
- Exclude debtor documents outstanding > 12 months – Unpaid customer invoices outstanding for more than 12 months will not be included in the deferred GST payable adjustment.
- Exclude creditor documents outstanding > 12 months – Unpaid supplier bills outstanding for more than 12 months will not be included in the deferred GST payable adjustment.
This option is useful for countries such as Malaysia, where certain taxes reported on a cash basis may be treated as payable after the invoice has been outstanding for more than 12 months, even if payment has not been received. In this case, the system can treat these long-outstanding amounts as no longer deferred, so the cash basis report and GST/SST payable balance can be reconciled more accurately.
After making the changes, click Save to update the settings. Once saved, the selected tax codes and exclusion rules will be applied when preparing deferred GST payable adjustments.
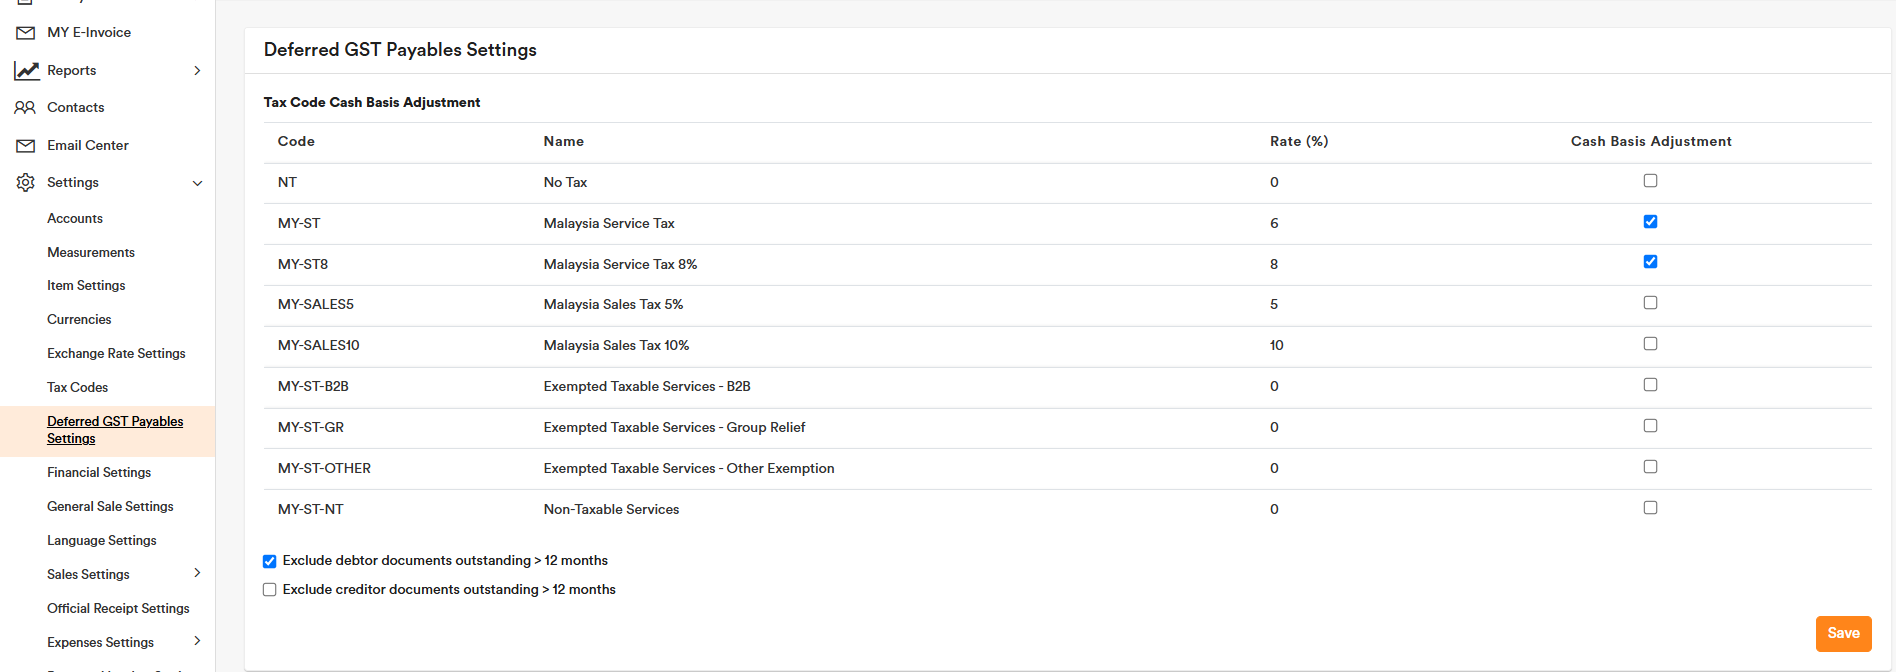
Add New Deferred GST Payables Adjustment
Deferred GST Payables is a system account created for this function. It works similarly to GST Payables and can be renamed if required.
To create an adjustment, go to GST Module > Deferred GST Payables Adjustments and click Add New Adjustment.
Select the As of Date and the applicable Tax Code, then click Search. The system will show the unpaid sales invoices that fulfil the selected conditions, such as invoices with outstanding GST or SST amounts under the selected tax code.
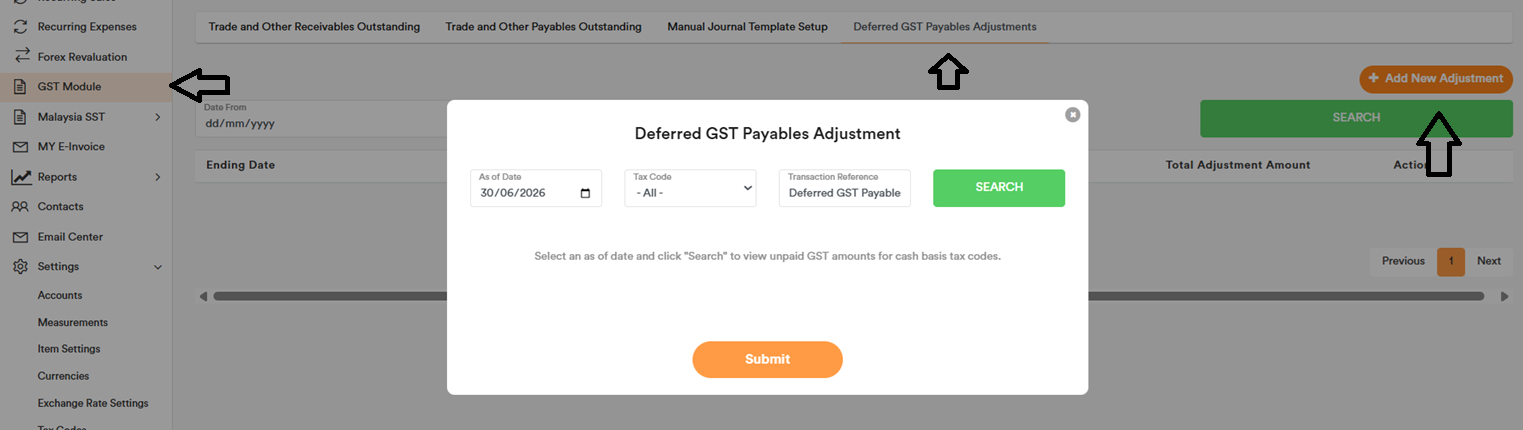
You can then select the invoices to be adjusted. The system will prefill the adjustment amount based on the outstanding GST or SST amount, but you may review and amend it if needed.
Once submitted, the system will record the adjustment from GST Payables to Deferred GST Payables.
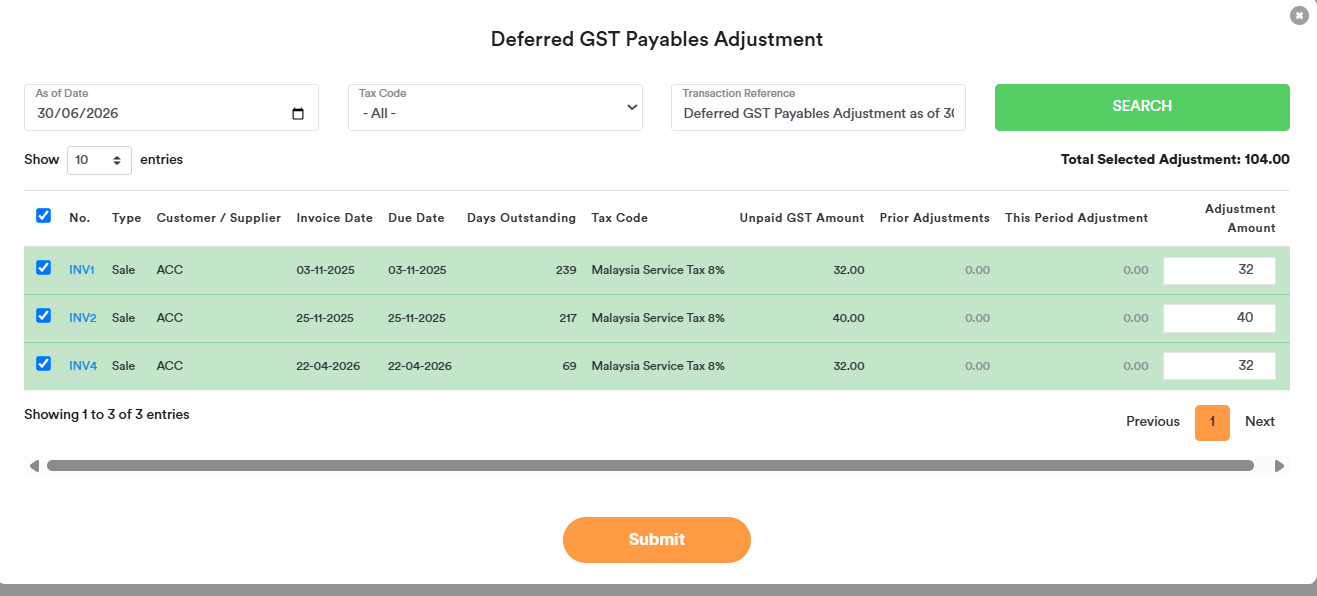
Subsequent Adjustments
To update the adjustment in a later period, use the same Add New Adjustment button and enter a new As of Date.
The system will check the unpaid invoices based on the new cut-off date and compare them against the previous deferred GST adjustments.
If an invoice was unpaid before but has now been paid, the system will automatically propose an adjustment to move the amount back from Deferred GST Payables to GST Payables.
If the outstanding amount has changed, the system will only propose the difference to be adjusted.
This means users do not need to manually calculate the adjustment. They only need to create a new adjustment with the correct As of Date, review the proposed amounts, and submit.
GST Recording for GST Only Transactions
You can create a new tax code under ‘Settings’ → ‘Tax Codes’ to track this type of transaction separately in the GST report.
![]()
When you want to enter only the GST amount, you can record it using two separate lines as follows.
![]()
In the journal report, the nett entry will appear as:
Dr GST Payable
Cr Trade Payable (Courier Company / Customs)
![]()
In the GST report, you will then be able to see the corresponding details clearly.
![]()
![]()
Reverse Charge Recording for Import Service
Reverse charge is commonly used for imported services or overseas purchases where the supplier does not charge GST. Instead, the buyer accounts for both the output tax and input tax in the GST return, where applicable.
First, go to Settings > Tax Codes and create a new tax code. Tick Reverse Charge, then enter the Input Tax Rate and Output Tax Rate. In most cases, both rates will be the same.
If the Input Tax Rate and Output Tax Rate are different, the difference will be posted to the system GST Expenses balancing account.
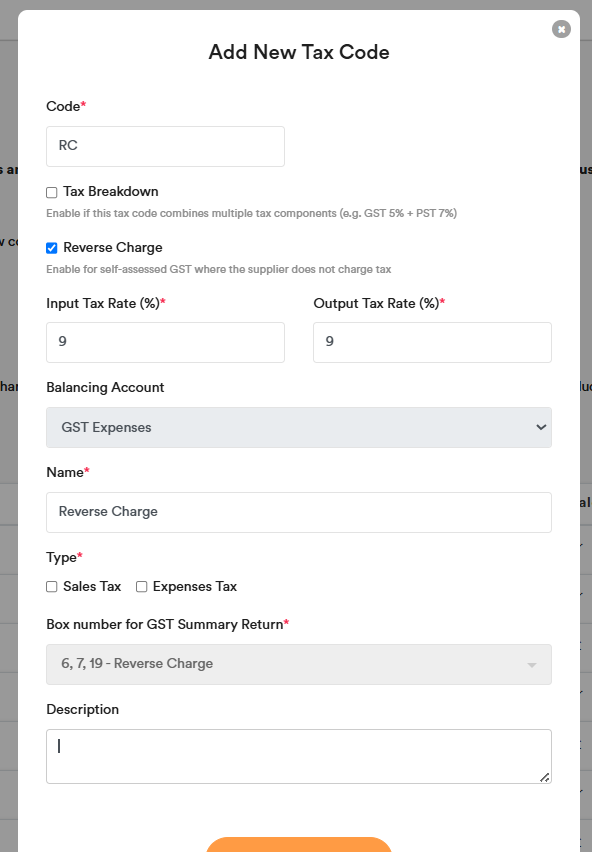
When you record an imported expense that is subject to reverse charge, select the reverse charge tax code in the expense transaction.
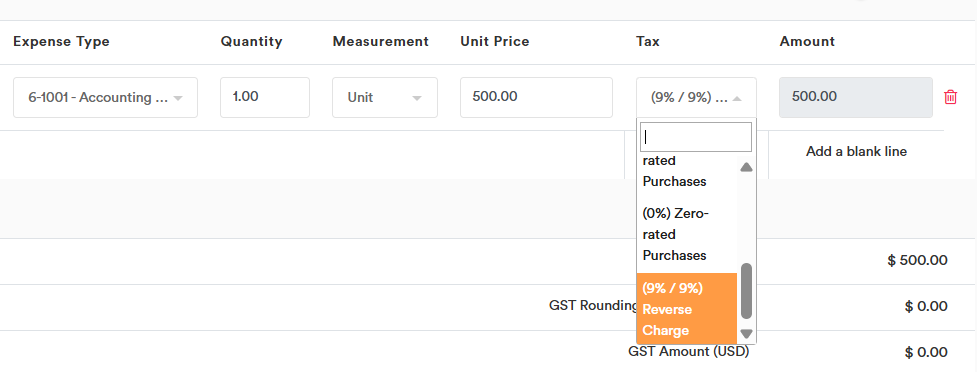
In the Journal Report, you can view the accounting entry generated by the system. The reverse charge entry will record both the input tax and output tax amounts. If there is any difference between the input tax and output tax, it will be posted to GST Expenses.
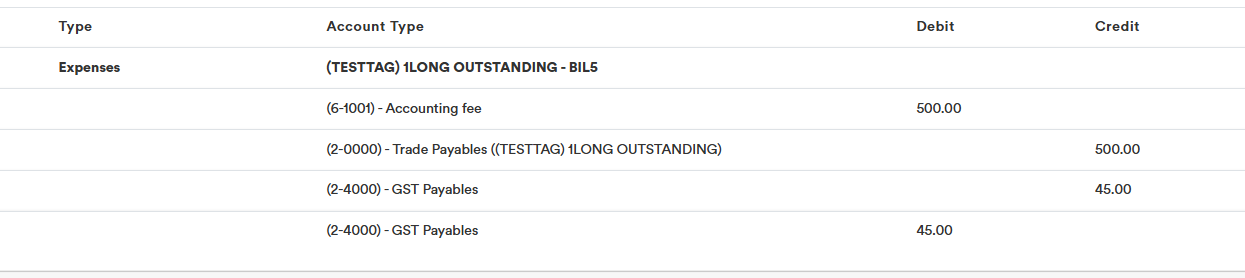
In the GST Report, you can review the input tax and output tax details separately for the reverse charge transaction.

In the GST Summary Return, you can also view the Reverse Charge Gross Amount.


Tax Code with Breakdown
The Tax Code with Breakdown function allows you to create one tax code with multiple tax components.
This is useful when more than one tax is charged on the same transaction, such as GST + PST.
Add Tax Code with Breakdown
Go to “Tax Codes” setting and click “Add New Tax Code”.
Tick “Tax Breakdown”, then enter the breakdown components, such as:
- Code
- Name
- Rate (%)
The system will total up all breakdown rates automatically.
Example:
GST: 5%
PST: 7%
Total tax rate: 12%
You can add more breakdown lines if needed.
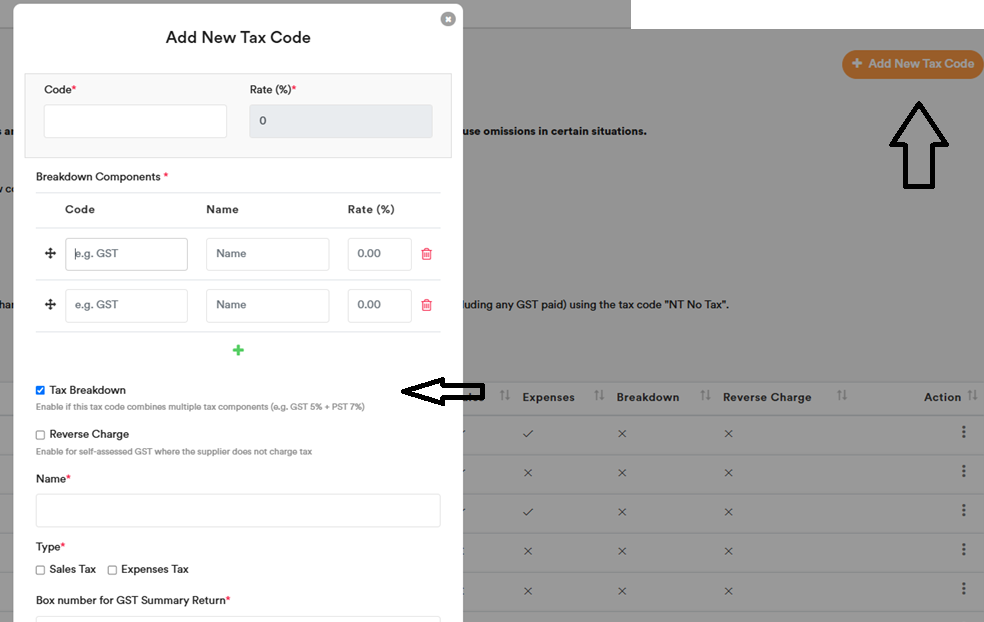
After that, complete the remaining tax code details. When this tax code is used in a transaction, the tax amount will be split according to each breakdown component.
For example, for a CAD 100 invoice:
GST 5% = CAD 5
PST 7% = CAD 7
The journal will also show the tax amounts separately.
Tax Invoice
When a tax code with breakdown is used, the tax invoice will show the tax components separately, so the customer can see how the total tax is calculated.
GST Report
In the GST Report, tick Show Tax Breakdown to view the tax amount by each breakdown component.
The report will show each tax component separately under the main tax code. You can also use Expand All, Collapse All, and Export to review or download the report.
Manual Journal
Manual Journal Entry
Please note that Manual Journals do not automatically generate an e-invoice. If you record sales or expenses under Manual Journals and need to issue an e-invoice, you must create it manually in the E-Invoice module.
To create a manual journal, go to Manual Journal → Add New Entry.

You can add a description to each line; it will appear in the general ledger.
After submitting the journal, use the options in the top right to duplicate the entry or reverse it (if you want to).
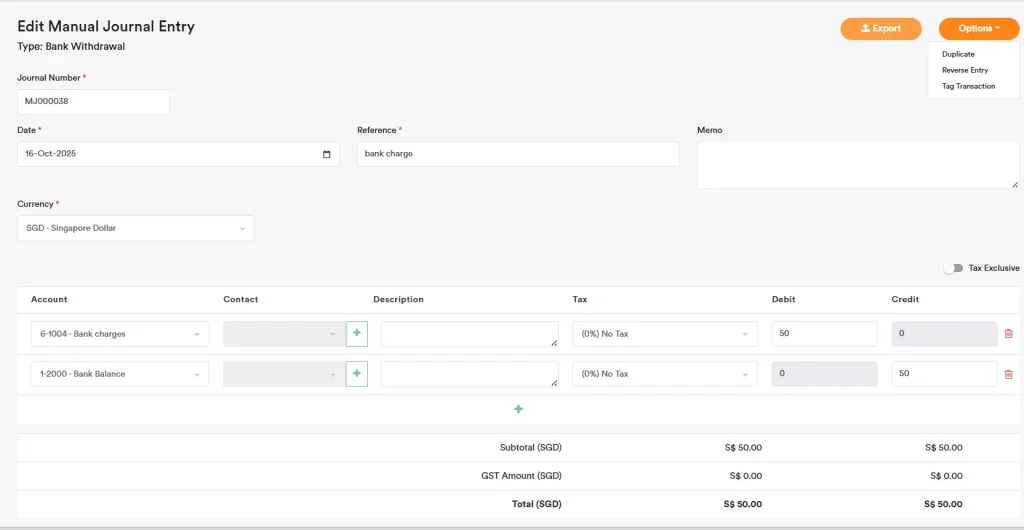
Manual Journal Entry Tagging
For each transaction—whether it’s a Sale, Expense, Inventory Sale, Inventory Purchase, or Fixed Asset entry—you now have the option to tag one or more Manual Journal Entries. This allows you to easily track related manual journal entries linked to the original transaction.
For example, if you’ve created a GST adjustment as a manual journal for a sales transaction, you can tag it accordingly for better traceability.
You may also add a new Manual Journal Entry and tag it using the “Options” menu, as shown below.

Alternatively, you can go directly to the Manual Journal Entry and use the “Tag Transaction” option to link it to the relevant transaction.
You can also tag one Manual Journal Entry to another.
Banking & Cash
Bank Transactions
Please note that Bank Entry do not automatically generate an e-invoice. If you want to capture full Sales Invoice or Expense details, it is recommended to record cash sales or expenses using the standard Sales or Expenses module instead. This ensures receivable/payable contact details are properly captured, so the system can automatically generate or capture an e-invoice when applicable.
For bank-related transactions, you may use the ‘Bank Entry’ module to record them, if you prefer—such as cash sales, cash payments, bank charges, interest income, and transfers between bank accounts.
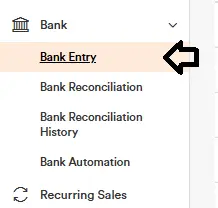
There are four types of Bank Entry:
- Deposit (Others): Used to record deposits that are not sales or expenses and do not require an e-invoice.
- Withdrawal (Others): Used to record withdrawals that are not sales or expenses and do not require an e-invoice.
- Deposit (Sales): Used to record cash sales where you want to issue an e-invoice.
- Withdrawal (Expenses): Used to record cash expenses where you may receive an e-invoice.
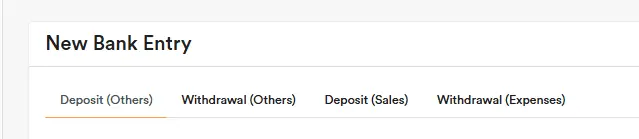
Example: Recording a Cash Sale via Bank Entry
Go to Bank Entry.
Click “Add New Entry” (top-right).

Select Deposit (Sales) (i.e. cash sales)
Fill in all details and click Submit.
![]()
After submission, the system will generate the journal entry accordingly.
To record cash expenses, follow the same steps and select Withdrawal.
![]()
Currency and bank account setup
The transaction currency follows the Bank Account currency set in the Chart of Accounts.
If you have bank accounts in different currencies, you must set them up as separate bank accounts.
Contact selection in Bank Entry
Bank Entry – Deposit (Others) and Withdrawal (Others): You may select any contact.
Bank Entry – Deposit (Sales): Only contacts marked as Customer can be selected.
Bank Entry – Withdrawal (Expenses): Only contacts marked as Supplier can be selected.
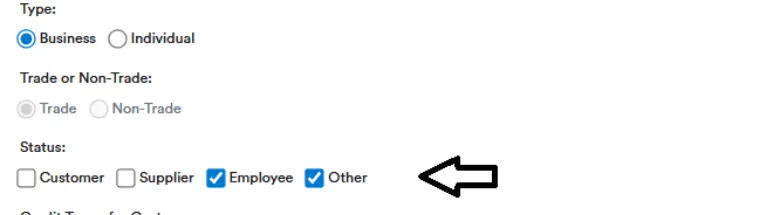
Bank Automation
You can use our Bank Automation feature to upload your bank statements and easily link or create receipts and payments. Instead of manually recording every transaction, you import your bank statement and let the system help you match each line to an outstanding invoice, bill, or existing receipt/payment.
Once the Bank Automation process is completed, your bank balance should tally, as each bank statement line will have been converted into a bank transaction and matched accordingly. After all bank lines have been matched and reconciled, you may proceed to the Bank Reconciliation section to carry out the final reconciliation. This final step helps you confirm that your bank records are accurate, complete, and that no transactions have been missed.
Once uploaded the Bank Statement, the system will try to:
- Find existing receipts or payments
- Identify related outstanding invoices or bills
- Let you create new receipts or journal entries where needed
Step 1: Go to the Bank Automation tab
First, go to the Bank Automation tab in the software.
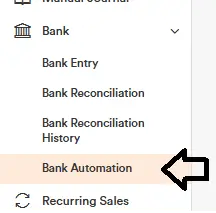
Step 2: Upload your bank statement
- Click the Upload Bank Statement button at the top right corner.
- Download the template and fill in the bank statement details.
a. Usually, you can export your bank transactions from your bank portal in Excel format.
b. You can then copy and paste into our template, or use an AI tool to extract the details as explained in the Automation tab. - Click Choose File and upload the completed CSV file.
- Select the Bank Account that matches your bank in the software.
- Click Match Bank Statement.
The system will then start processing and try to match each transaction for you.
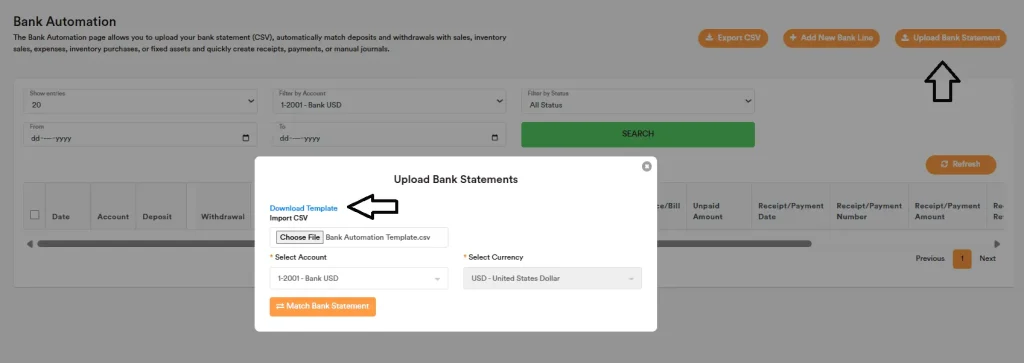
Please note that the first line of the imported bank transaction can be used to enter the opening balance. This ensures that the calculated balance starts from the correct bank opening balance and remains accurate. Example:
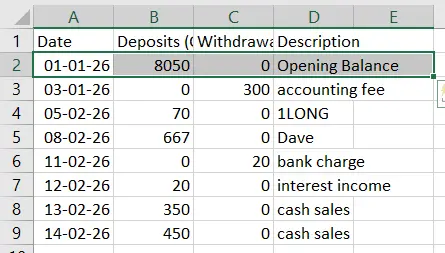
Once imported, the bank balance will be calculated automatically and displayed as shown below.
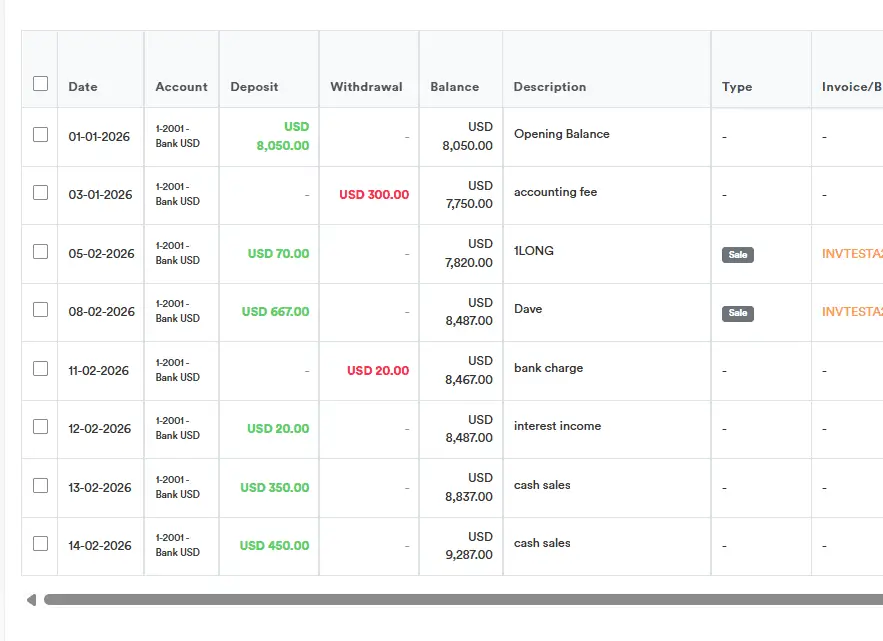
You can also choose to add a single bank line manually instead of importing it by clicking the “Add New Bank Line” button at the top right. Once you enter the details and click “Add Bank Line”, the new bank line will be added and displayed in the list.
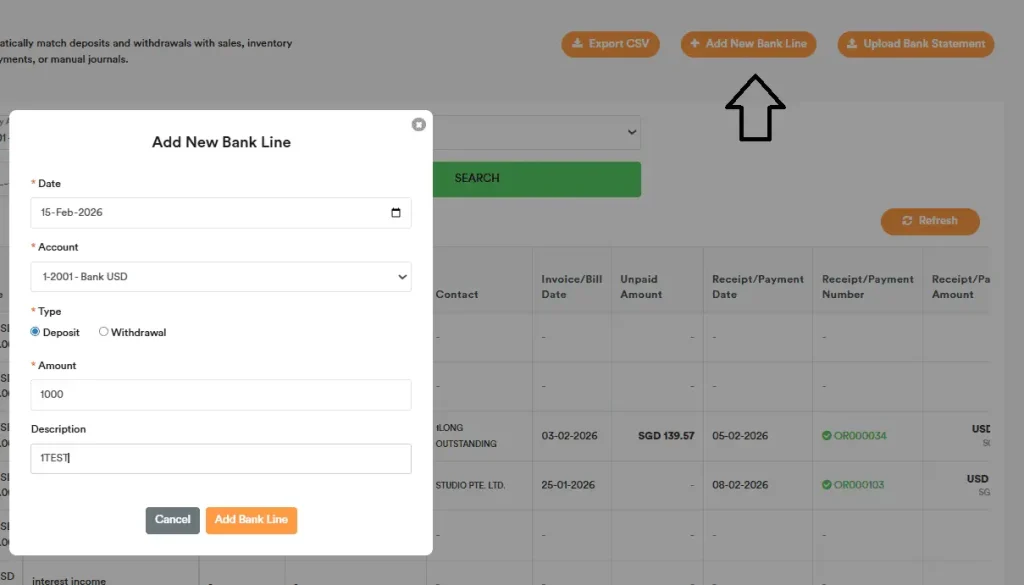
Matching Examples
Sample 1 – Opening Balance
You can scroll to the right and select “Add New Manual Journal” to record the opening balance.
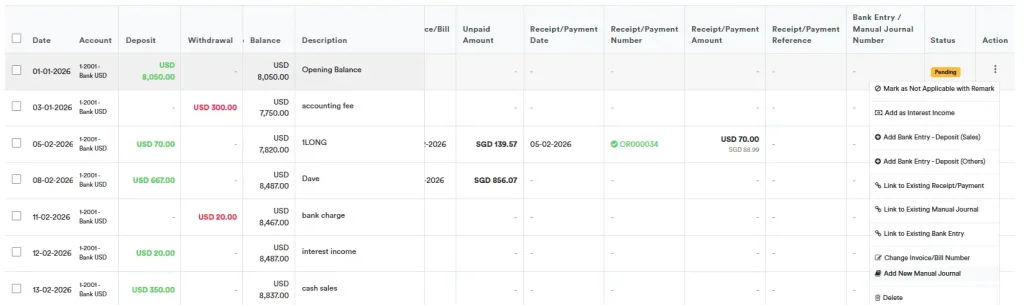
Once the manual journal has been created, click “Save Manual Journal” as shown below.
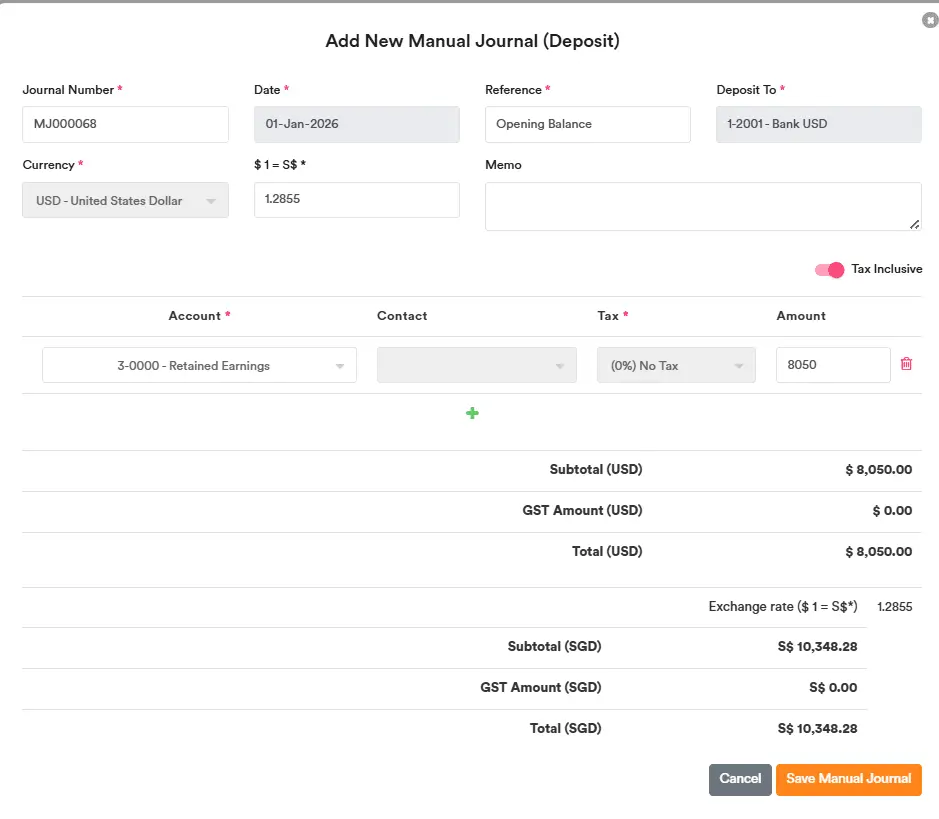
Sample 2 – Existing Payment Detected
The system has detected the related payment, and the status will be shown as ‘Created’. Please review the details to confirm that the match is correct. If it is correct, click “Matched Correctly”. The status will then change to ‘Matched’.

Sample 3 – Outstanding Invoice
There is no existing receipt, so the system tries to match the line to an outstanding invoice.
If it matches correctly, click ‘Create Receipt’.
If it is matched to the wrong invoice/bill, select Change Invoice/Bill Number and choose the correct one.
If you don’t want it to match anything, select Unmatch.

After you click Create Receipt, the relevant information will be populated automatically.
Fill in the Transaction Reference (if any).
Click Submit.
The status will then change to ‘Matched’
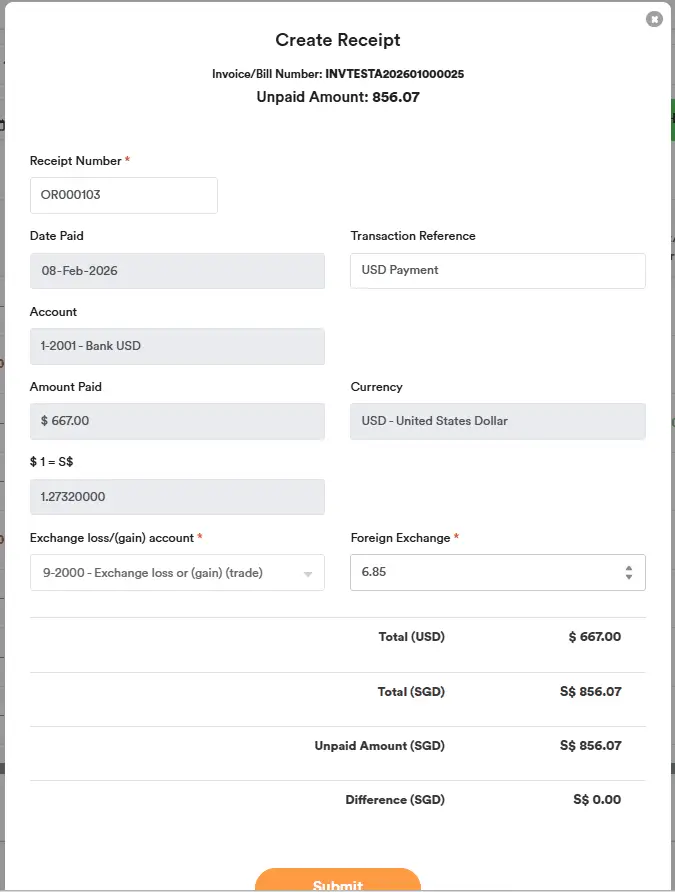
Sample 4 – Bank Charge
The line represents a bank charge.
You can select ‘Add as Bank Charge’, ‘Add New Bank Entry – Withdrawal’ or Link to Existing Bank Entry / Manual Journal (if a relevant one has already been created).
In this example, we select “Add as Bank Charge”.
A form will appear:
Click Save Manual Journal, and it will be recorded.
Sample 5 – Bulk Creation
You can select multiple lines (they must be either withdrawals or deposits only — you can’t mix both — and they must be for the same bank account). Then click “Bulk Create Bank Entry.”
Select the Entry Context and enter a Contact (if applicable). Choose the Account (e.g., Sales Income). Fill in the Reference for each line, then click “Create Bank Entries.”
Each selected line will create its own bank entry.
Sample 6 – Multiple Items for a Bank Transaction
If a single receipt applies to multiple invoices, use the ‘Add Another Link’ function to add all related items.
When the total amount matches the bank deposit amount exactly, the status will appear as Matched. If the total amount does not match, the status will appear as Mismatch.

In the example below, the total amount matches the bank deposit amount, so the status is shown as Matched.

Sample 7 – Transfer Funds Between Bank Accounts
We want to transfer SGD1,000 to a USD bank account. First, select “Add Bank Entry – Withdrawal (Others)”.

Fill in the required details and submit the bank entry.
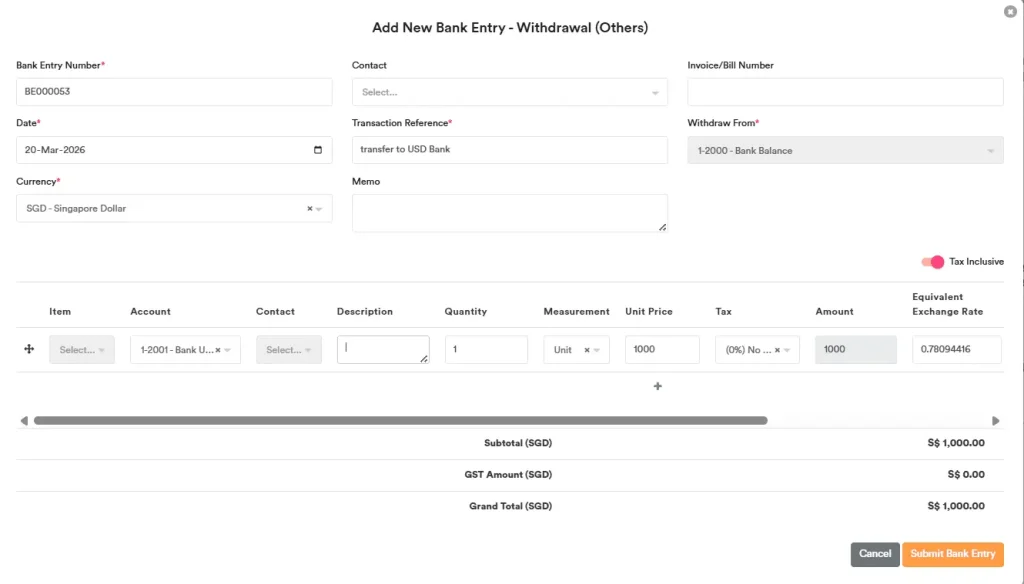
Next, go to the USD Bank. On the line where the funds are received, select “Link to Existing Bank Entry” under Action.
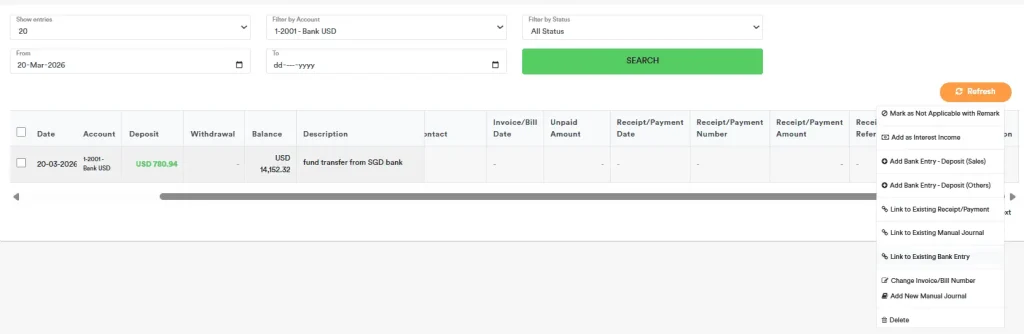
Then, select the bank entry that was just created.
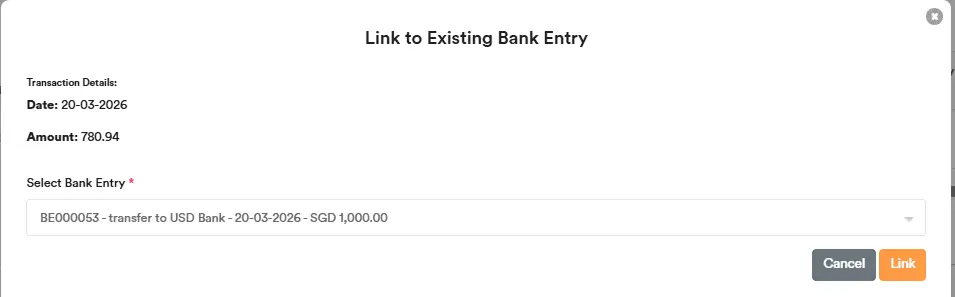
A prompt will appear. Click OK, and the entry will be linked.
![]()
Bank Reconciliation Automation
First, you need to enter the transaction into the account (e.g., payment received or payment made). Then, you can import the bank statement, and it will automatically match and be marked as ‘tick’ if it corresponds correctly. You can see the detailed steps below.
You can import your bank statement in CSV format to automate the bank reconciliation process.

Select whether the bank account for reconciliation is in the home currency or a different currency to ensure the automatic matching is done correctly.
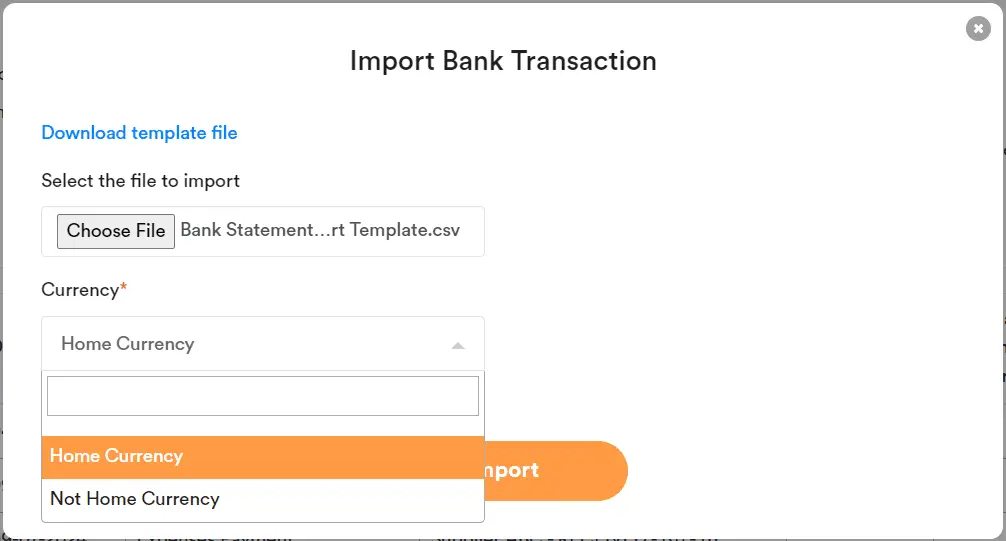
The system will automatically match and tick the entries that correspond. For unmatched entries, you can manually review and tick them. You can also save your work in progress and continue the bank reconciliation later.
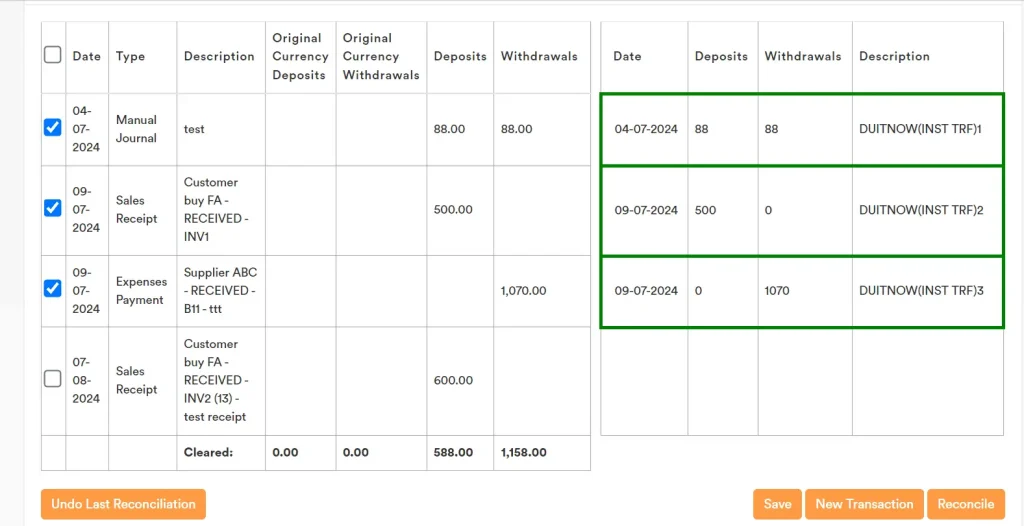
Before completing the bank reconciliation, first click the button in the top-right corner to export the Bank Reconciliation Report, which lists all reconciled and unreconciled items for your review. Once you’ve verified the report, click ‘Reconcile’ in the bottom-right corner to finalize the reconciliation and record it in the system.
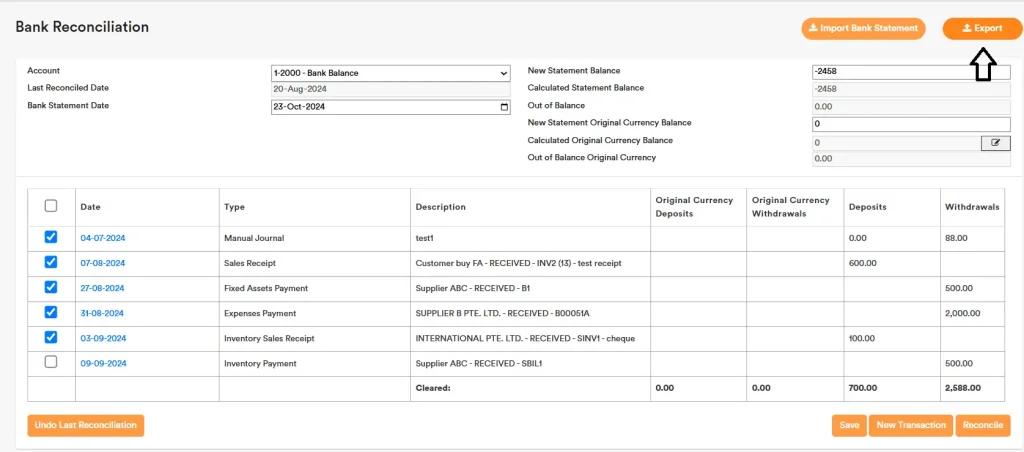
You can click Save to store your work in progress. The next time you select the same bank account, the previously saved partial work will be shown. However, if you change the Bank Statement Date for that account, the data will be refreshed and any saved information for that account will be cleared.
Bank Reconciliation – Modify or Delete Existing Records
After completing a bank reconciliation, you can click ‘Undo Last Reconciliation’ to delete the most recent reconciliation and redo it.
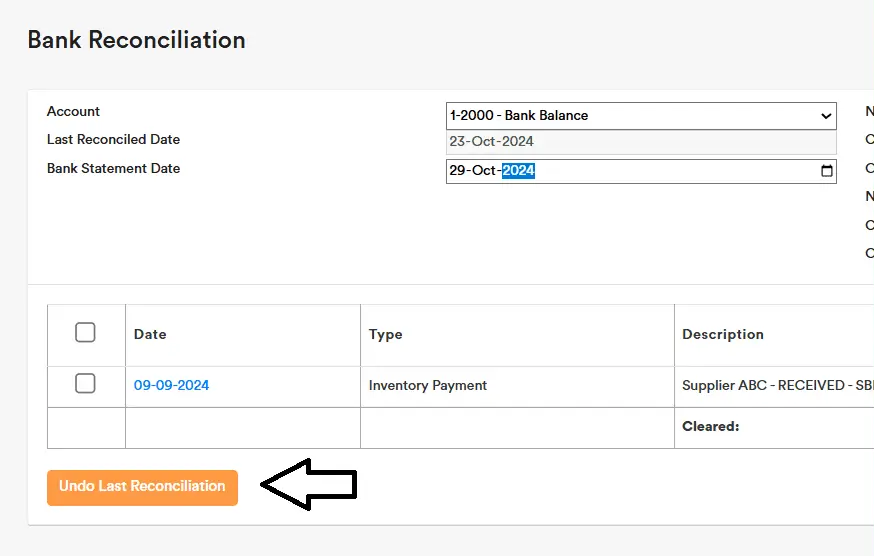
You can also open Bank Reconciliation History to edit a past reconciliation. Click Edit to make changes.
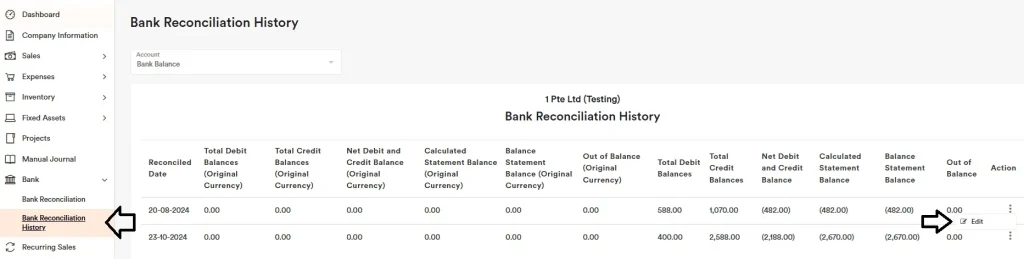
Reselect the bank reconciliation items you want and click Save. Remember to update the Bank Statement Balance (if applicable) so the reconciliation does not go out of balance.
Kindly note: when you edit any bank-related transactions, the amounts and details will automatically update in Bank Reconciliation History. If the reconciliation goes out of balance, an amount will be shown for your review and action.
Projects Recording
You can use the project module to keep track of your projects and calculate each project’s profit.
The completion percentage is calculated based on:
Expense Total Amount / Budgeted Cost
You can tag sales invoices and expense invoices to the project. Each sale and expense can be tagged to only one project.
Fixed Assets
Fixed Assets Recording
You can record fixed assets in the account via the ‘Fixed Assets’ module. All double entries will be automatically generated when you input the details and submit. Do not duplicate entries in the expenses module.
For the disposal of fixed assets, you can click Options → Dispose. All double entries, such as gain or loss on disposal, will be automatically generated based on the sales proceeds you enter.
Alternatively, you can record a fixed asset in the ‘All Expenses’ section. Please note that you cannot run the automatic depreciation function if you record it this way. You will need to post the depreciation adjustment manually via a journal entry.
Fixed Assets Accounts – Steps to add Chart of Account
1. you need create one main account and 2 accumulated account in below format
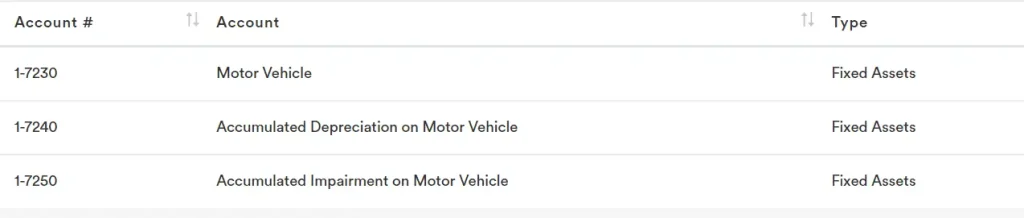
2. Click Motor Vehicle, then connect the 2 accumulated account created
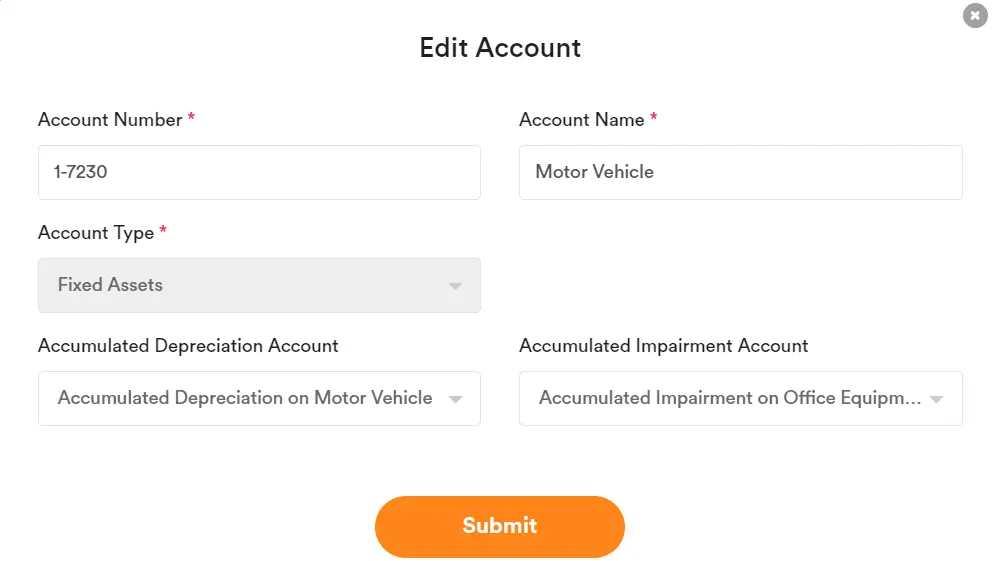
3. Then submit and will appear in Fixed Assets Module
Fixed Assets Depreciation Account
You can use the system’s default Depreciation account to record depreciation expenses. By default, this account is automatically selected when you create a fixed asset entry.
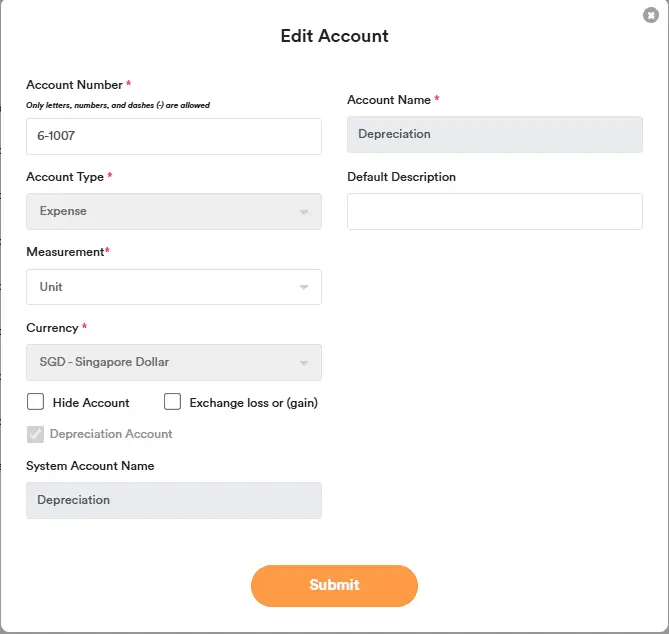
If you want depreciation to appear under Cost of Sales in your Profit & Loss report, you can create a new depreciation account as follows:
Create a new account.
- Set Type = Cost of Sales (or Expense).
- Tick “Depreciation Account”.
- Submit the account.
- After you submit, the “Depreciation Account” checkbox will be locked and cannot be changed.
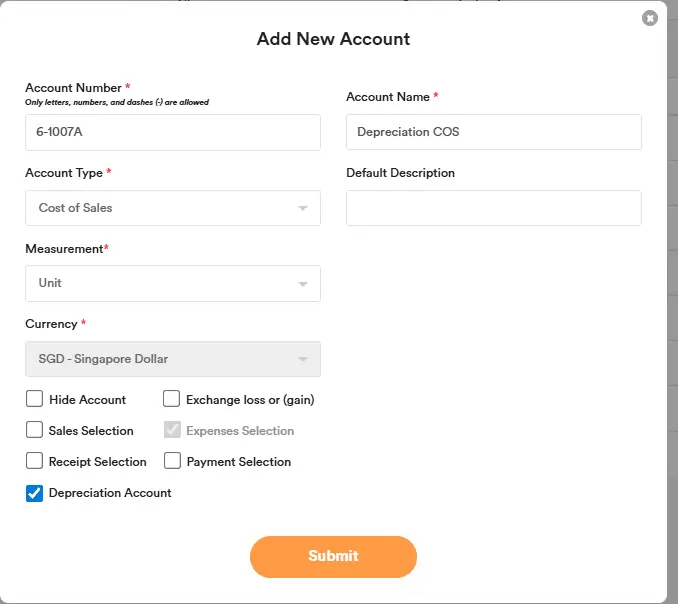
When recording a fixed asset, you can select this newly created depreciation account as the depreciation expense account. If depreciation has already been posted/run for the fixed asset, you cannot change the depreciation expense account for that asset.
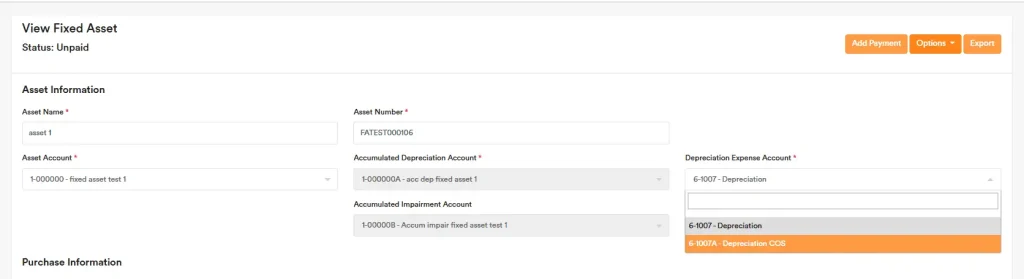
In the Profit & Loss report, the new depreciation account will appear under Cost of Sales.
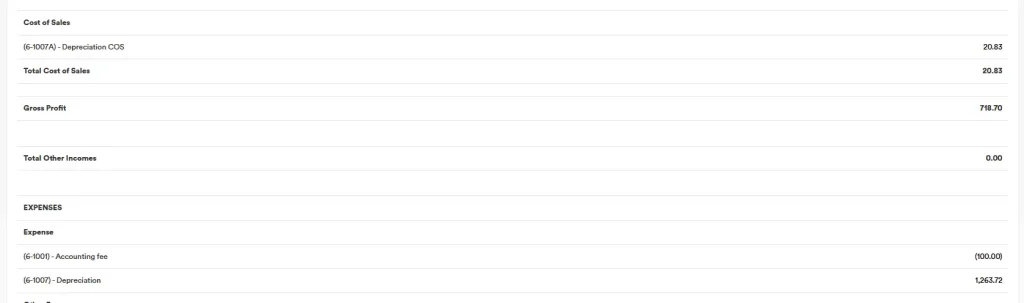
Fixed Assets Run Depreciation
Fixed asset depreciation is calculated on a monthly basis based on the asset cost, useful life, residual value, and depreciation start date entered for each asset.
Example:
Asset cost: $2,580
Residual Value: $0
Useful life: 10 years
Monthly depreciation: ($2,580 – $0) ÷ 10 ÷ 12 = $21.50
If depreciation starts in June, the depreciation for that year would be:
$21.50 × 7 months = $150.50
(June to December)
The final amount may vary depending on the year-end cut-off and the depreciation start date configured for the asset.
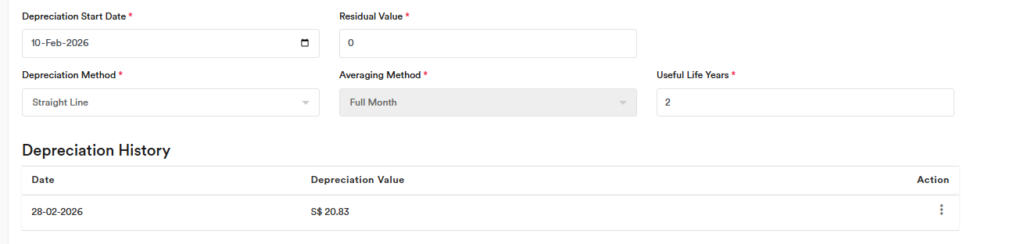
You can go to “Run Depreciation” module to automatically calculate depreciation.
You can automatically run the double-entry depreciation record by entering the period ‘To’ and click “DEPRECIATE” for you to run the depreciation entry for the fixed assets entered into the software.
You can rollback incorrectly run depreciation by clicking ‘Rollback Depreciation’.
Important Note: Residual value (also called salvage value) is the estimated value of an asset at the end of its useful life—what you expect it could be sold for or kept as. Residual value is usually set to 0. If the residual value is the same as the asset’s cost or net book value, depreciation will not run.
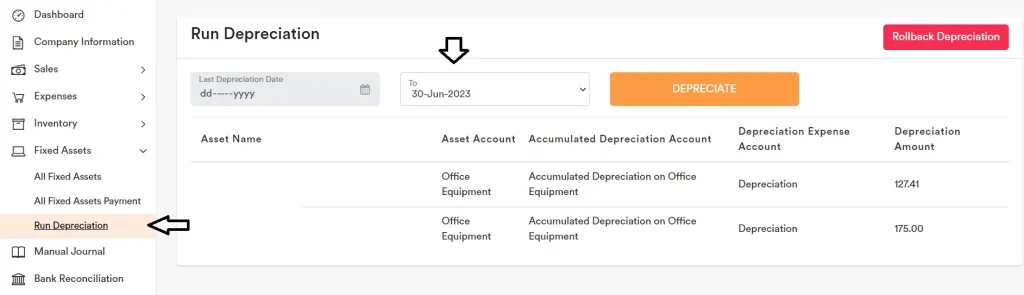
You can use the following Account to record for Related Parties, such as Director, Subsidiary, Related Company and etc balances.
1-5100 Supplier Related Parties
2-3100 Customer Related Parties
Example, You can create contact “Director A” – Other Receivables, then it will show when you select “2-3100 Customer Related Parties”
Expenses Paid on Behalf by Director
When a director pays an expense on behalf of the company, you can record it as follows:
First, create a contact named “Director Account.”
When recording the payment for the expense, select the account 1-5100 Supplier Related Parties and choose the contact “Director Account”
This records the expense as being paid on behalf of the company by the director.
Multi-Currency
Foreign Exchange Currency Setup
You can refer to the steps in ‘Customise Plan (How to Create a New Company)’. First, add the company’s Home Currency (functional currency). You may select any currency; the first currency you select will be treated as the Home Currency (also known as the functional currency).
If you are subscribed to the Premium Plan, AI Account will set up the Home Currency for you when we create the company at sign-up.
Note: Once set, the Home Currency cannot be changed. If the company needs to change its Home Currency, a new company must be created and the data migrated as opening balances.
You can view currency details at ‘Settings’ → ‘Currencies’.
For any foreign currency you no longer need, select Action ‘Hide’ to remove it from selection. It will move to the ‘Hide Currencies’ tab.
When preparing consolidated accounts, any entity with a foreign functional currency must be translated into the reporting currency for consolidation, with exchange differences recognised in equity. For details, see ‘Consolidation Account Automation’.
Kindly ensure a separate bank account , or separate contact be created for different currencies so you can do bank reconciliation, or keep track of your foreign currency customer and supplier clearer.
For foreign currencies other than the home currency, try to group the same foreign currency in a separate account. Avoid mixing different foreign currencies in one account as it can lead to incorrect calculations of the original currency.
For year-end exchange gains and losses (foreign currency revaluation) on foreign currency balance sheet items, you can record them with a manual journal entry in the home currency.
Foreign Exchange – Set Your Own Exchange Rate
You can go to Exchange Rate Settings and set your own exchange rate for any period you want. Then, when you enter data, the selected date range will follow your preferred exchange rate.
Foreign Exchange Chart of Account Setup
When entering transactions, you can select the desired foreign currency (make sure to add the foreign currency first in Settings → Currencies).
For each chart of account with the types listed below, you can select the desired currency. By default, the home currency is used.
- If you select a foreign currency (for example, USD), then:
When you create a transaction and choose an account that is set to USD, the transaction currency will automatically change to USD; or - You will only be able to select that account when the transaction currency is USD.
This helps prevent other currencies from being mixed into an account that is designated for a specific foreign currency.
Applicable account types:
- Bank
- Current Assets
- Current Liabilities
- Non-current Liabilities
- Non-current Assets
- Customer Deposits
- Supplier Deposits
Note: System accounts are locked to the home currency and cannot be changed.
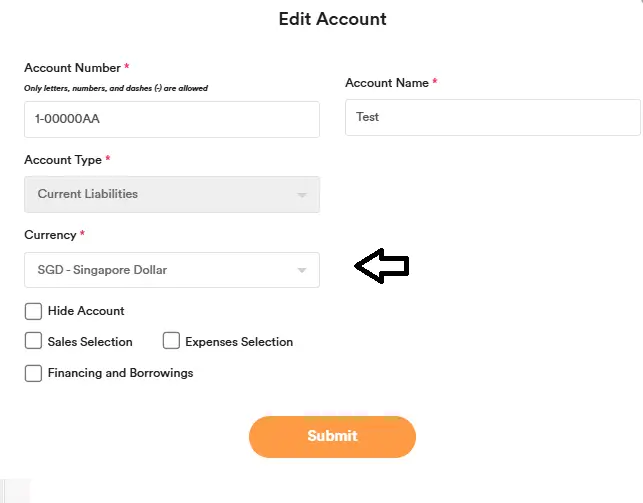
Foreign Exchange Currency – Year-End Revaluation
Video Guide on Forex Revaluation Automation
If you want to use your own unrealised exchange gain or loss account instead of the system default account, go to the Chart of Accounts, create the account you want, and tick “Exchange loss or (gain) – Unrealised”. Once this option is selected, the account will become available for use in the Forex Revaluation module.
You can process unrealised foreign currency exchange gains or losses automatically through the Forex Revaluation module.
To begin, go to the Forex Revaluation module and click Add New Entry. This will start the process of creating your unrealised exchange gain or loss entry.
Notes:
Unrealised exchange gains or losses can be processed in two ways:
- by account balance, or
- invoice by invoice (optional)
If you choose the invoice-by-invoice method, you must first run “Unpaid Amount in Foreign Currency (Optional)”, followed by “Accounts in Foreign Currency”.
In Accounts in Foreign Currency, select the ending date to view all balance sheet accounts with non-zero foreign currency balances, then generate the adjustment. The system will automatically create the unrealised exchange gain or loss entries in your home currency. These year-end adjustment entries can be reversed in the following period after year end so that unrealised gains or losses are not double counted over time.
If you use Unpaid Amount in Foreign Currency, review the unpaid invoices listed, confirm the proposed exchange gain or loss adjustment line by line, and amend the exchange account if required before posting.
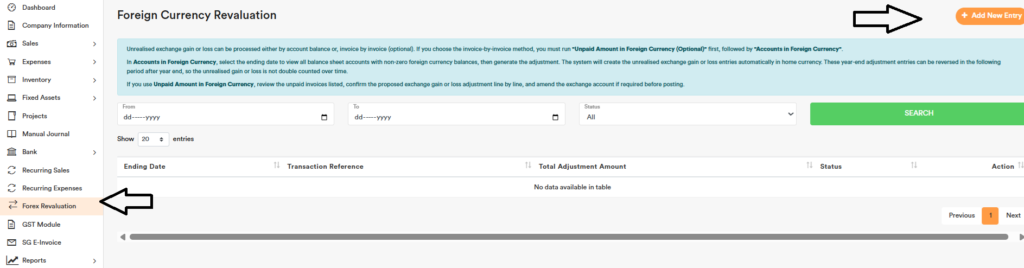
If you want to use your own unrealised exchange gain or loss account instead of the system default account, go to the Chart of Accounts, create the account you want, and tick “Exchange loss or (gain) – Unrealised”. Once this option is selected, the account will become available for use in the Forex Revaluation module.
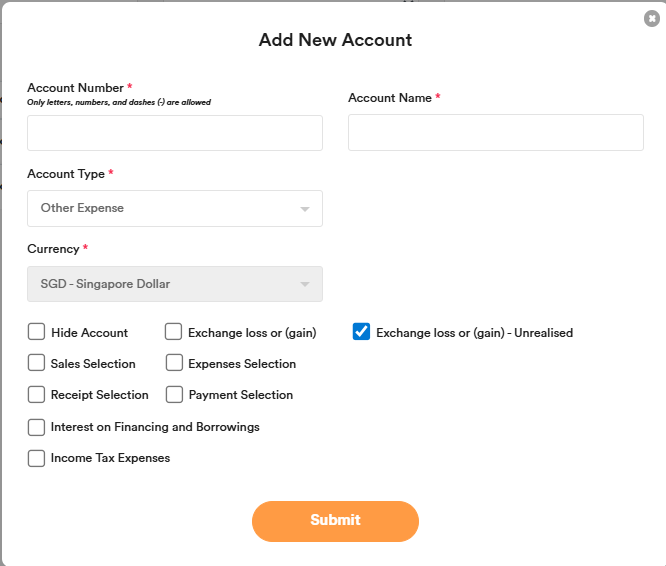
If there are balance sheet accounts that you do not want to include in the revaluation process, such as inventory, you can tick “Skip Foreign Currency Revaluation”. The system will then exclude those accounts from the automation.
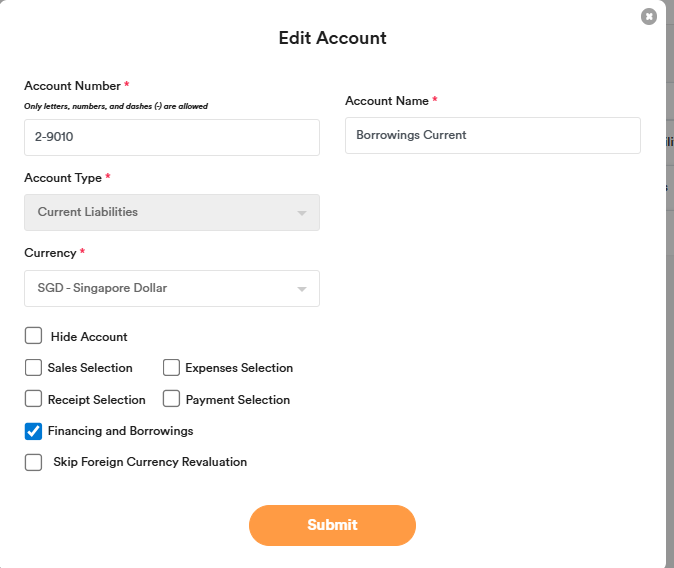
After clicking Add New Entry, you will see the screen below. Enter the ending date for the revaluation and click LOAD. Then select the accounts you want to process, or enter your own exchange rate if needed. You may also set your own daily exchange rate by following the guide “Foreign Exchange – Set Your Own Exchange Rate”. Click Submit to complete the entry.
After the entry is created, you can go to Action and select Reverse Entry to create a reversal entry on the future day. Alternatively, you may choose not to reverse the entry and instead adjust any differences in the subsequent period by the automation.
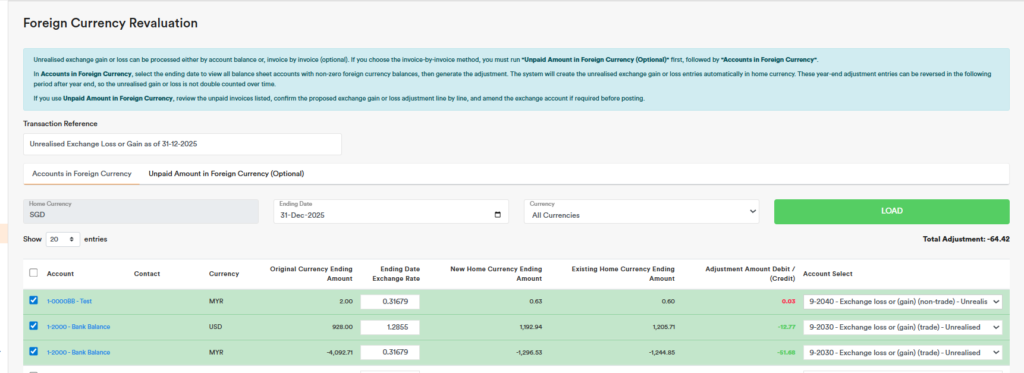
You may also choose the invoice-by-invoice method by ticking the relevant invoices and clicking Submit.
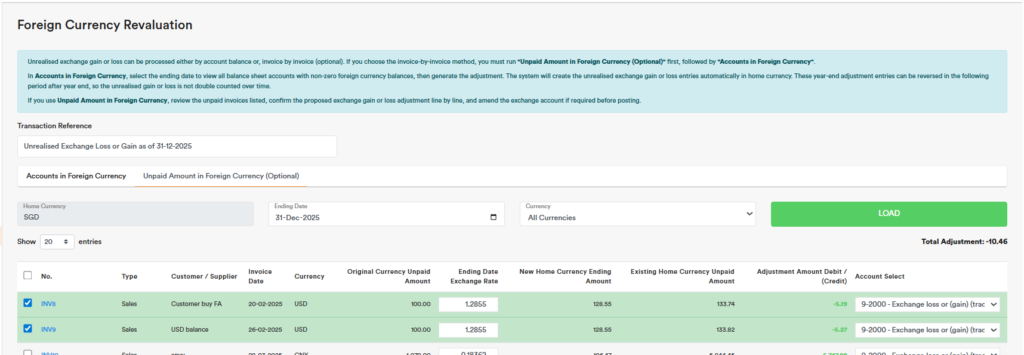
The system will then post the entry as a single payment or receipt under “Exchange Gain Loss Adjustment Only”. These entries cannot be reversed automatically. However, you can run the process again on the next day using a different exchange rate, and the system will adjust the balance again based on that day’s ending revalued amount.
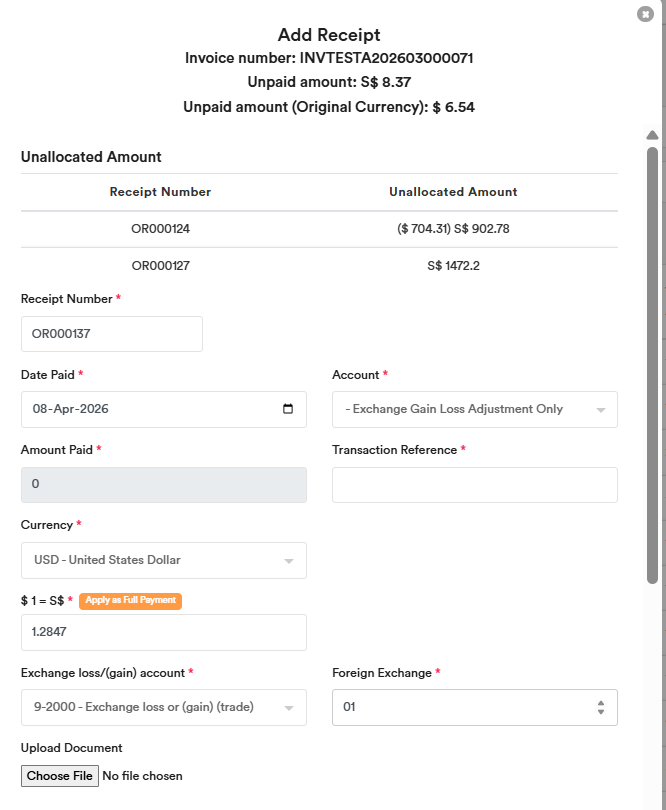
Below is the manual alternative method for consideration.
For year-end exchange gains and losses (foreign currency revaluation) on foreign currency balance sheet items, you can record them with a manual journal entry in the home currency.
Example:
Generate the general ledger for the foreign-currency account. In this example, the closing balance on 31 Dec 2025 is US$500.
If the year-end exchange rate is 1.29, the SGD equivalent should be SGD 645.00.
The account currently shows SGD 669.10, you need to recognise an unrealised exchange loss of SGD 24.10 (669.10 − 645.00).
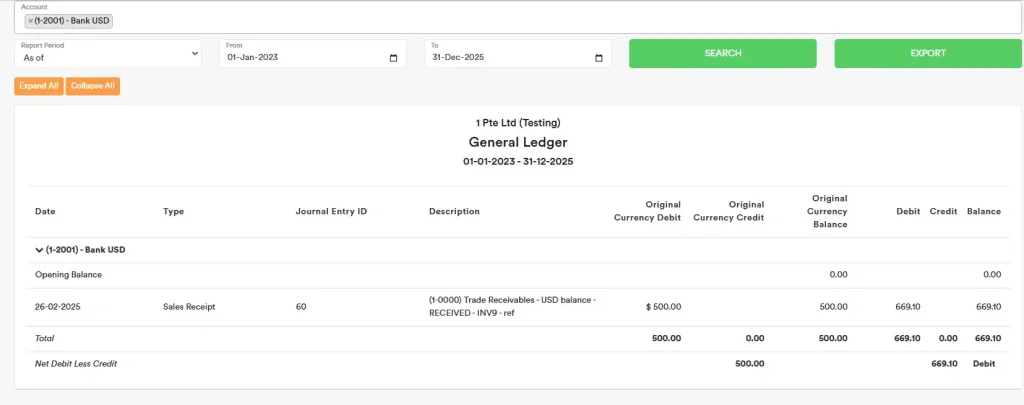
Journal entry (home currency):
Dr Unrealised exchange loss (P&L) — SGD 24.10
Cr USD bank (revaluation) — SGD 24.10

After posting, the general ledger will reflect the correct SGD-converted amount at year-end (SGD 645.00) while the foreign-currency balance remains US$500.
Note: If the book value is below the revalued amount, reverse the entry (Dr the USD account; Cr Unrealised exchange gain).
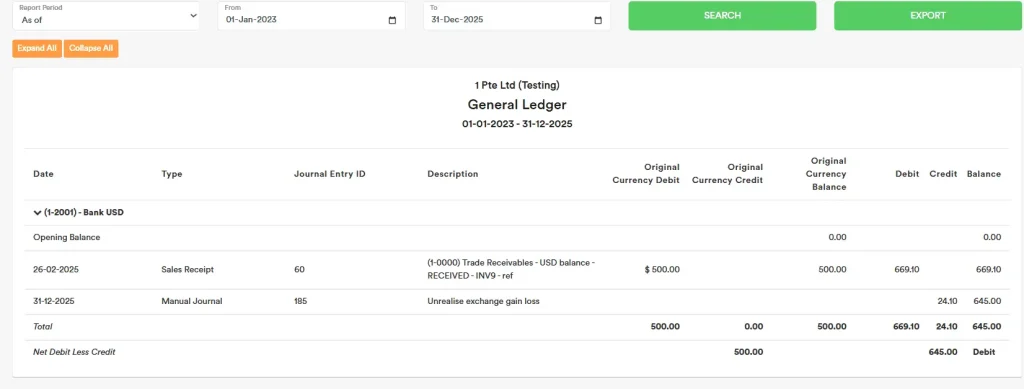
For unpaid foreign-currency sales, the transactions will appear as ‘Unpaid’ in the Sales Listing. The outstanding amount represents a foreign-currency trade receivable that must be revalued at year-end. To record the exchange gain/loss adjustment, click Add Receipt.

Select the ‘Exchange Gain Loss Adjustment Only’ account, enter the foreign exchange gain or loss amount, and click Submit. The sales transaction will then be revalued to the year-end amount.
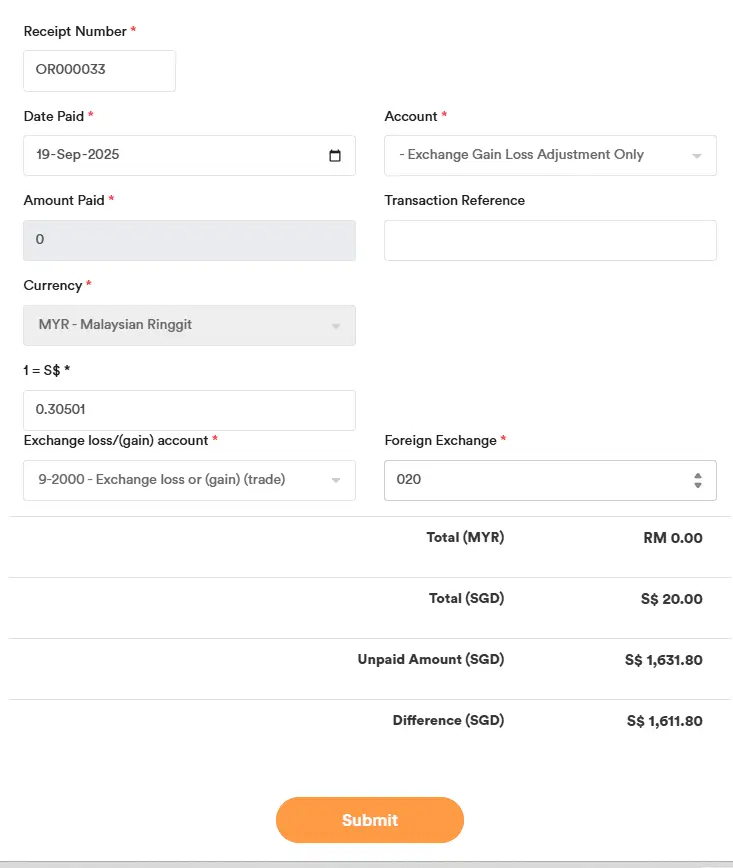
The expense transaction can be revalued to the year-end amount in a similar way.
Alternative method
Alternatively, you can go to General Ledger and/or General Ledger (Contact) and filter by Currency Code (e.g., USD) to generate a report in that foreign currency only. This lets you quickly identify all accounts with USD balances. Export the report, calculate the total unrealised exchange gain/loss based on the year-end rate, and then post the adjustment via a manual journal entry.
This approach is especially helpful for accounts with mixed currencies (e.g., trade receivables). When you filter for USD, only the USD portion is shown—so you can calculate the unrealised gain/loss on a total USD balance basis, rather than revaluing each transaction individually.
However, please note that if you filter by USD, you will not see the journal entry for unrealised exchange gain or loss. This is because the adjustment is recorded in the home currency rather than in USD. You should therefore also check whether any unrealised exchange gain or loss adjustment was posted previously. In most cases, these entries should be reversed after year-end so that each year’s unrealised gain or loss is calculated separately. This helps prevent the adjustment from being double counted in the following year.

Foreign Currency Transaction Recording
When entering transactions, you can select the desired foreign currency (make sure to add the foreign currency first in Settings → Currencies).
The exchange rate is automatically generated by the system based on the transaction date, but you can overwrite it by entering your preferred exchange rate.
When invoicing and recording payment in the same foreign currency, the system will automatically calculate the exchange gain or loss. Any difference between the exchange rate at the time of invoicing and at the time of payment will be posted as a foreign exchange gain or loss.
If you make a local currency payment and the amount exceeds the foreign currency invoice (after conversion), the difference will be posted as an exchange gain or loss. If the payment is less than the converted invoice amount, it will be recorded as a partial payment of the invoice.
Foreign Currency Transaction Recording – Sales Transaction
For every sales transaction, you can set the original transaction currency (label in the screen). The default is the home currency.
When you change this to a foreign currency, the exchange rate appears and is automatically generated based on the rate for the date you entered. This exchange rate is used to convert the foreign currency into the home currency for double entry purposes.
When you select the home currency, you can use any account under Revenue Account (in any currency).
When you select a foreign currency, you can only choose Revenue accounts that are either in the home currency or in the same foreign currency. For example, if you select CNY, you can select accounts in SGD (home currency) or CNY. If an account is in USD, you cannot select it as a Revenue account. This prevents mixing different foreign currencies.
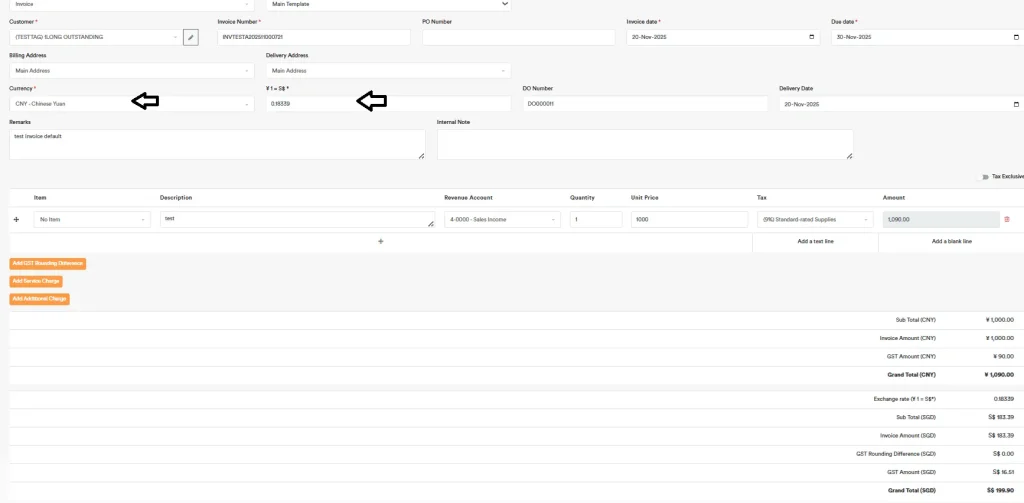
Assume you now want to pay this CNY invoice using USD bank:
In the field marked 1, the USD payment is converted into the home currency to post the payment’s double entry.
In the field marked 2 (“Equivalent Currency”), the currency is used to convert the payment currency (USD) into the original sales currency so that Trade Receivables can be reduced in its original currency (CNY in this case).
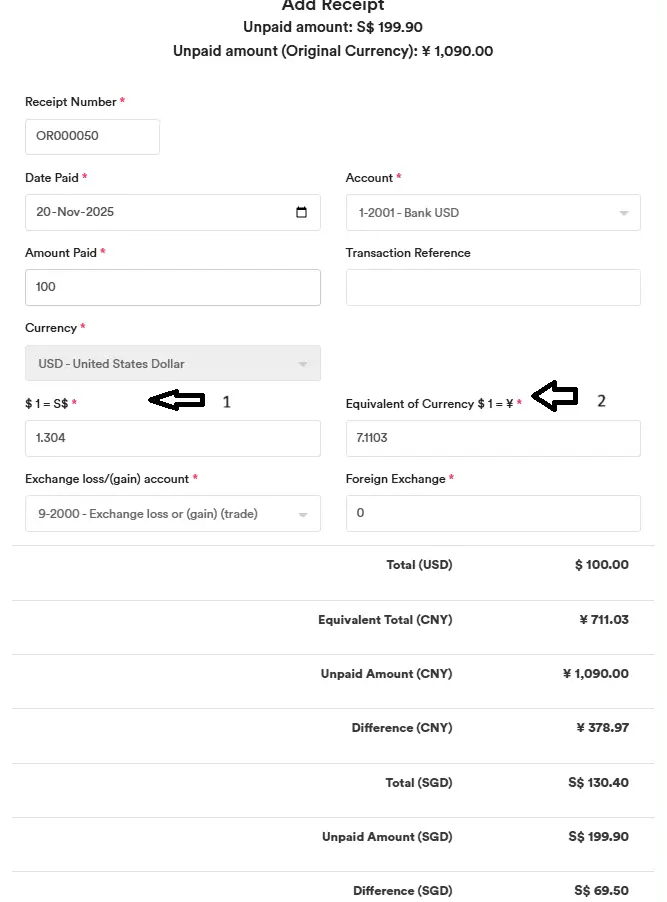
In the General Ledger, the Original Currency column shows the foreign currency, if any. If the transaction is in the home currency, this column will be blank for that line.
In the example below:
The Trade Receivable entry is posted in Chinese Yuan because the original invoice is in CNY.
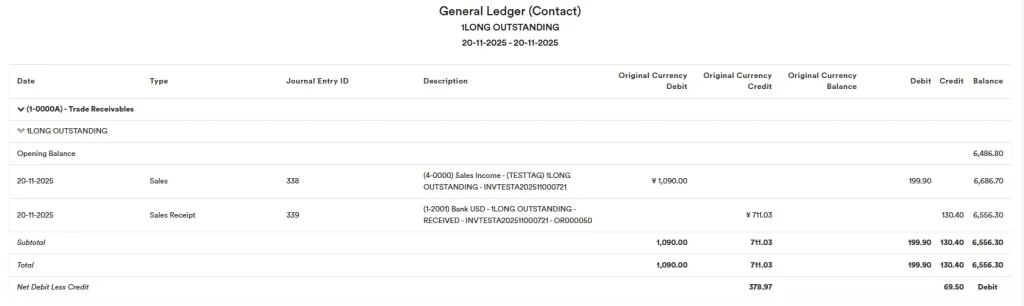
The Bank USD payment entry is posted in USD because the Equivalent Currency is set to USD.
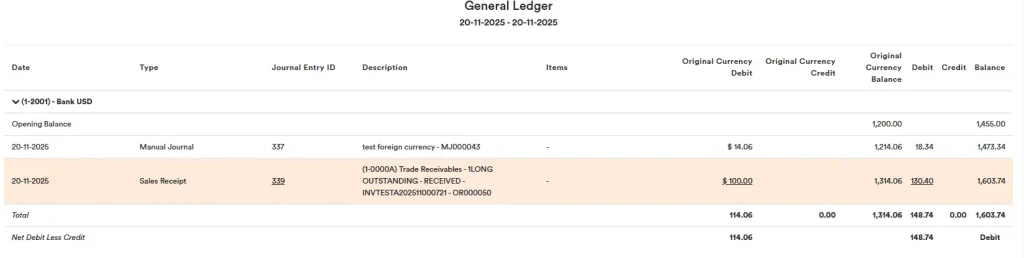
Foreign Currency Overpayment Warning – How to Resolve
This invoice is issued in CNY, but you are recording the receipt in SGD.
Because of currency conversion, the system must convert your SGD amount paid into CNY equivalent using the exchange rate you enter. This is to check how much of the CNY invoice is being paid.
What happens in your example
- Remaining unpaid (CNY): ¥239.80
- Remaining unpaid (SGD equivalent): S$44.12
- You entered payment: S$50.00
- With the exchange rate, S$50.00 = ¥272.31
- Since ¥272.31 is more than ¥239.80, the system shows this warning: “Amount paid cannot be greater than remaining unpaid amount.”
The difference you see (e.g., Difference (CNY) -¥32.51 / Difference (SGD) -S$5.88) is caused by the exchange rate and conversion.
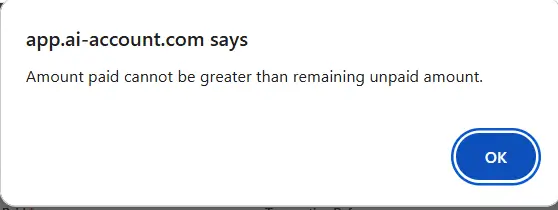
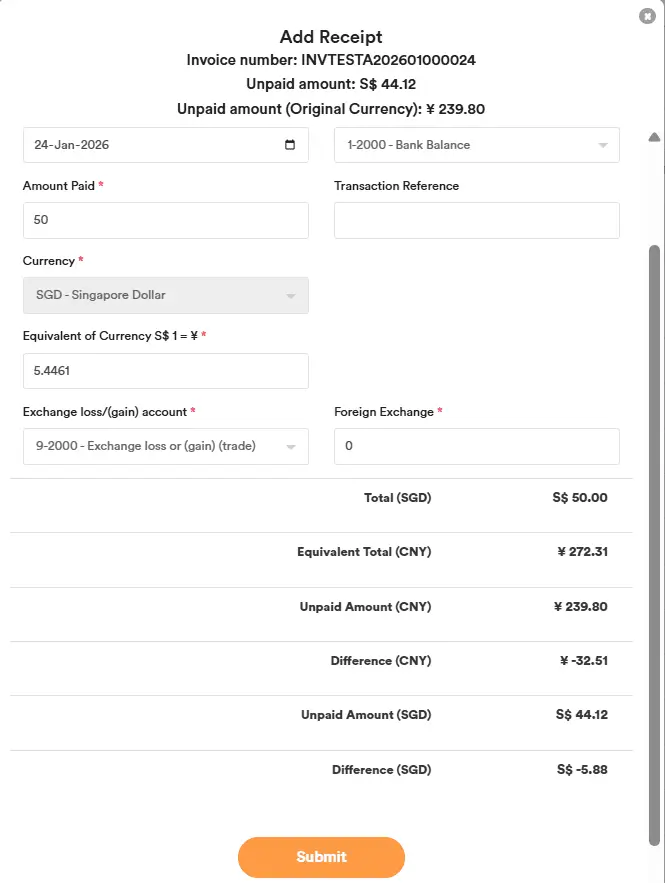
How to fix the Foreign Currency Overpayment Warning
This invoice is in CNY, but you are paying and recording the receipt in SGD.
To submit successfully, the system converts your SGD amount into CNY equivalent using the exchange rate you enter. The CNY equivalent must match (or not exceed) the remaining unpaid CNY amount.
Scenario A: S$50 is the full payment
If S$50 is the exact full amount received, you should adjust the exchange rate so that:
Equivalent Total (CNY) = Unpaid Amount (CNY)
 Example (like the screenshot):
- Amount Paid: S$50
- Unpaid Amount (CNY): ¥239.80
- Set exchange rate so S$50 converts to ¥239.80 (the system will show Difference = 0.00)
- Because S$50 (your bank amount) may not match the invoice’s SGD equivalent (e.g., S$44.12) after conversion, the difference will be recorded under “Foreign Exchange” as an exchange gain/loss.
Result:
- Invoice is fully closed
- Any currency difference is captured in Foreign Exchange (and posted to the exchange gain/loss account)
Scenario B: S$50 is NOT fully for this invoice
If S$50 includes extra money (e.g., customer paid more, or you want to keep the balance as credit), then you should:
- Record only the amount needed to settle the invoice (based on the correct exchange rate), and submit.
- Record the remaining amount as a separate receipt (via bank entry) to the Client Deposit account (or Customer Deposit / Advance Payment account).
Why: The system does not allow paying more than the remaining unpaid amount for the invoice. Any extra should be stored as a customer credit/deposit for future invoices.
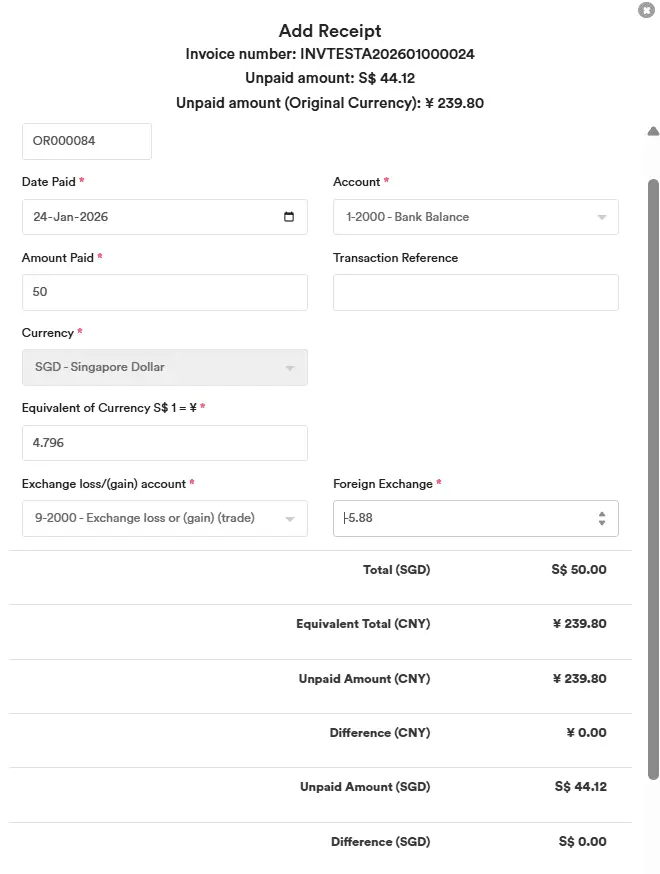
Foreign Currency Transaction Recording – Manual Journal
For every manual journal transaction, you can set the original transaction currency (label 1 in the screen). The default is the home currency.
When you change this to a foreign currency, the exchange rate appears and is automatically generated based on the rate for the date you entered. This exchange rate is used to convert the foreign currency into the home currency for double entry purposes.
By default, each new line will use the currency defined in the chart of accounts for that specific account.
In the field marked 2 (“Currency Equivalent”), the currency refers to the chart of account currency. You can change this if needed. For example, if it is a USD bank account, even when the transaction is recorded in Chinese Yuan, you can still post to this USD bank account in USD and use the equivalent exchange rate.
When the home currency is selected in field 2, no foreign currency is involved and the equivalent amount will automatically be zero.
When the currency selected in field 2 is the same as the currency in field 1, the exchange rate defaults to 1 because they are the same currency.
![]()
In the General Ledger, the Original Currency column shows the foreign currency, if any. If the transaction is in the home currency, this column will be blank for that line.
In the example below:
The Bank USD entry is posted in USD because the Currency Equivalent is set to USD.
The Cash in hand entry is posted in Chinese Yuan because the Currency Equivalent is set to CNY.
The double entry can be found in the Journal Report, as shown below in the home currency.

Foreign Currency Transaction Recording – Correcting Original Currency
Some old transactions may have been recorded with the wrong original currency amount, and you may not want to go back and amend each one individually.
For example, assume a trade receivable has an incorrect original currency balance. It is currently showing a balance of USD 8.70, but we actually want it to show USD 12.70. In other words, we need to increase the debit by USD 4.00.
You can post a manual journal entry, as shown below, to adjust the original currency amount.

After this, the general ledger you generate will show the correct original currency balance.
In this way, you adjust the original (foreign) currency amount while keeping the home currency amount unchanged.
Year End Closing or Change of Year End
You can go to Settings, and select Financial Settings
Input the New Start Date, New Year End Date, and Lock Date so the periods closed cannot change.
You can also fill up the lock date for any cut off date you want to lock the accounting period.
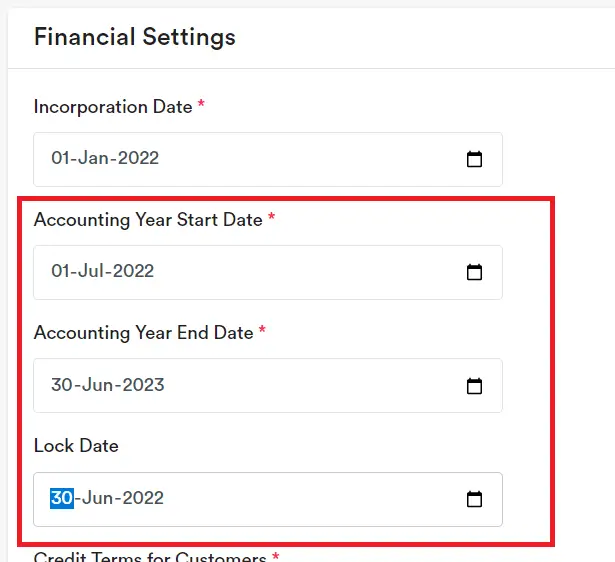
Click Save

Email Center
Send quotes, sales invoices, and official receipts to your customers directly from AI Account. You can also email purchase orders to your suppliers to place orders straight from the system.
Visibility settings
In Settings, you can set a ‘Hide Before Date’ for Quotes, Sales Invoices, Official Receipts, and Purchase Orders.
For example, if you enter 31 July 2025 in Quote Settings, any quotes dated before 31 July 2025 will be hidden from the Quotes tab and won’t be available to email.
Email defaults
In Quote Settings, Sales Settings, Official Receipt Settings, and Purchase Order Settings, you can configure:
- Email subject
- Email body
- Reply-To email (the address that appears when recipients click “Reply”)
- CC email (addresses to copy on outgoing messages)

Example
Sending from the ‘Sales’ tab
Select the sales records you want to email to your customer, or mark them as Not Applicable if you don’t want to send an email.
Click ‘Mail All Pending Sales’ to send emails for all items with Pending status that have a valid email address.
If a Status shows ‘Invalid Email’, it means the contact doesn’t have an email address. Edit the contact to add a valid email and the status will update.

Emails will automatically include a PDF attachment for quotes, invoices, official receipts, and purchase orders. To customize the PDF templates (such as the invoice header, quote footer, or other details), go to the settings menu under:
- Quote Settings
- Invoice Settings
- Inventory Sale Quote Settings
- Inventory Sale Invoice Settings
- Purchase Order Settings
- Inventory Purchase Order Settings
- Official Receipt Settings
Email Center – Statement of Account
You can send a Statement of Account to your client using the Email Center.
First, go to ‘Statement of Account Settings’ and choose the template format you want to use when sending the Statement of Account from the Email Center.
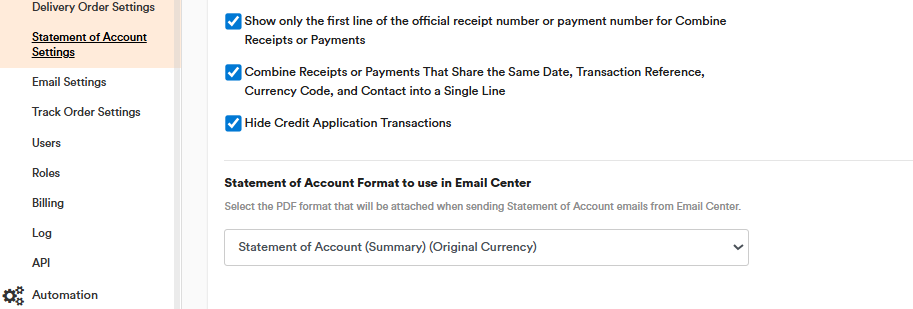
Go to Email Center → Statement of Account Settings tab. Here, you can set your email template, Reply-to Email, and CC Email. You can also tick Attach outstanding invoices with the Statement of Account. When enabled, outstanding invoices will be sent as separate attachments in the email.

Next, go to the Statement of Account tab. Select the account, such as Trade Receivables, and choose the period for which you want to send the Statement of Account to your customer. Then, click ‘Create Statement of Account’.
If the same contact has transactions in different currencies, the system will split them into separate Statements of Account.
The status will show as Pending if the Statement of Account has not been sent yet. You can click the orange Mail All Pending button to send all pending Statements of Account at one time.

Alternatively, you can select the specific Statements of Account you want to send and click ‘Mail Selected’. If you do not want to send a particular Statement of Account, you can mark it as Not Applicable. Then, click Send Selected to send the selected Statements of Account to your customers.
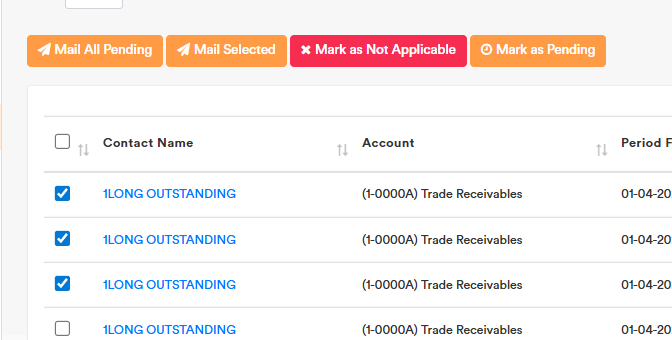
Once sent, the status will be updated to Sent.

When you close the page and come back later, the system will remember the Sent status if you select the same period again. However, if you choose a different period, the status will change back to Pending.
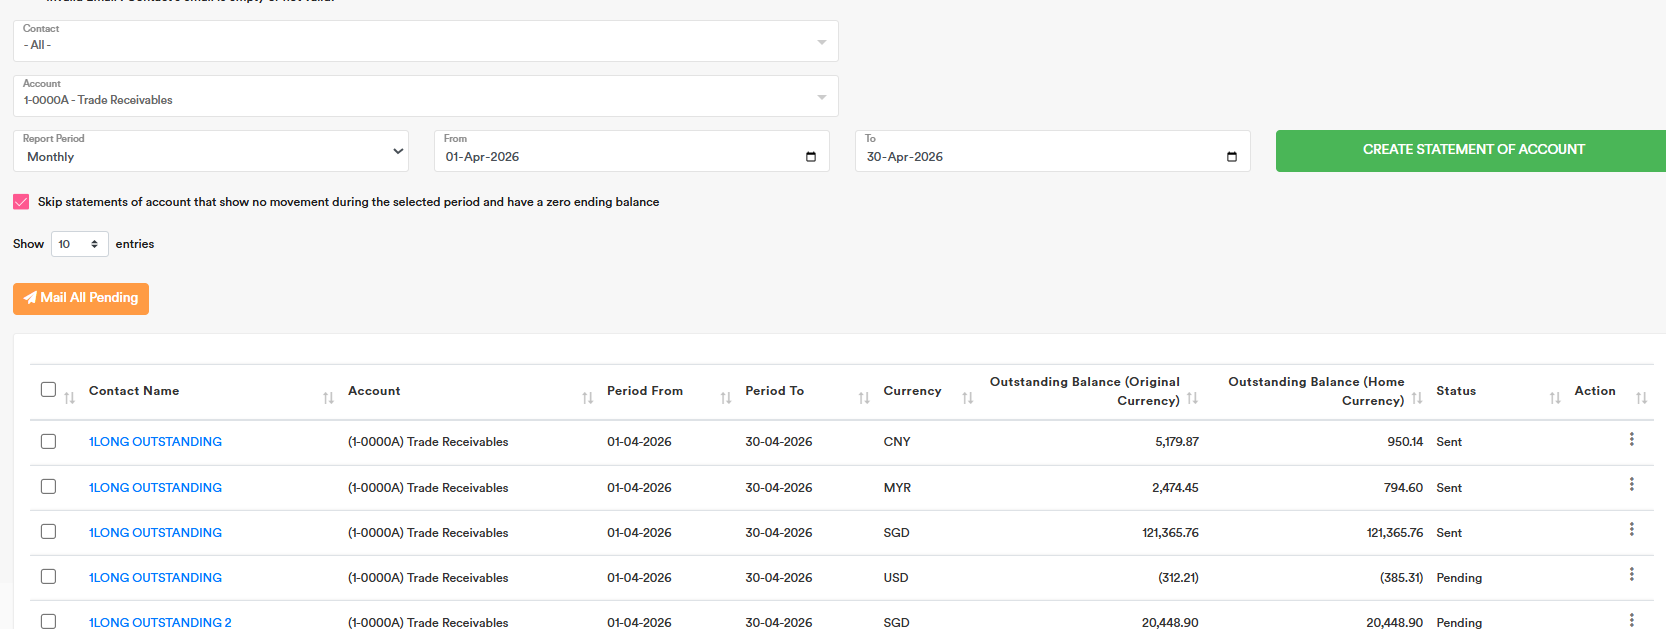
Upload and Manage Supporting Files
In the section below, you can upload supporting documents when you create a transaction. This feature is available for:
- All Sales
- All Expenses
- All Inventory Sales
- All Inventory Purchases
- All Fixed Assets
- All Manual Journal Entries
- All Bank Entries
You can upload more than one file. Each uploaded file is limited to 5 MB. If your PDF is too large, you can use free online tools to optimise the file size, or split it into multiple files before uploading.
You can preview the uploaded file and download it from our software whenever needed.
Example
First, create the transaction and click Submit. After submission, you will see the Manage Files button. Click Manage Files.
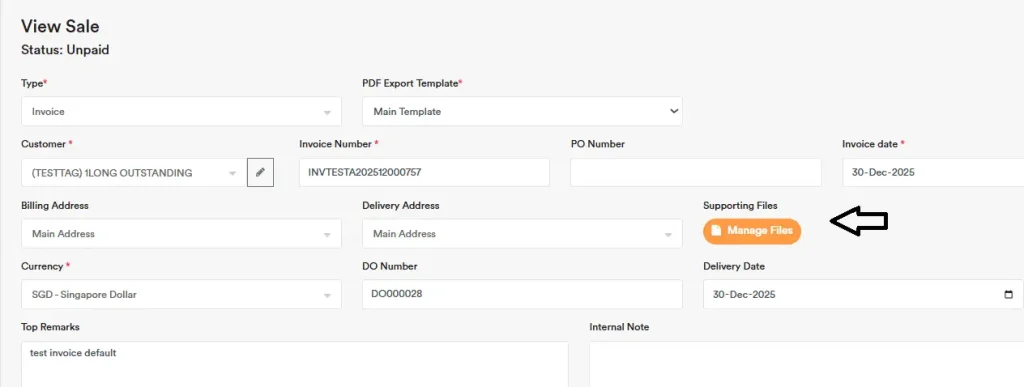
Click Upload File to upload your documents.
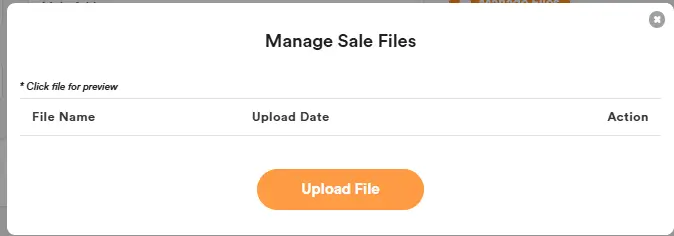
After uploading:
- Click the File Name to preview the file.
- Click Action to download the file or delete it if needed.
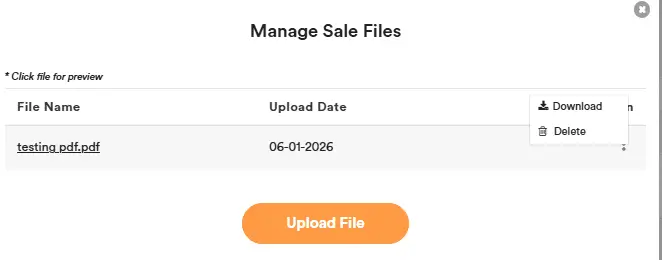
Track Order
The Track Order function allows users to monitor order fulfilment by batch after a transaction has been created. Users can enter one or more Track Order records for each transaction.

Users can click Track Order from a transaction and create one or more track order records. Each record can include:
- Item
- Description
- Quantity
- Track Order Date
- Track Order Number
- Track Order Remarks
Each track order record can generate a Track Order Report, similar to the Delivery Order format.
The report template can be updated in ‘Track Order Settings’. In this setting, users can create multiple templates and set a default template for each supported module. The initial default template can be Main Template. Users can also set the prefix number in Track Order Settings.

The total quantity across all track order records cannot exceed the original transaction quantity.
You can update the Track Order labels in Language Settings using the labels Track Order Name and Track Order Number.
Track Order should be available for:
- Quotes
- Sales
- Purchase Orders
- Expenses
- Inventory Sales Quotes
- Inventory Sales
- Inventory Purchase Orders
- Inventory Purchases
Software Settings
You can adjust the settings in the sections below:
Financial Settings
Update the ‘Accounting Year Start Date’ and ‘Accounting Year End Date’ each year after the accounts have been closed. For example, after closing the accounts for December 31, 2022, update the ‘Accounting Year Start Date’ to January 1, 2023, and the ‘Accounting Year End Date’ to December 31, 2023. Set the ‘Lock Date’ to December 31, 2022, to lock entries on or before this date, making them non-editable. You can also update the ‘Credit Terms for Customers’ and ‘Credit Terms for Suppliers’ in this section.
** You can update the credit terms for each customer or supplier under ‘Contacts’ if needed. Any contacts without updates will use the default credit terms specified in the financial settings. **
You can tick “Mark Description Field Optional” and Save. Then, in the All Quotes, All Sales, All Purchase Orders, and All Expenses sections, the description field will become optional to fill in.
![]()
You can untick “Transaction Reference is Optional” and Save. Then, in the All Quotes, All Sales, All Purchase Orders, and All Expenses sections, the Transaction Reference field will become compulsory to fill in.
![]()
You can set the default number of rows per page for each section by selecting your preferred row count in Financial Settings.
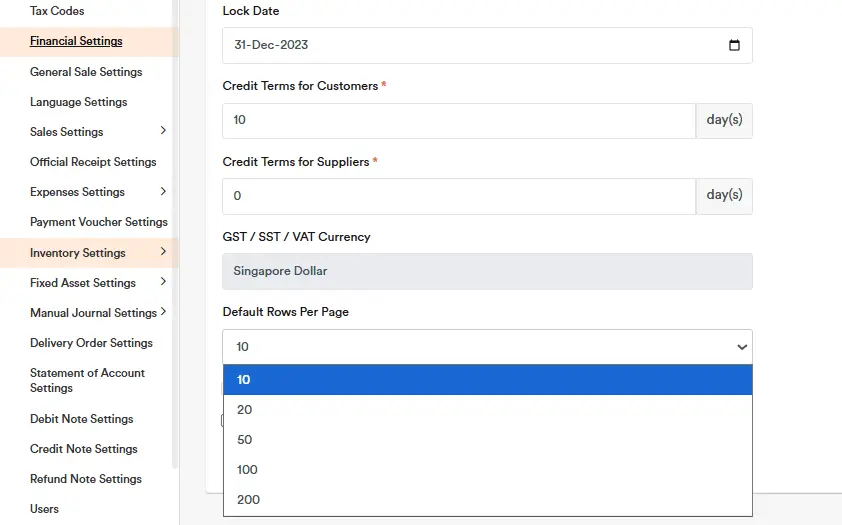
You can set the report’s date format by selecting your preferred Date Format in Financial Settings.

When you tick “Repeat Header Notes on every page” in Financial Settings and click Save, the Header Notes will be repeated on every page in each PDF export.
You can tick “Export PDFs as a single page” in Financial Settings and click Save. After that, reports such as tax invoices will be generated as one single long PDF page, and the header and footer will not repeat.

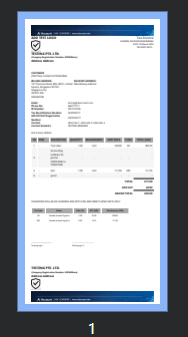
In Financial Settings, you can tick the option below, ‘Show Page Number at all PDF report export,’ to enable page numbers to appear at the bottom of exported PDF tax invoice reports.

Email Settings
You can configure your own SMTP email so that your own email address is used to send emails to your customers from the Email Center, or to email e-invoices to your customers. By default, this feature is disabled and emails are sent using our address: noreply@aiaccount.com
Please note: some email hosting providers set limits on how many emails you can send per day (for example, a maximum of 100 emails daily). If you use your own SMTP and reach this limit, you may see sending errors. In this case, you will need to check with your hosting provider or email service vendor to confirm your sending limits or request an increase.
Add New Users
1. First, go to Settings → Users
2. Click on “Add New User”
3. Enter the email address, select the user’s permissions, and click ‘Submit’ to complete the user addition process. The user should then visit the ‘First Time Login’ section to log in to their account and begin using the software.Permission ‘User’ will have full access to the account, Permission ‘Sales Only’ will restrict staff to the sales section only, Permission ‘Expenses Only’ will restrict staff to the expenses section only, and Permission ‘Read Only’ will allow staff to view the account without making modifications.
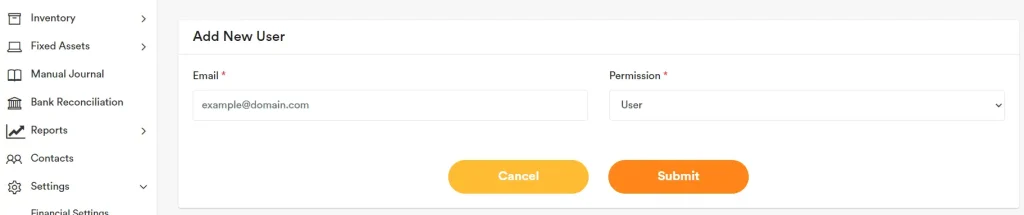
4. When a user is added, they will receive an invitation email from the AI Account.
5. If the user doesn’t receive the email, go to Action and click “Resend Invitation Email” to resend it.
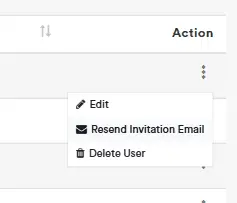
Add New User Roles
You can add your own custom user permission roles.
For example, go to “Roles” and click “Add New Role” at the top right corner.
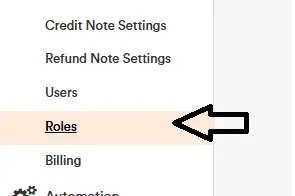
Enter a name for the new role, then tick the access level you want to grant (e.g. Full Access, Read Only). When you’re done, click Submit.
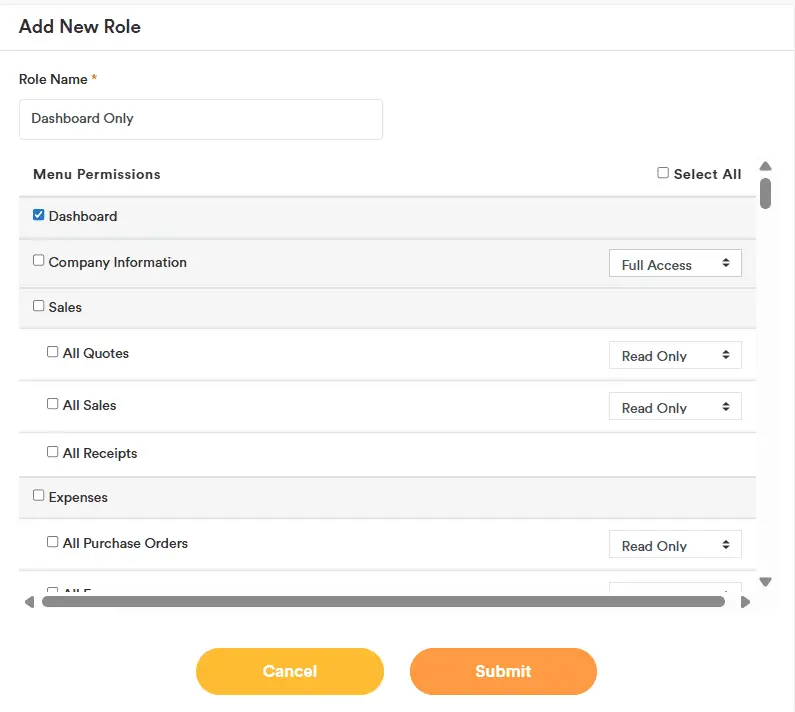
The new role will then be available for selection when you create a user.
User Log
Go to Settings → Log to view user logs.
The Group Admin and User role has full access and can view logs for all users.
To control access, go to User Roles and use Customise Role to grant either ‘Read Own User’ or ‘Read All Users’ permissions for a specific role.

Default Description Settings – Sales and Expenses
In “Settings” → “Accounts” , you can assign a default description to any account type classified as “Income”, “Cost of Sales”, or “Expense”. Once saved, this description will automatically appear whenever you select that account in a sales or expense transaction, eliminating the need to retype it each time.
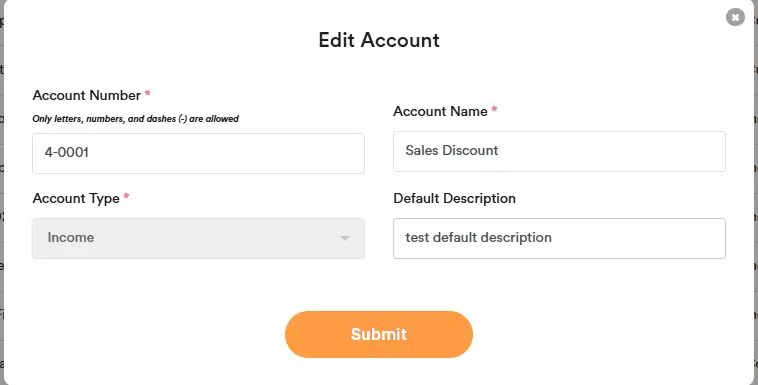
Default Tax Code and Pricing Settings – Sales
In “Settings” → “Accounts” , you can assign a default tax code and default pricing to any account type classified as “Income”. Once saved, this tax code and pricing will automatically appear whenever you select that account in a sales transaction, eliminating the need to retype it each time.
Default Description Settings – Inventory
In the Inventory List, select an item, enter a Default Description, and click Submit. Once saved, this description will automatically populate whenever you choose that item in any sales or purchase inventory transaction, so you no longer have to re-enter it each time.
Default Selling and Purchase Price Settings- Inventory
In the Inventory List, select an item, enter the Default Selling Price and Default Purchase Price, then click Submit. Once saved, the default selling price will automatically populate whenever you select that item in any sales inventory transaction, so you won’t need to re-enter it each time. Likewise, the default purchase price will automatically populate whenever you create a purchase transaction for that item.
Default Remarks
In the Purchase Order, Expenses (Bill Settings), Quotes and Sales settings, you can define a Default Remark at top and/or bottom that automatically appears whenever you create a new transaction. This field is useful for entering recurring details—for example, you might pre-fill it with:
“Courier slip number:
Courier vendor:”
Example, when you raise a quote or invoice, these lines will appear by default, allowing you to fill in the specific slip number and vendor, and they will be included in the exported PDF report.
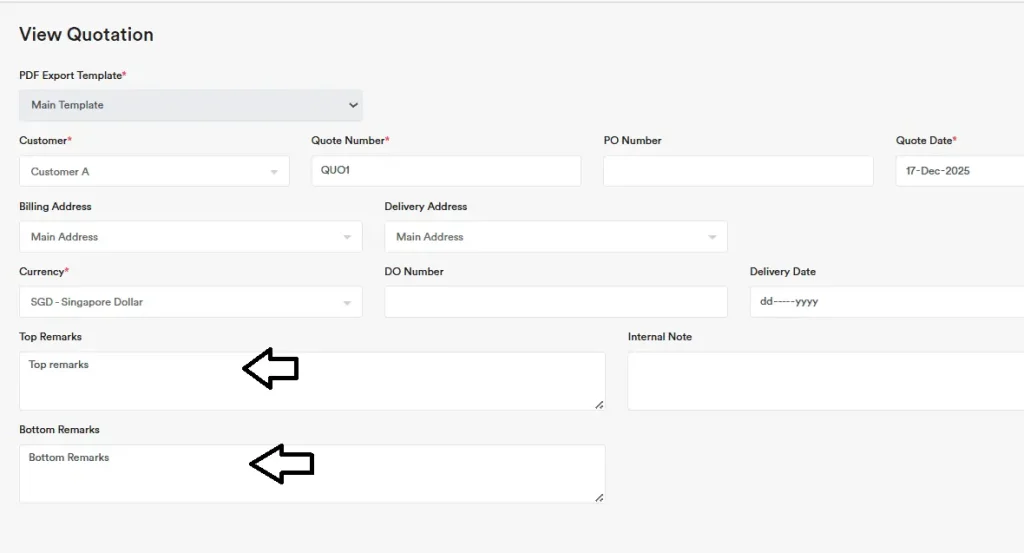
In the exported PDF report, the Top Notes, Bottom Notes, Top Remarks, and Bottom Remarks will appear in the highlighted section below.

Default Tax
You can select Default tax code use for Sales and Expenses
So when you input Sales or Expenses, the default tax you tick will show and you can save the time to select it.
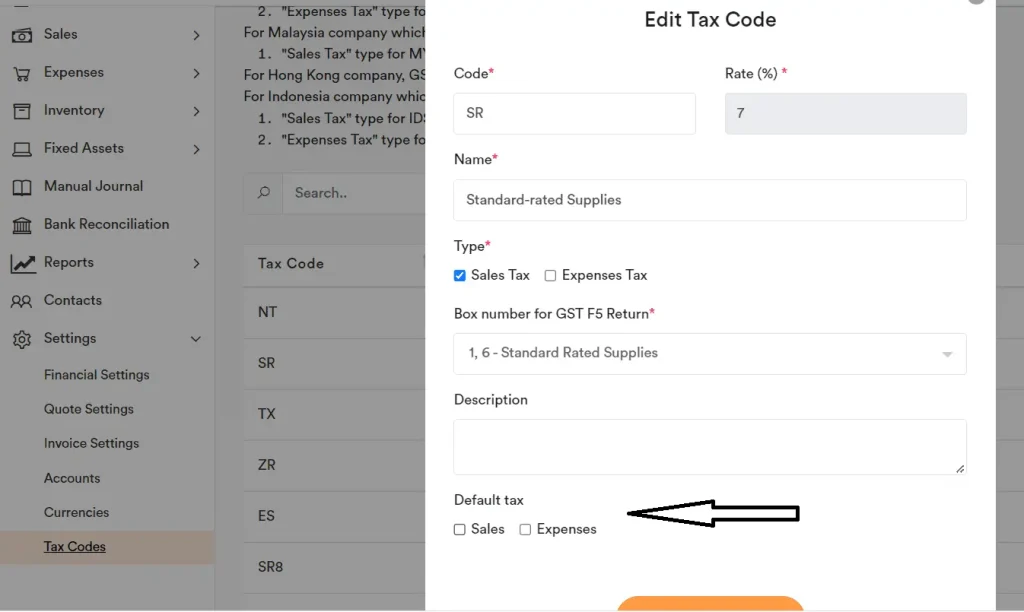
Top Notes and Bottom Notes Settings
Each settings section lets you control how the report’s Header, Top Notes, Bottom Notes and Footer are shown.
How to Add a Logo to an Invoice
For example, to edit Invoice Top Notes, go to Invoice Settings, update the content, adjust the font size, paste any image (Ctrl+V), and click Save. Tax Invoice will use your saved Top Notes.
You can also add your logo to different types of reports, such as invoices, quotations, and purchase orders. To do this, go to Financial Settings, scroll down to the section you want to update, for example Top Notes. After pasting your logo there, click “Copy the Top Notes to all sections of the Settings page”. This will apply the same Top Notes to all sections.
For the best appearance and alignment, it is recommended to place the Company Logo in the Top Notes section.
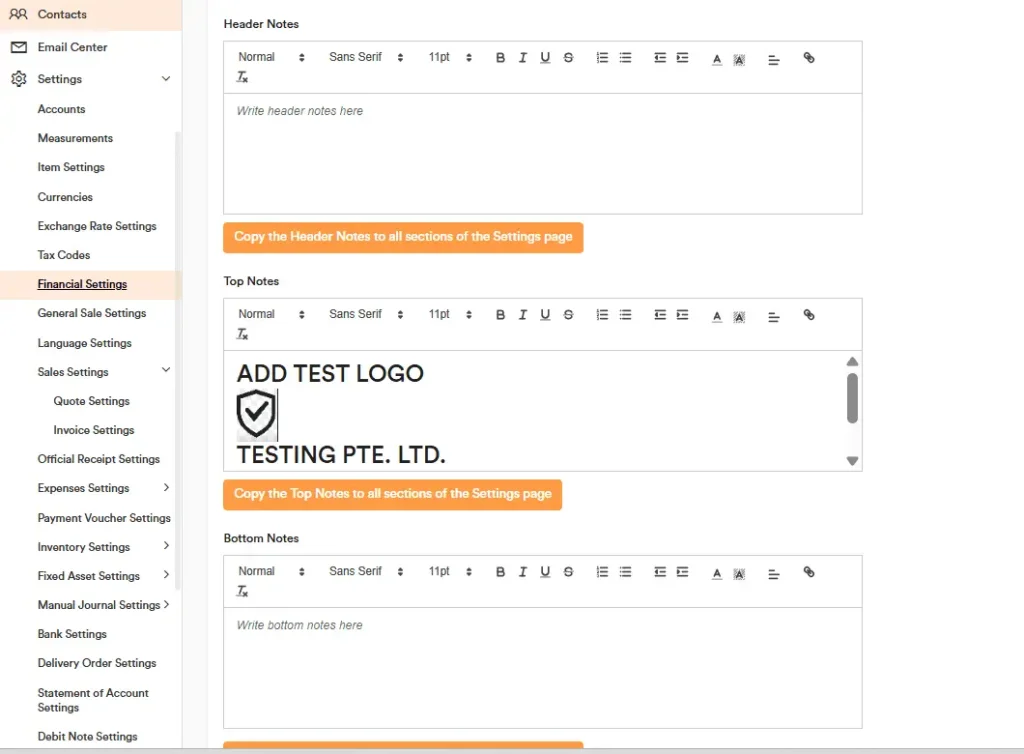
If a warning box appears, click OK.
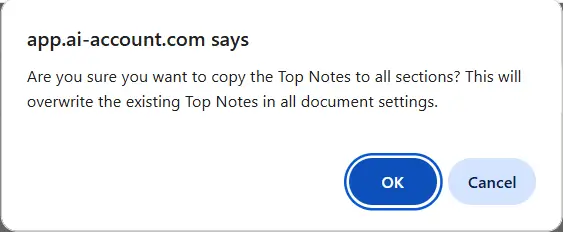
After that, the system will display a message confirming that the update was successful
Important about images
You cannot drag and drop or copy an image file directly into the Top Notes box.
Instead, you can:
1. Use the Screenshot function or Snipping Tool (in Windows) to capture the image you want, then press Ctrl + V to paste it into the Top Notes box.
2. Or, open the image in Paint app, select the part you want, press Ctrl + C to copy, and then press Ctrl + V to paste the logo or image into the Top Notes.
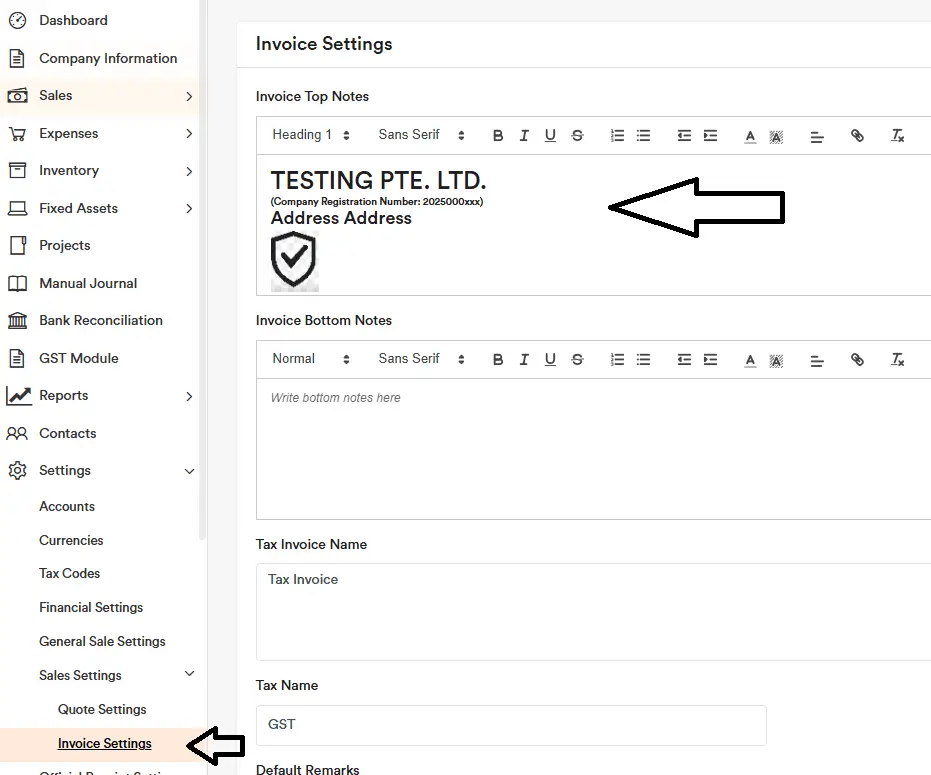
If you want finer layout control, design the Top Notes in Word, take a screenshot of the exact area you need.
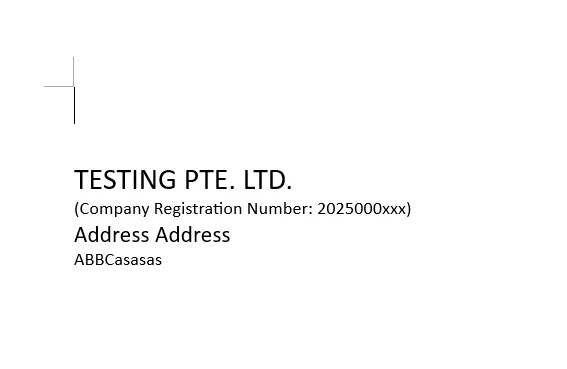
Then paste that image into Top Notes and click Save.
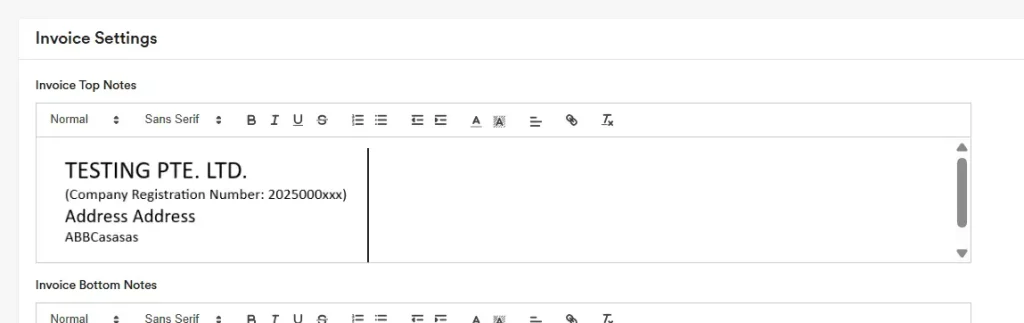
The generated Tax Invoice will display exactly as designed.
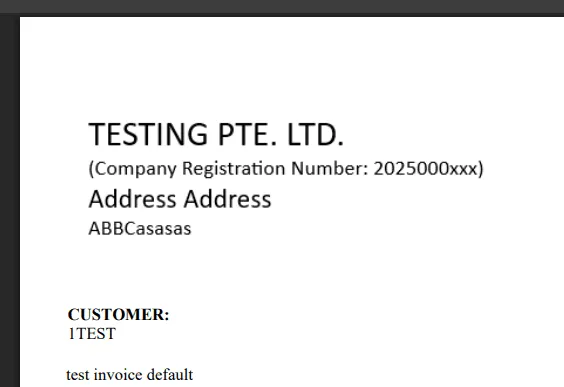
Similarly, you can configure Header Notes, Footer Notes, and Bottom Notes to appear at the bottom of the generated Tax Invoice.
In the exported PDF report, the Header Notes, Footer Notes, Top Notes, Bottom Notes, Top Remarks, and Bottom Remarks will appear in the highlighted section shown below.
If you want the Header Notes to appear at the top of every page, go to Financial Settings, tick “Repeat Header Notes on every page”, and click Save. The Header Notes will then be repeated on every page in each PDF export.
If you want the Footer Notes to appear at the bottom of every page, go to Financial Settings. From the Footer Notes Settings dropdown, select “Repeat Footer Notes on Every Exported PDF”, then click Save. The Footer Notes will then appear on every page of each exported PDF

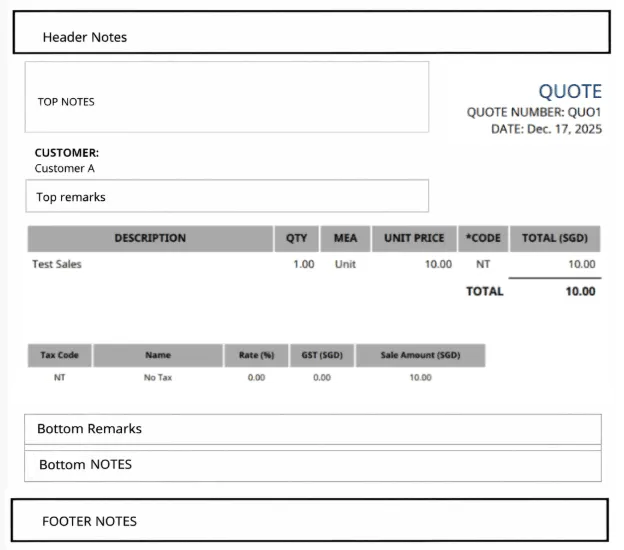
Tax Invoice Settings
You can generate “Tax Invoice” report on the top right corner of each Sales.

Go to Invoice Settings, you can update the below items which will reflect in the Tax Invoice report.
See the Top Notes and Bottom Notes Guide for details on customizing to your needs—such as adding an image to the top note or setting a specific font size.
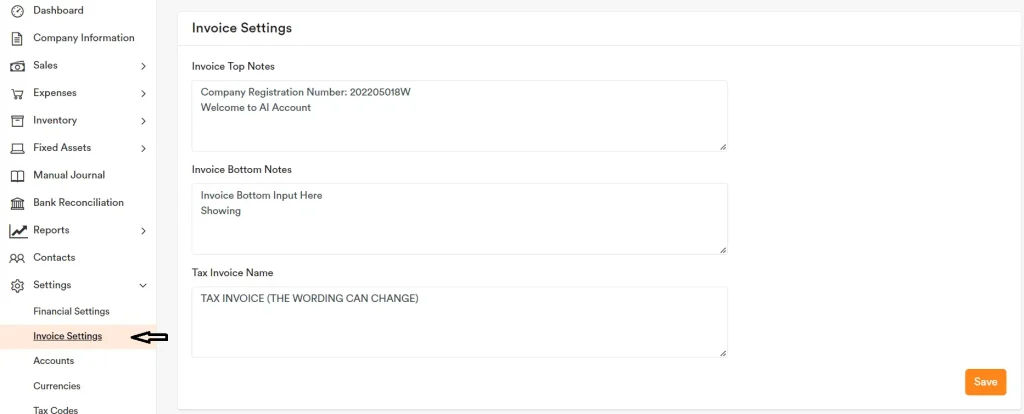
You can update the report label — for example, change ‘TAX INVOICE’ to ‘INVOICE’—in Language Settings.
Sample Report how it will be displayed in Tax Invoice Report
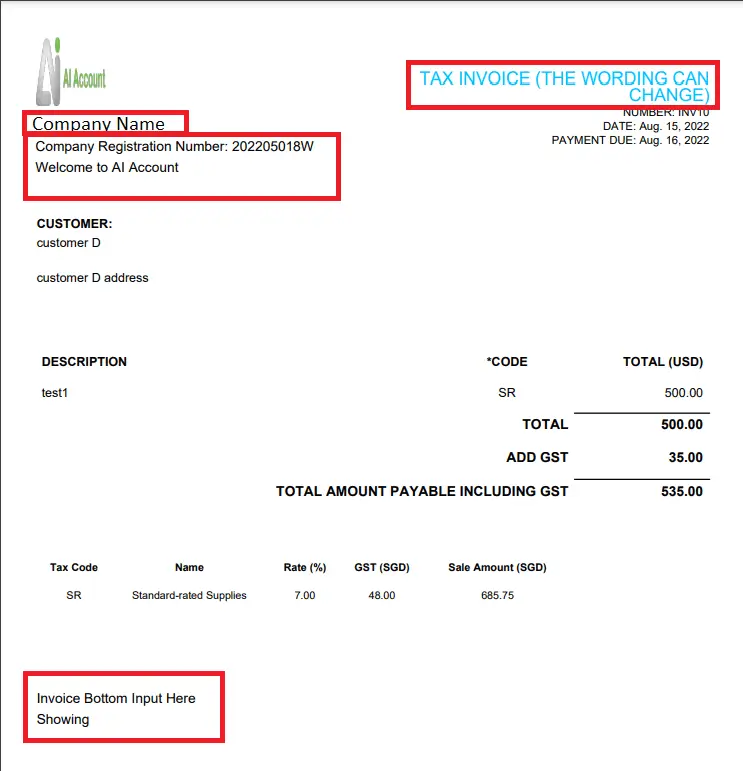
In Invoice Settings, go to the Default Remark section to create a remark template and, if needed, add custom input fields for Tax Invoices (e.g., courier slip number, order number). The Default Remark is inserted automatically whenever you create a new invoice, so you can pre-fill recurring lines such as “Courier slip number:” and “Courier vendor:” and simply complete the details for each transaction; these entries will also appear in the exported PDF Tax Invoice.
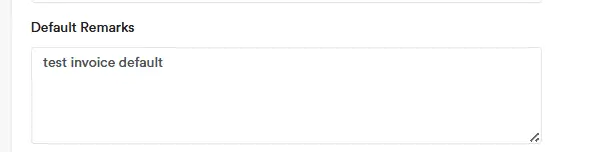
Tick “Show Delivery Address.” If the contact has a delivery address, it will be displayed on the generated Tax Invoice.
To include quantity in your exported documents, tick “Display Quantity and Unit Price in Exported Quotes and Sales Invoices” and click Save. The exported PDF reports for both Quotes and Sales will then show the quantity and unit price.
You can then go to All Quotes or All Sales to start creating your quotes and sales transactions with quantity.

Go to Invoice Settings,
(Optional) Tick “Show Numbering for Each Row in PDF”, then click Save.
(Optional) Tick “Hide the tax code from PDF when there is no tax”, then click Save.

After this, exported Tax Invoices, Debit Notes, Credit Notes, and Refund Notes will:
- show row numbering in the PDF; and/or
- omit the tax code when no tax applies (the tax table will not be shown).
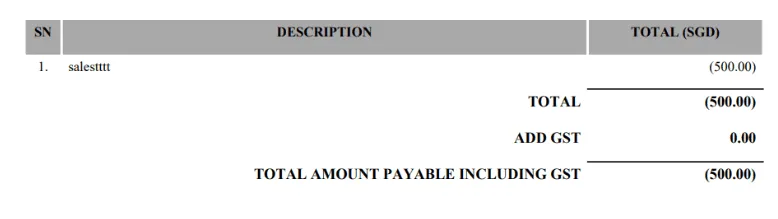
The invoice may include tax amount (GST/SST/VAT), but if you don’t want to show the separate tax table at the bottom, tick “Hide all of the tax code from PDF”. When this option is selected, the tax breakdown table will not appear on the invoice PDF.
Tick “Hide measurement in export PDF” and Save. The invoice will display only the quantity, and measurements won’t appear.

Tick “Show Contact Name Internal Tag in PDF Export” and Save. The invoice will display the customer name with the internal tag in front, as shown below.
![]()

You can set the prefix numbering for sales transactions in the section below. For details, see Prefix Number Settings.

Tick “Show the Final Total in Words” and Save. The generated invoice will display the currency and amount in words after the grand total.
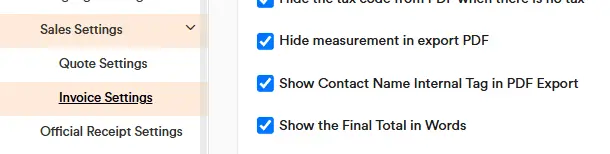

You can issue quotes and invoices in a foreign language if you wish. See Foreign Language Settings for details.
Under General Sale Settings, you can select which ‘Contact’ fields to display on Tax Invoices, Debit Notes, Credit Notes, and Refund Notes.
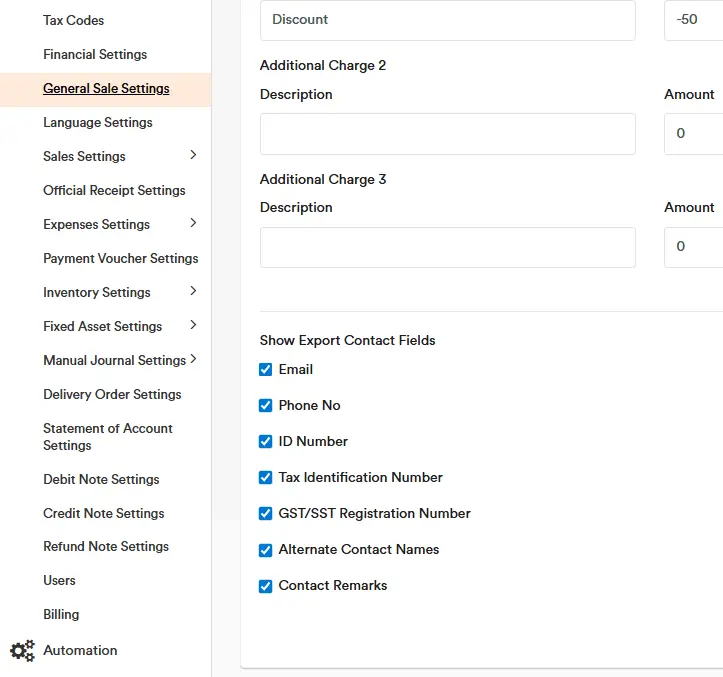
For example, if you tick the fields under “Show Export Contact Fields”, they will appear on the Tax Invoice as shown in the sample below.

In Invoice Settings / Inventory Sale Invoice Settings, tick “Show Credit Terms in Tax Invoice”. The credit terms will then appear at the top right of the tax invoice. They are calculated as the Due Date minus the Invoice Date recorded in the transaction.
![]()
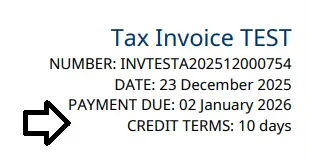
In Invoice Settings / Inventory Sale Invoice Settings, tick “Hide payment due date.” The payment due date will be hidden on the tax invoice.
In Invoice Settings / Inventory Sale Invoice Settings, tick “Show Delivery Date in Tax Invoice” The Delivery Date will be shown on the tax invoice.
In Financial Settings, you can tick the option below to activate the function that displays fixed and consistent decimal places in the exported PDF tax invoice report.

In Financial Settings, you can tick the option below, ‘Show Page Number at all PDF report export,’ to enable page numbers to appear at the bottom of exported PDF tax invoice reports.
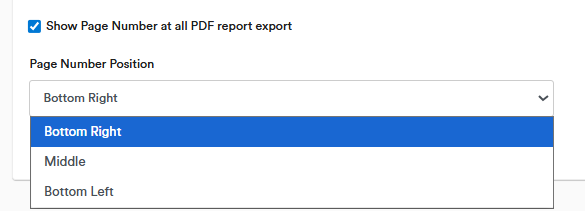
At Invoice Settings, when you tick ‘Show the current date and previous [ ] lines statement of account details in the invoice’, the system will add the statement of account details to the invoice.
It will show:
– the transaction on the invoice date, and
– the selected number of previous transaction lines before that date.
These details will appear in a table on the invoice.
![]()
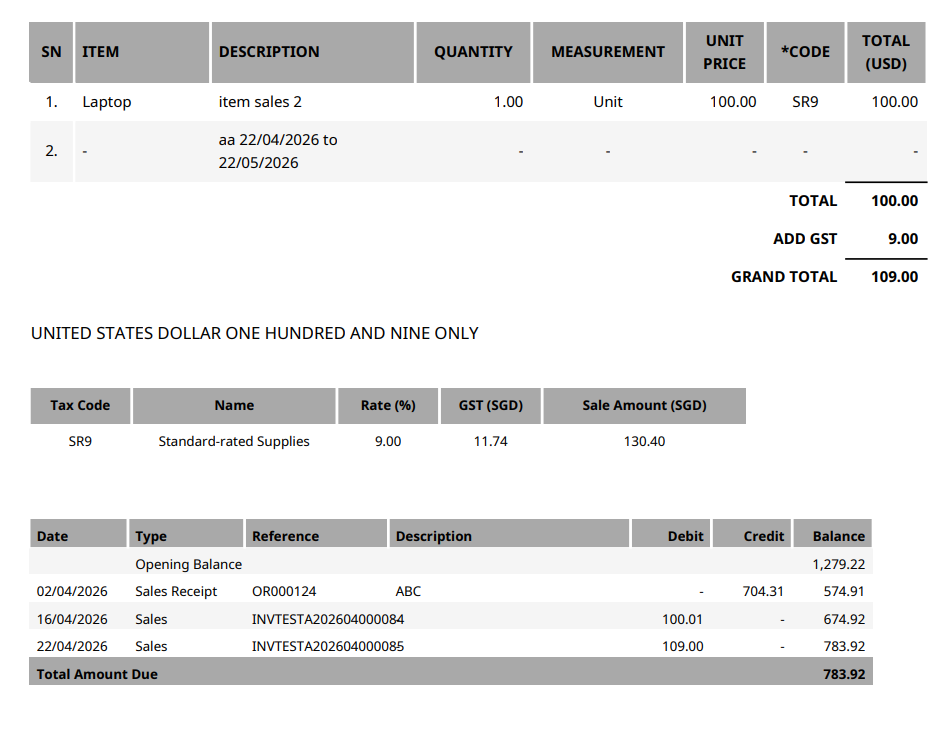
Tax Invoice Item Display Options
You can select your preferred display option for the Tax Invoice.
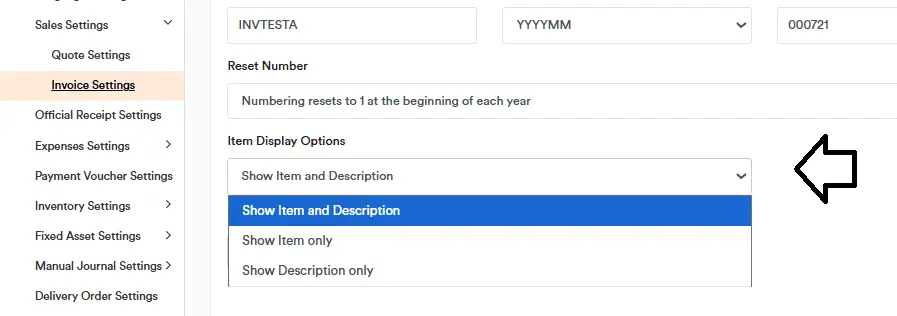
If you select “Show Item and Description”, each line on the invoice will display both columns.
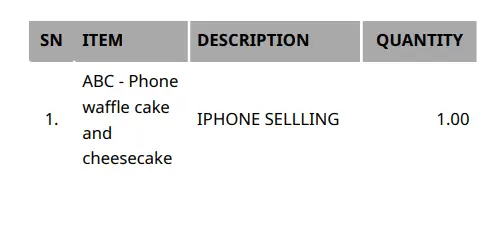
If you select “Show Description only”, the invoice will appear as shown below.
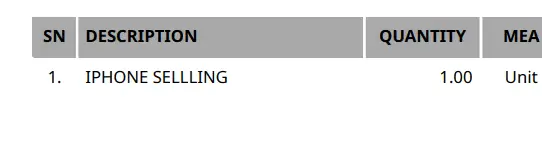
Tax Invoice Font Size and Font Type
You can adjust the font size and font type in Language Settings. For the English language, you can set a different font size and type for your reports. After making your changes, scroll down and click Submit.
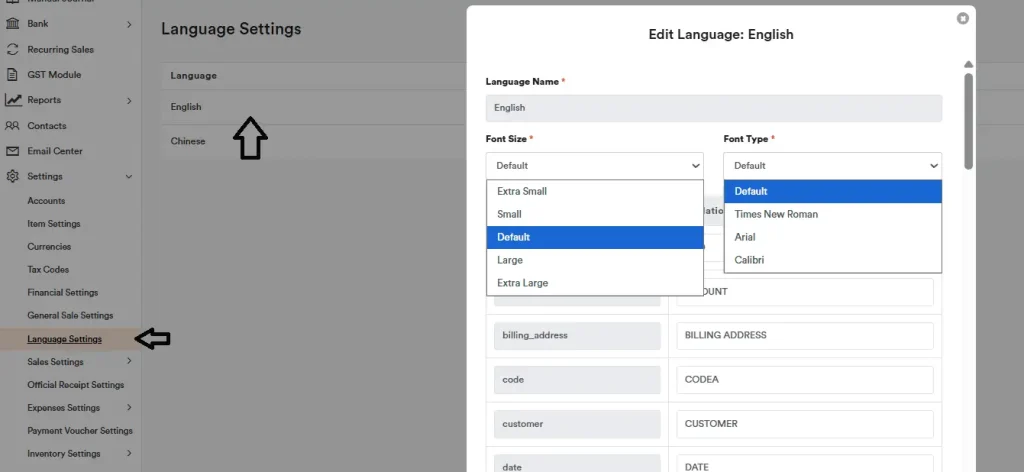
Tax Invoice Wording and Column Width Adjustment
If the Quantity and Measurement columns take up too much space on your tax invoice, you can shorten their labels to make those columns narrower.
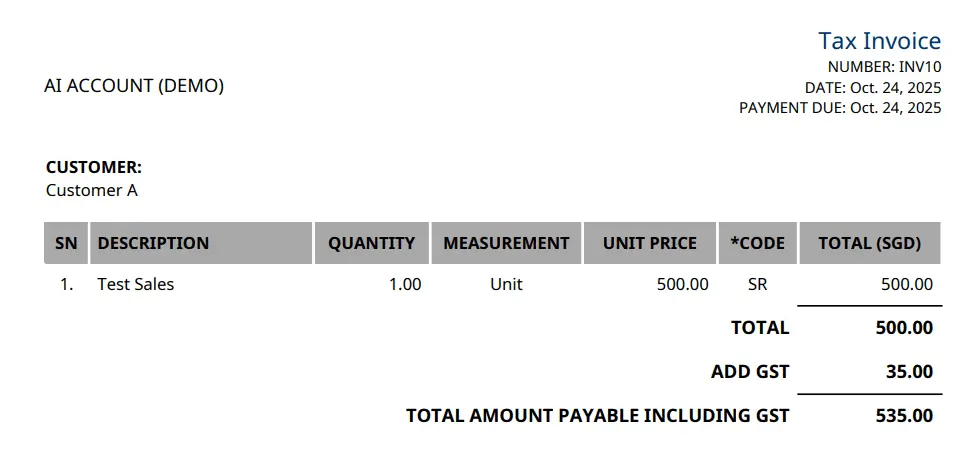
Go to Language Settings and select English.
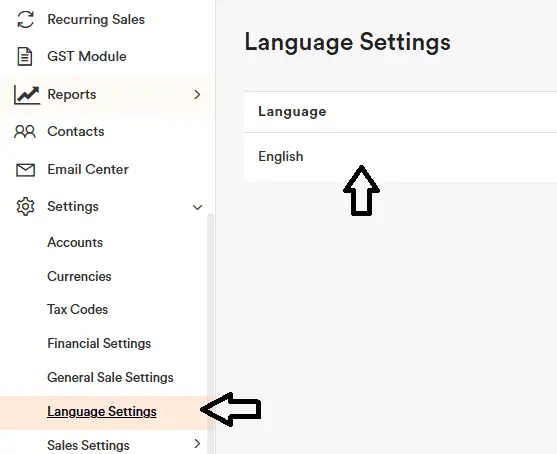
Edit the labels for Measurement and Quantity to your preferred abbreviations, then click Submit at the bottom.
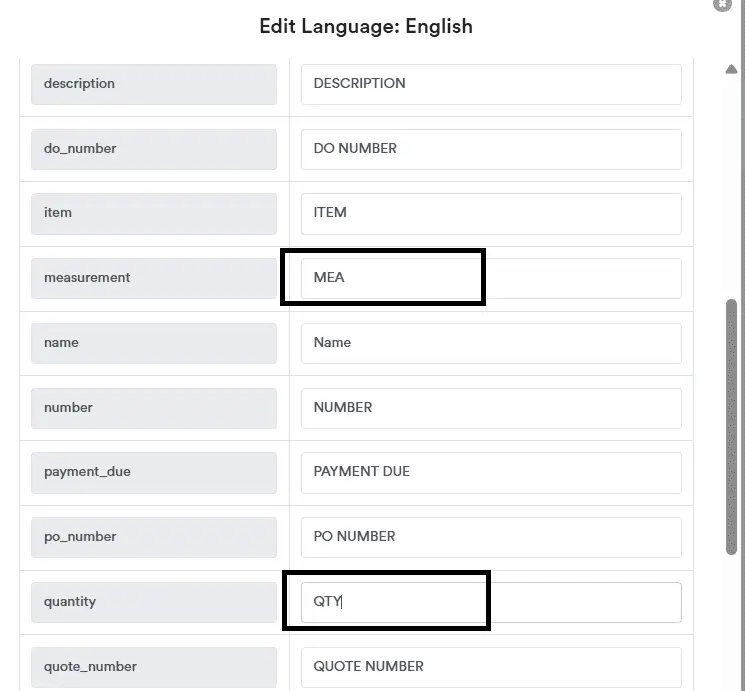
Generate the tax invoice again. The Description column will now be wider, and the Quantity and Measurement columns will be narrower.
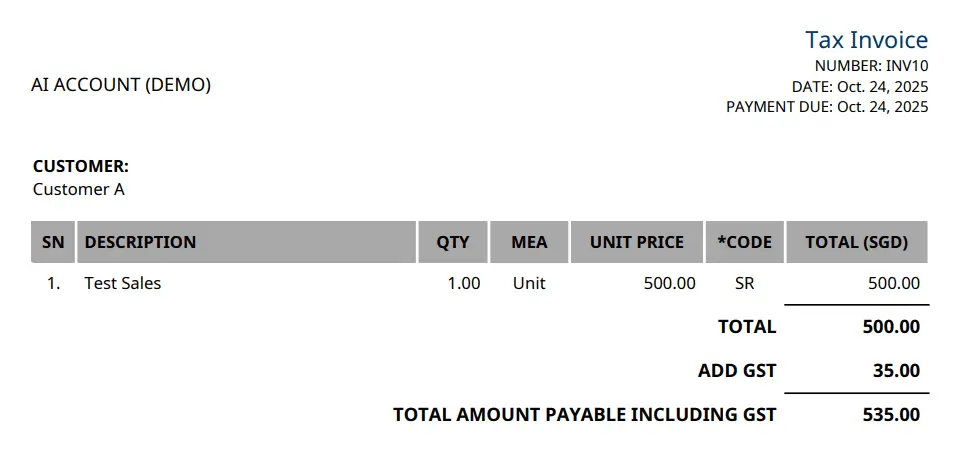
Tax Invoice Templates
You can watch a step-by-step video on how to set multiple templates with different labels.
You can create custom templates with different top notes, bottom notes, and languages.
The templates you create can be selected when you create a sales transaction. You can also add or manage templates in Quote Settings.

After you create a template, it appears in the list (see below).

When creating a Sales, select the template you created. This lets you apply different invoice templates to different sales.
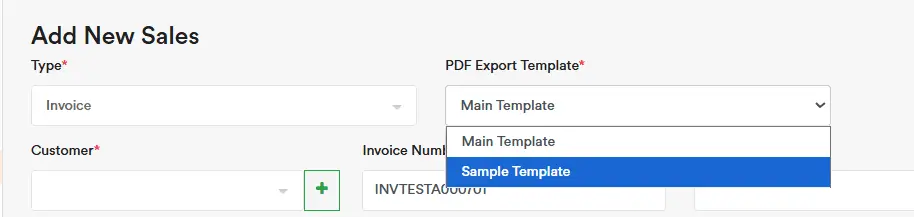
Tax Invoice Formats
You may find that our current invoice format, even after the above settings, still does not fully meet your needs. If so, you can contact us to customise the format according to your preferences, such as the alignment, spacing, and arrangement of items.
As shown in the example below, we can adjust the layout to fit more line items after customisation. Please email info@aiaccount.com to request any invoice format customisation. This is a tailored service and may require additional work, depending on your requirements.
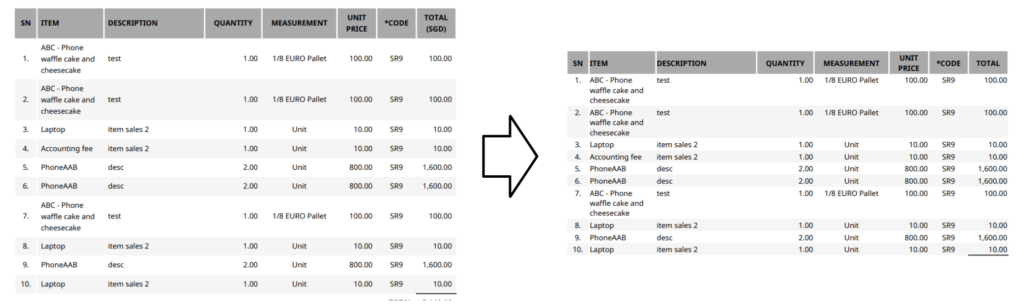
After AI Account has finished creating the format, you can go to Invoice Settings and, under Main Template Export Format, select the new format. When you generate the invoice, it will follow the selected format.
Please note that for each new template created, you need to select the format manually. If no format is selected, the Default Format will be used automatically.
Depending on the complexity of the work, additional charges may apply.
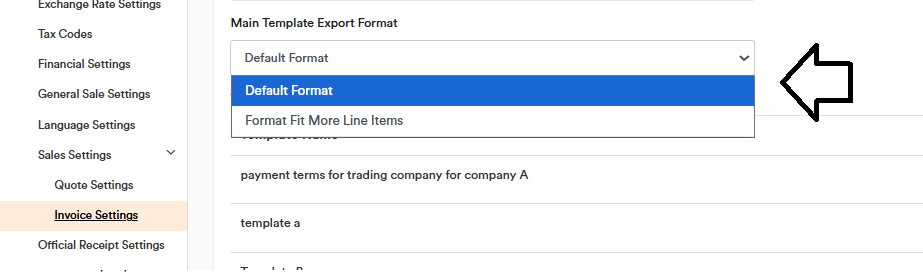
Delivery Order Settings
In Delivery Order Settings, you can configure the delivery order report, including the top note, bottom note, delivery order name, row numbering in PDFs, showing the contact name and internal tag in PDF exports, and displaying a grand total for quantity.
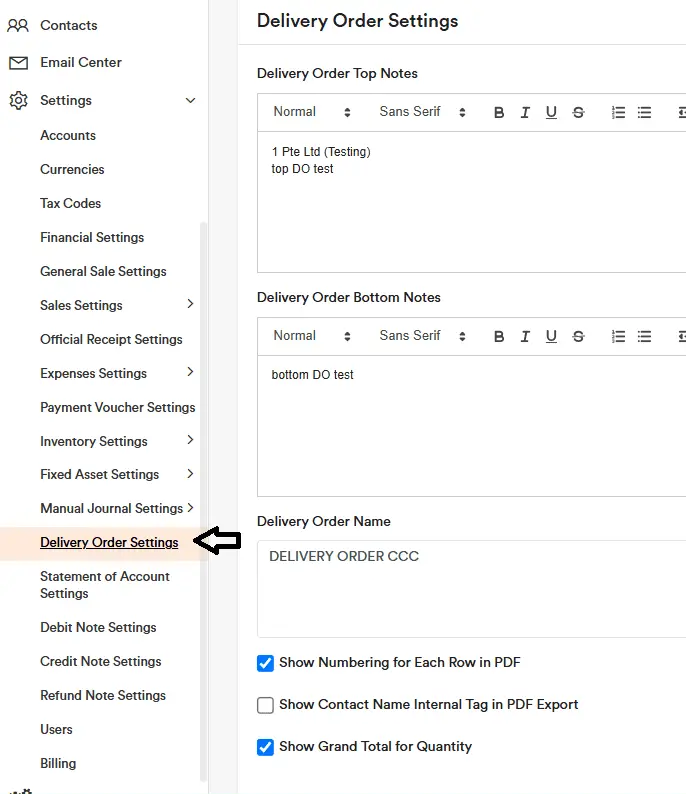
Tick ‘Activate Prefix Number for New Sales’ and/or ‘Activate Prefix Number for New Inventory Sales’ to enable prefix numbers in the Sales section.
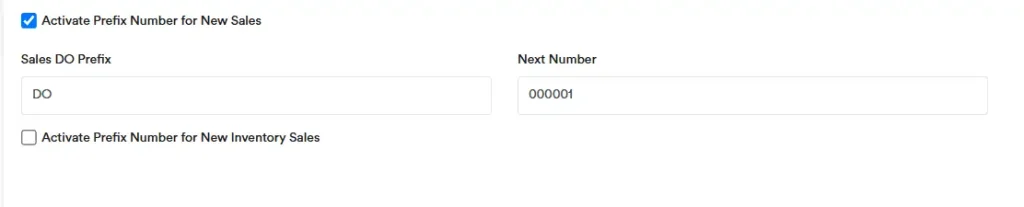
Once activated, a DO (Delivery Order) number will appear when you create a sale, and the delivery order date will default to today.
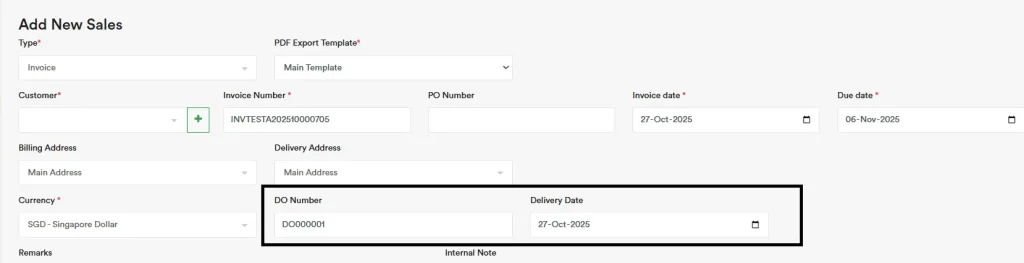
Expense Report Settings
You can generate an ‘Expense Report’ for each expense via the Export button in the top-right corner.

Configure the report’s header and footer notes in Bill Settings.
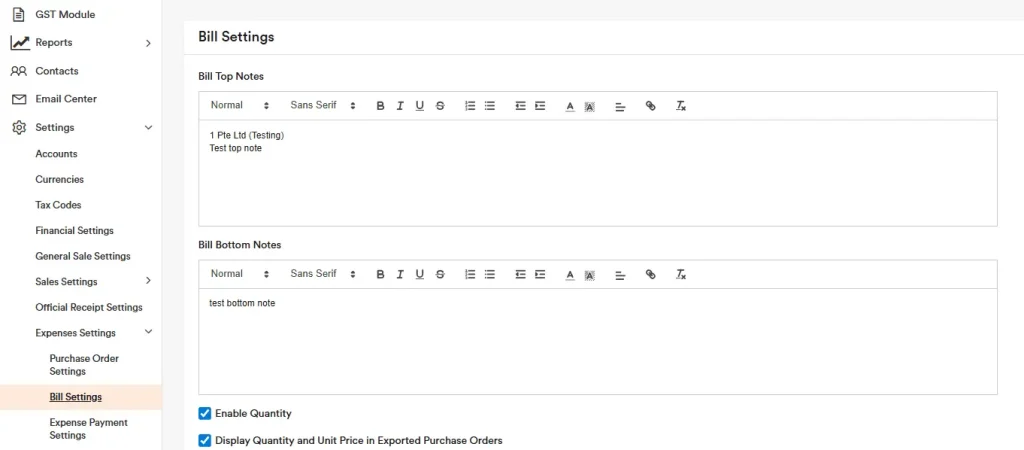
Inventory Purchase Report Settings
You can generate an ‘Inventory Purchase Report’ for each Inventory Purchase via the Export button in the top-right corner.

Configure the report’s header and footer notes in Inventory Purchase Bill Settings.
Fixed Asset Report Settings
You can generate an ‘Fixed Asset Report’ for each Fixed Asset via the Export button in the top-right corner.

Configure the report’s header and footer notes in Fixed Asset Settings.
Official Receipt Settings
You can setup official receipt settings at below
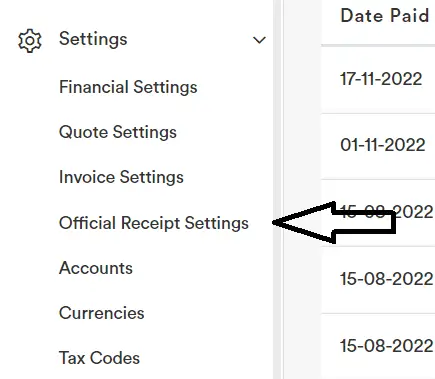
You can export the Official Receipt at each Receipt
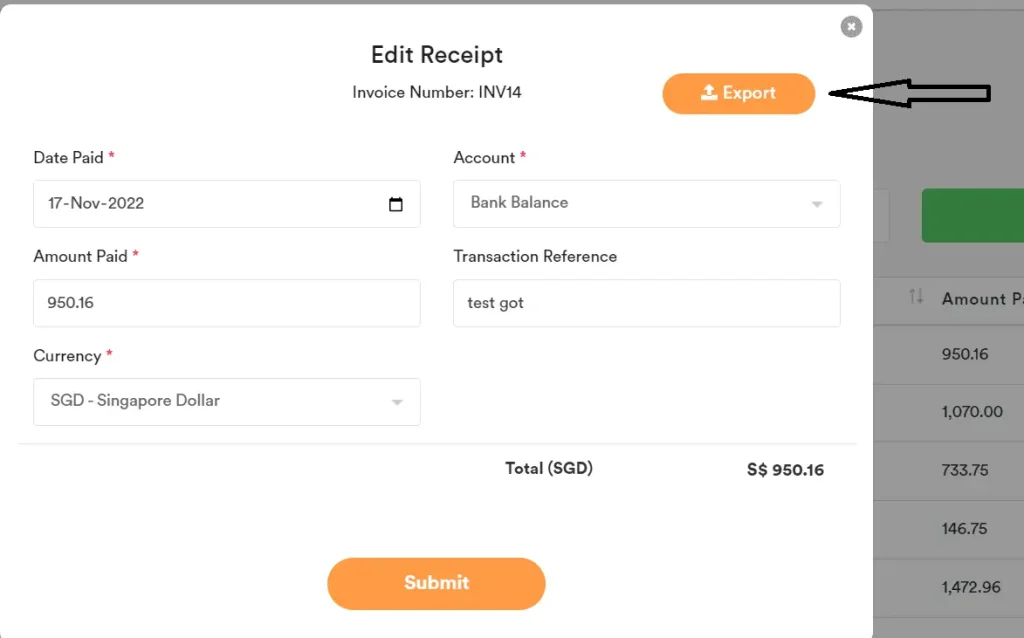
In Official Receipt Settings, you can tick “Show Sales Top Remarks”.

Then, the top remark you enter during a sales transaction will appear in the Official Receipt report when it is generated.
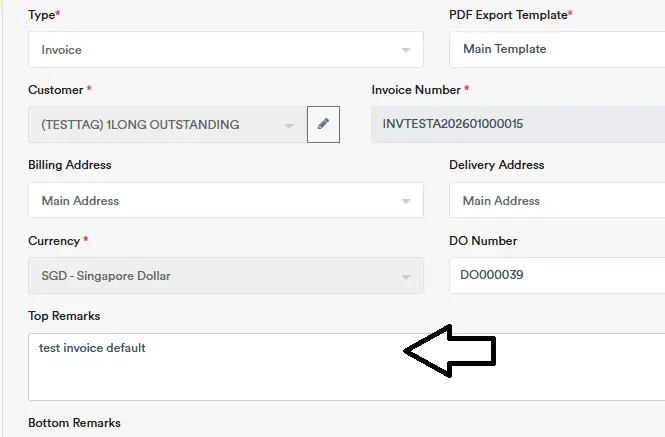
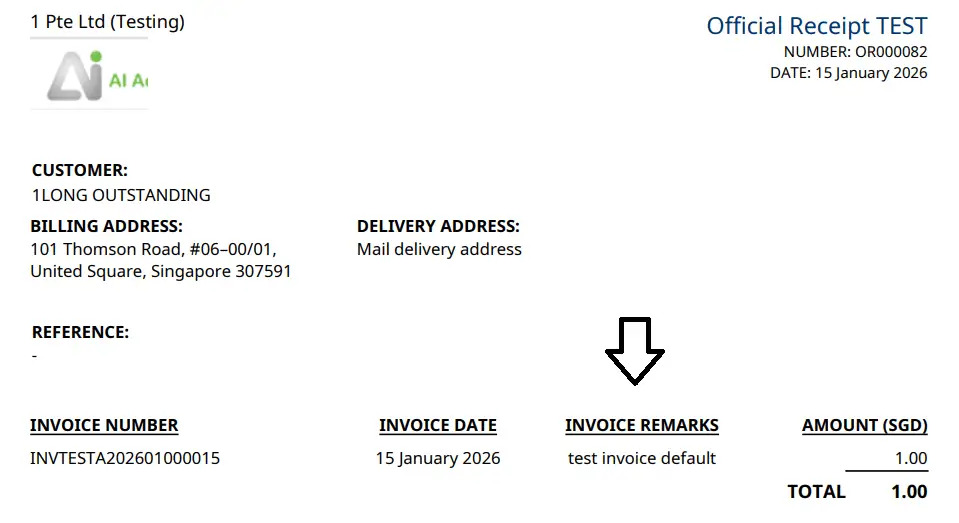
Payment Voucher Settings
You can setup Payment Voucher Settings at below
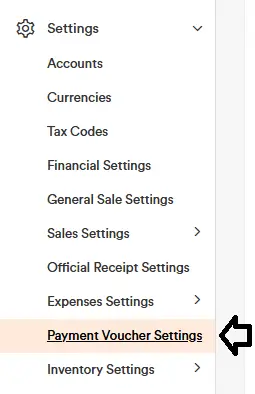
You can open any payment and click the ‘Export’ button to export the payment voucher for that payment.
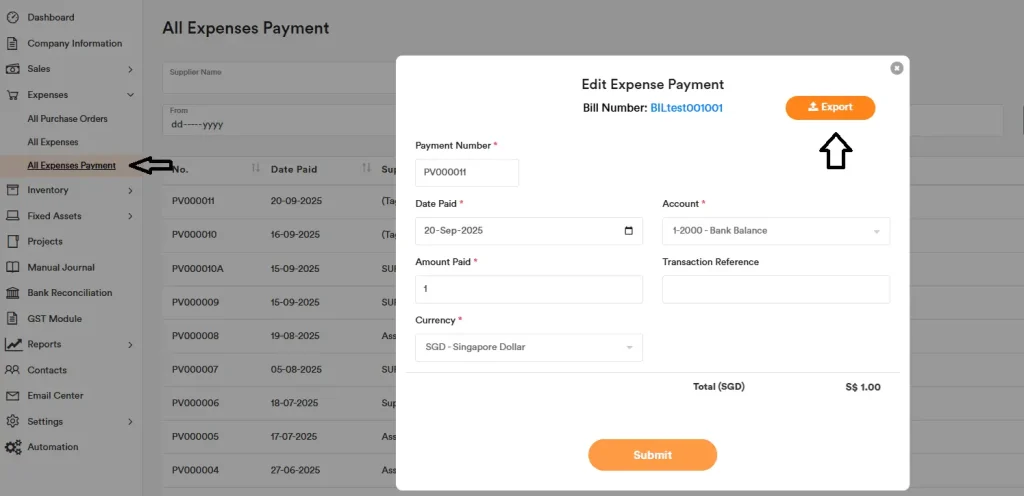
Statement of Account Settings
You can setup Statement of Account settings at below
You can set your own preferences by selecting your preferred option in the Statement of Account settings to decide how the exported report is displayed.

You can export the Statement of Account at General Ledger (Contact)
Input the Contact and Account, select the relevant periods, and click Search before exporting the Statement of Accounts.
You can export the Statement of Account using below options.
- Statement of account (Account Activity) – This will generate the statement by combining all lines from the same sales invoice into a single item, instead of showing a detailed line-by-line breakdown.
- Statement of account (Detailed Line Items) – This will generate the statement by showing a detailed line-by-line breakdown.
- Statement of account (Summary) – This will generate a statement showing unpaid or partially paid invoices only, similar to an aging report.
- Statement of Account (Home Currency) – Generates a statement of account in your home currency, with each line item converted. This can be generated for all currencies only.
- Statement of Account (Original Currency) – Generates a statement of account in the original currency of each transaction. You can generate this for a specific currency or for all currency codes. Each currency will be shown as a separate statement of account.
Export Statement of Account for All Contacts
You can select Contact – All – and choose the account you want to generate (for example, Trade Receivables). Then click Export Statement of Account.
A Statement of Account will be generated (as a PDF) for each contact that:
– has a closing balance not equal to zero, and/or
– has movement during the selected period.
All PDFs will be zipped into one file and downloaded. After you unzip the file, you’ll see one PDF per contact.
Please note that the export may take a few minutes or longer if the volume is large. You can leave the browser tab open and continue with other tasks — once the export is complete, the file will download automatically to your browser.
Manual Journal Voucher Settings
You can setup Manual Journal Voucher settings at below
You can export the Manual Journal Voucher at each Manual Journal
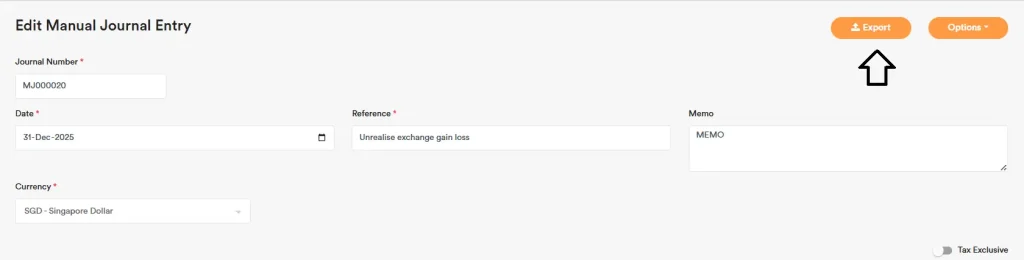
Prefix Number Settings
You can set a prefix for the running numbers in the following settings:
- Quote Settings
- Invoice Settings
- Purchase Order Settings
- Bill Settings
- Inventory Sale Quote Settings
- Inventory Sale Invoice Settings
- Inventory Purchase Order Settings
- Inventory Purchase Bill Settings
- Official Receipt Settings
- Expenses Payment Settings
- Inventory Receipt Settings
- Inventory Payment Settings
- Fixed Asset Payment Settings
- Fixed Asset Settings
- Manual Journal Settings
For example, in Quote Settings, you can set a prefix like “QUOTEST”. The next number defines the starting point of the running number sequence. If you enter a value such as 00069, the system will maintain a consistent 5-digit format (e.g., QUOTEST00069, QUOTEST00070, etc.).
Once a quote is created, the system will automatically increment the number for the next quote (e.g., from QUOTEST00069 to QUOTEST00070). However, if you manually enter a custom number or prefix when creating a quote, the system will not update the running number sequence for subsequent quotes.
The same logic applies to other modules such as invoices, purchase orders, and bills — each will follow its own prefix and running number sequence based on your settings.

Invoice Special Prefix Number Settings
In ‘Invoice Settings’ and ‘Inventory Sale Invoice Settings’, you’ll find the Middle prefix option for invoices.
If you set the Middle prefix to YYYYMM, the invoice number will auto-generate like this:
E.g. INVTESTA202510000704
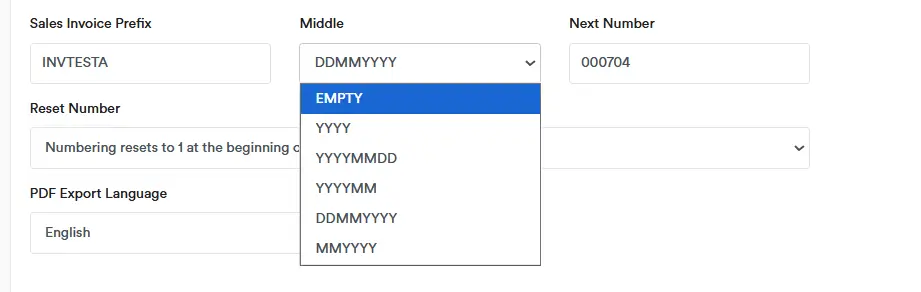
You can also choose whether the sequence resets to 1 every month or every year when using the Middle prefix.

Custom Prefix Number
In ‘Invoice Settings’ and ‘Inventory Sale Invoice Settings’, you’ll find the Middle prefix option for invoices.
In each section’s settings, tick “Set my own prefix format” to create a custom prefix format. Enter your desired pattern in “Custom Prefix Pattern” using the placeholders below. A preview will show you how the prefix will appear.
Prefix format placeholders
Use these placeholders to build your own prefix format, for example:
{YY} {YYYY} {MM} {DD} {D} {000000}
Year
{YY} = 2-digit year (e.g., 26)
{YYYY} = 4-digit year (e.g., 2026)
Month
{MM} = 2-digit month with leading zero (e.g., 01, 11, 12)
{M} = month without leading zero (e.g., 1, 11, 12)
Day
{DD} = 2-digit day with leading zero (e.g., 01, 03, 10)
{D} = day without leading zero (e.g., 1, 3, 10, 20)
Running number (auto-increment)
{000000} = 6-digit running number (e.g., 000001, 000002, …)
{000} = 3-digit running number (e.g., 001, 002, …)
Example
Format: {YYYY}{MM}{DD}-{000}
Result: 20260107-001
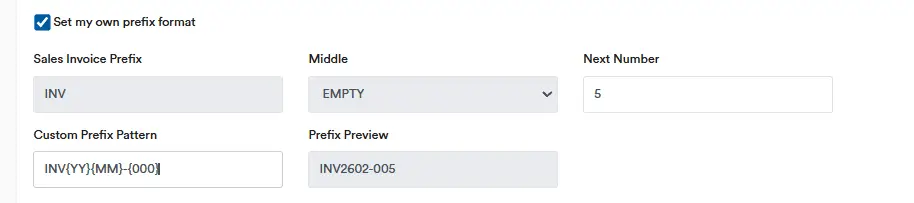
Custom Bank Account Prefix Number
You can go to the bank account in the Chart of Accounts and enable the Custom Receipt Prefix or Custom Payment Prefix function for that bank account. Once enabled, every receipt or payment created using that bank account will follow the selected prefix number. This prefix will then be applied to the Payment Number, Official Receipt Number, or Bank Entry Number.
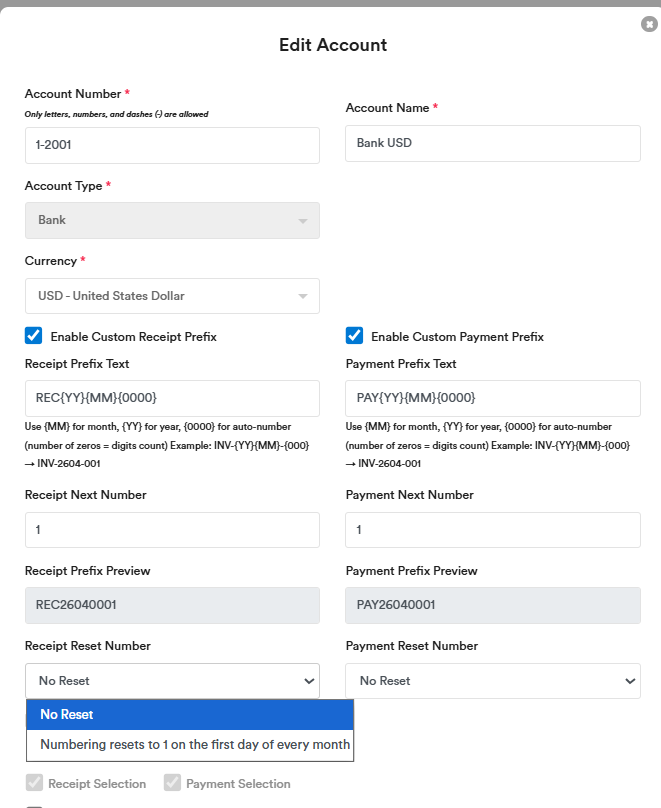
General Sale Settings
You can set up a Service Charge, which allows you to automatically generate an income item based on a specified percentage. This will be explained further in the next section.
You can also set up three Additional Charge to invoice clients below the gross amount, such as government taxes, miscellaneous income, or fees that you want to apply to every client — for example, shipping fees, discounts, etc.

Service Charges
You can set up a Service Charge, which allows you to automatically generate an income item based on a specified percentage.
If you have sales income (e.g., commissions, service charges) that you want to calculate as a percentage of sales automatically, you can configure it under General Sale Settings as follows:
- Go to ‘General Sale Settings’
- Tick “Has Service Charge”, and the service charge will appear by default when you create a sale.
- You can edit the default description if desired.
- Enter the percentage to calculate, e.g., 10%. The system will then automatically calculate and apply the service charge as 10% of the total sales gross amount.
- Select the default tax code to apply to the service charge, if applicable. If your service charge is not subject to SST, VAT, or GST, you can use the default tax code 0% (No Tax).”
The account “4-8000 Service Charges” is used to record service charge income. You can rename this account if needed to reflect the nature of the income.
Example,
Your restaurant adds a 10% service charge, and that service charge is not taxable.
Set the service charge tax code to 0% (No Tax).
If the food items are taxed separately, keep their tax codes as-is (e.g., SST 8%), while the service charge stays at 0% (No Tax).
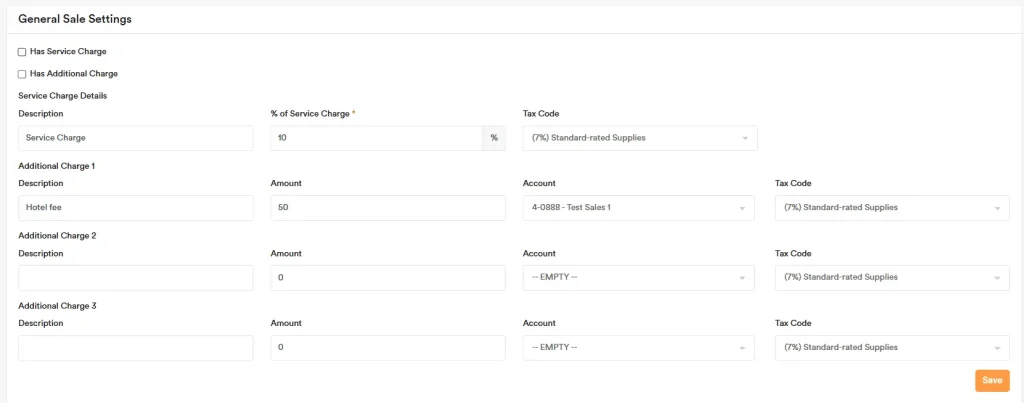
Example:
When you create a sale, the invoice will display the service charge as shown below.
You can also customize the default description (e.g., “Commission 10%”), and it will appear on the invoice with this description.
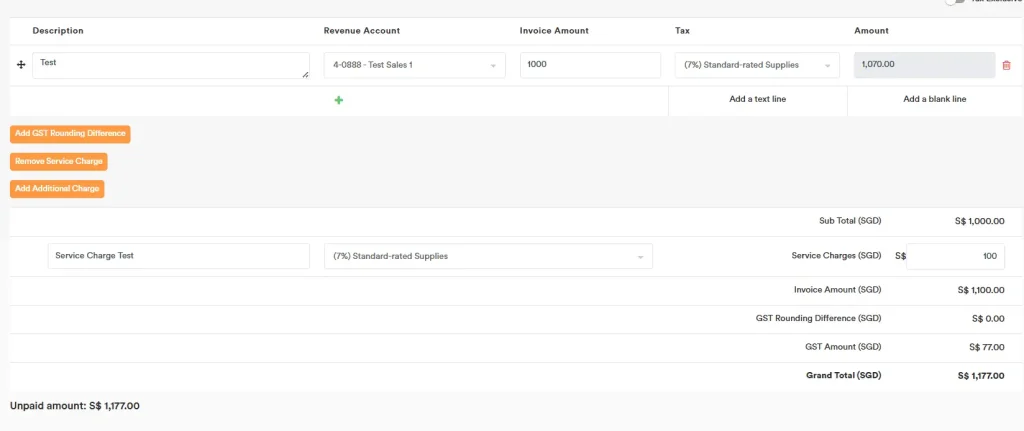
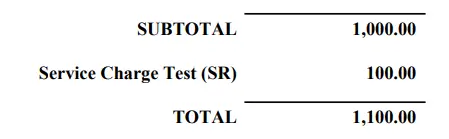
Additional Charge
If you have additional income to invoice clients below the gross amount, such as government taxes, miscellaneous income, or fees you want to apply to every client — for example, shipping fees, discounts, etc. — you can configure it under General Sale Settings as follows:
- Tick “Has Additional Charge”, and three additional charge fields will appear by default when you create a sale.
- You can edit the default description, default value, and default tax code for each field if desired.
- For each field, select the default account you want this charge to be posted to.
- You can also select the account “– EMPTY –” if you do not want to use the charge in that field.
Example:
When you create a sale, the invoice will display the additional charges as shown below. (In this example, only one field is used, described as Hotel fee.)
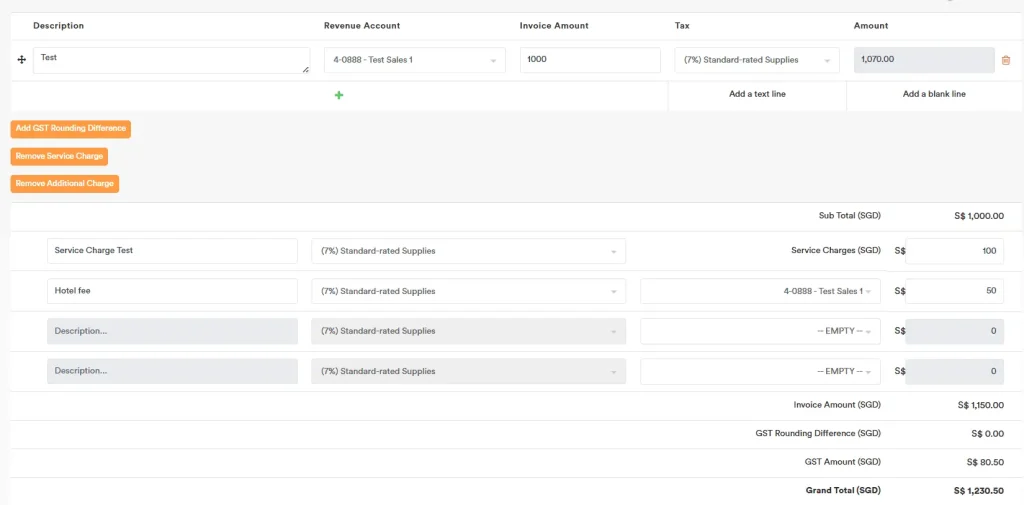
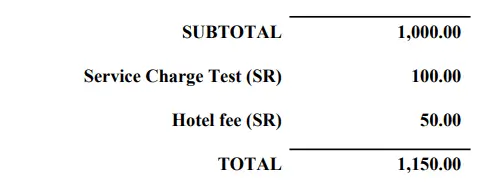
Display Contact Fields on Tax Invoices
Under General Sale Settings, you can select which ‘Contact’ fields to display on Tax Invoices, Debit Notes, Credit Notes, and Refund Notes.

For example, if you tick the fields under “Show Export Contact Fields”, they will appear on the Tax Invoice as shown in the sample below.
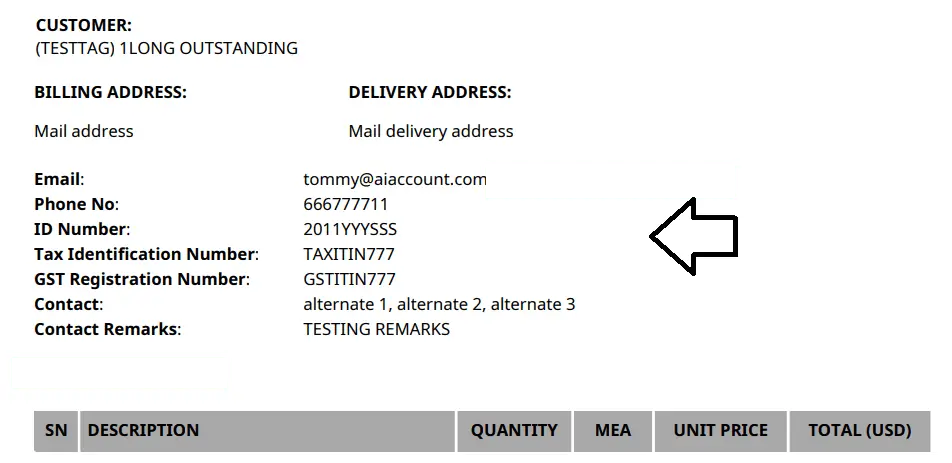
Under General Sales Settings, you can tick the Show City, State, Postal Code, or Country option to include these fields in the exported PDF.
When selected, these below Contact details will appear on the Tax Invoice under the Billing Address, based on the information entered in the Contact record (see example below).

When you generate the Tax Invoice, the Address details will be shown in the following order:
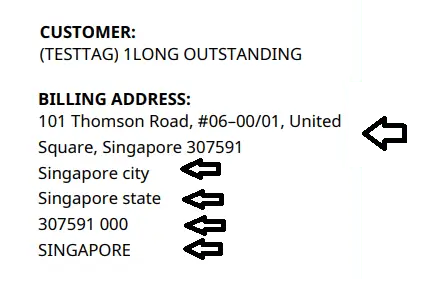
Language Settings
Update Report Labels
You can change report labels in Language Settings.
1. Go to ‘Language Settings’ → Language, then select ‘English’.
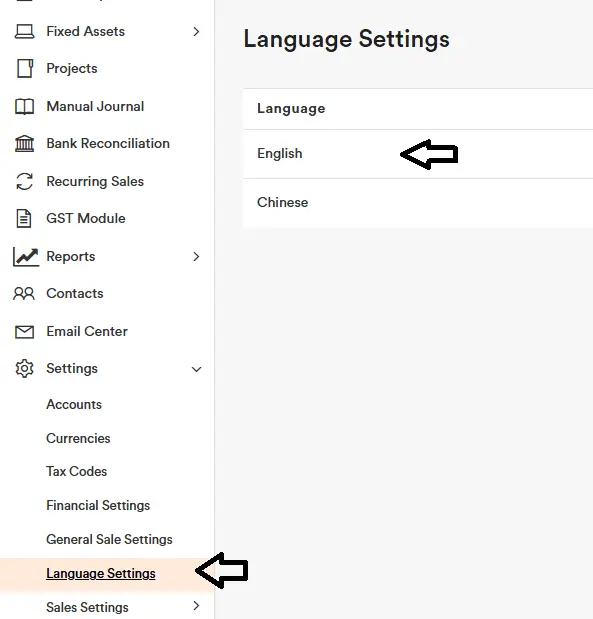
2. Edit the label you want to change — for example, change “Tax Invoice” to “Tax Invoice TEST.”

3. Open a Sales transaction and export the Tax Invoice.

4. The exported Tax Invoice report will now display “Tax Invoice TEST.”
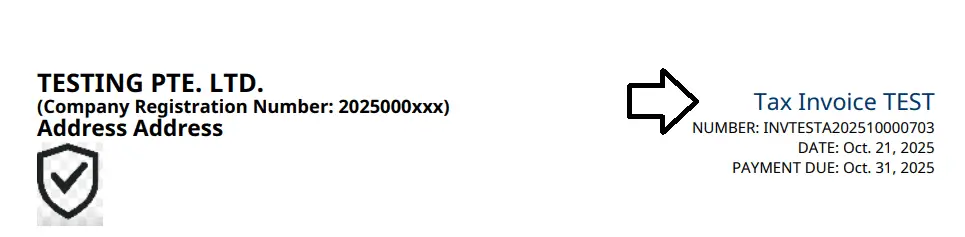
To update labels on the PDF reports listed below, use the corresponding fields in Language Settings.
- Quote Settings
- Invoice Settings
- Inventory Sale Quote Settings
- Inventory Sale Invoice Settings
- Purchase Order Settings
- Inventory Purchase Order Settings
- Official Receipt Settings
- Payment Voucher Settings
- Manual Journal Voucher Settings
- Delivery Order Settings
- Statement of Account Settings
Update Tax Labels – GST / SST / VAT
You can change the tax labels in Language Settings.
1. Go to ‘Language Settings’ → Language, then select ‘English’.

2. Update the tax_name label to match your country’s tax name (e.g., GST, SST, or VAT).
After you update it, any tax invoices you generate will display the new tax label.
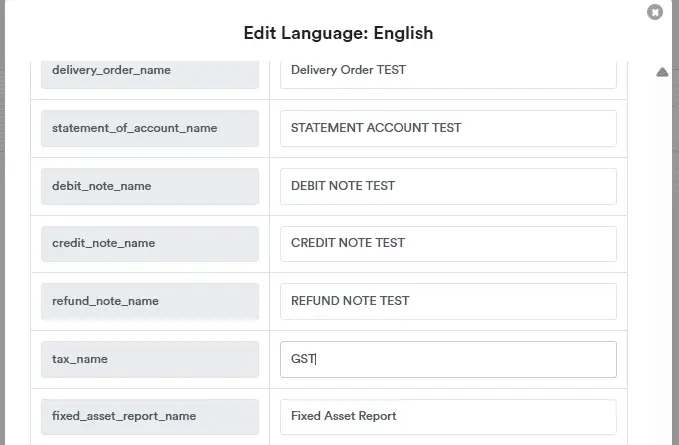
Using AI Account in a Foreign Language
You can view our software in your preferred language using Google Chrome’s built-in translation.
Steps
1. Open our software in Google Chrome.
2. Click the three dots in the top-right corner.
3. Select “Translate…”.
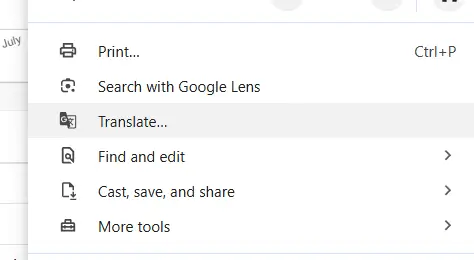
4. In the address bar, click the Translate icon.
5. Choose “Choose another language”.
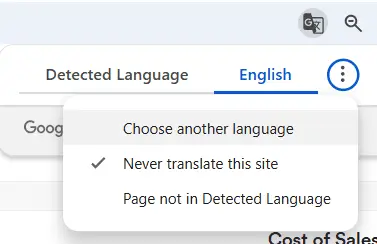
6. Select your preferred language and click Translate.
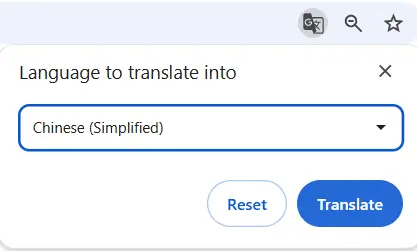
The website will now appear in the language you selected.
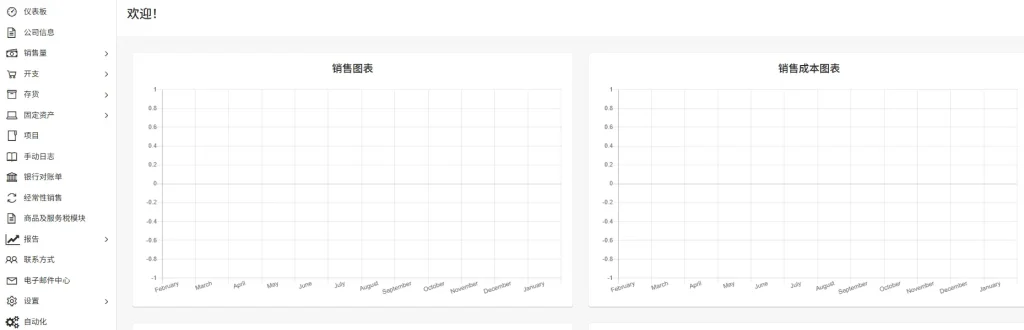
Issuing Quotes and Invoices in a Foreign Language
Some countries require invoices to be issued in the local language (e.g., Burmese in Myanmar). To set this up:
1. Go to Language Settings.
2. Click Import (top right) and download the template file.
3. Open the Excel file and either add your own translations for invoice terms or use the default values provided.
4. Upload the Excel file and click Import. The language list will be added to your company.

Next, set the language for each document type:
– Quote Settings
– Invoice Settings
– Inventory Sales Quote Settings
– Inventory Sales Invoice Settings
At the bottom of each settings page, under PDF Export Language, select the language you want to use for the exported PDF, then click Save.
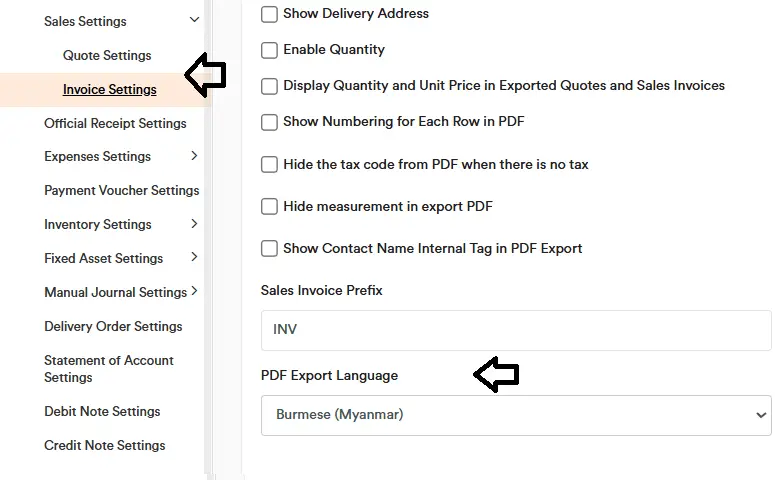
You can now generate tax invoice PDFs (and quotes) in the selected foreign language.
Issuing Other Reports in a Foreign Language
You can also issue other reports in foreign languages
To set this up:
- Go to Language Settings.
- Click Import (top right) and download the template file.
- Open the Excel file and either add your own translations for the terms or use the default values provided.
- Upload the Excel file and click Import. The language list will be added to your company.
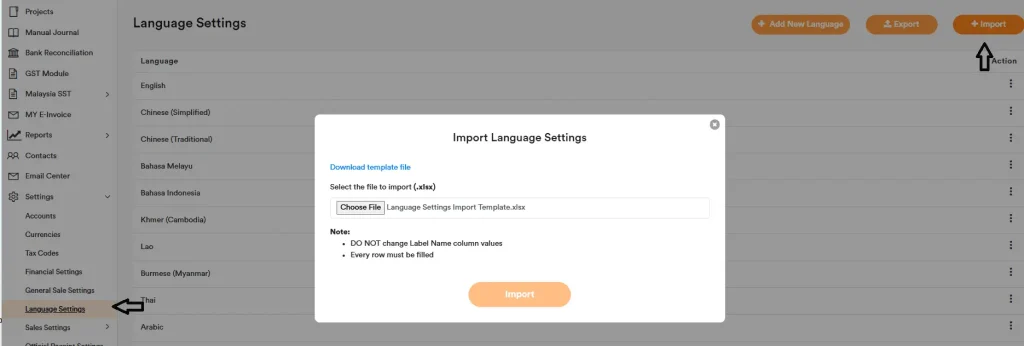
Next, set the language for each document type:
- Purchase Order Settings
- Inventory Purchase Order Settings
- Official Receipt Settings
- Payment Voucher Settings
- Manual Journal Voucher Settings
- Delivery Order Settings
- Statement of Account Settings
At the bottom of each settings page, under PDF Export Language, select the language you want to use for the exported PDF, then click Save.
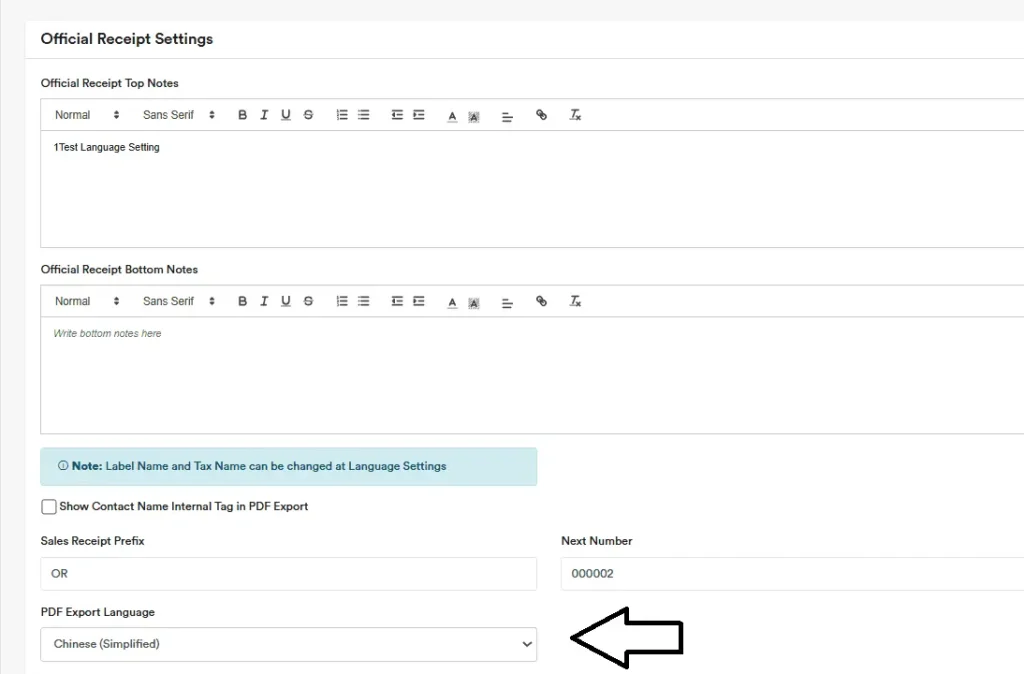
You can now generate PDFs in the selected foreign language. Example:
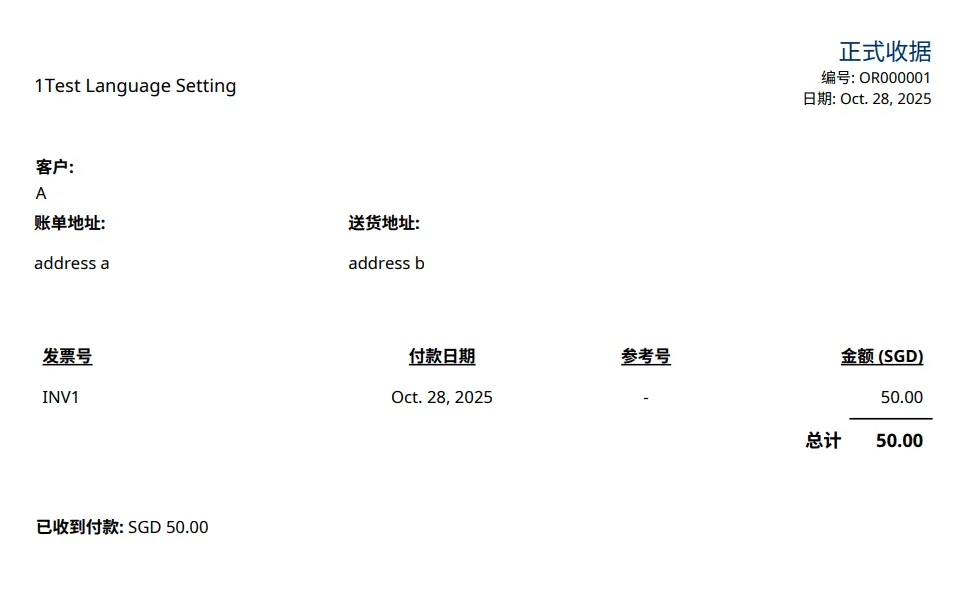
API Settings
The API Settings module lets you connect external software to AI Account for data import.
You can use this page to:
- generate an API key
- set the API key expiry period
- choose the allowed import permissions
- view API documentation and sample request format
- download the required import templates
- check import history and error messages
The API Documentation tab will show the API URL, required fields, file format, and example request. Please refer to the details in the module when setting up the connection
HQ and Branch Setup Options
In most cases, HQ and branch are treated as separate company accounts in accounting software. This allows each entity to track its own sales and expenses independently and use its own invoice number prefix. You can create two separate companies in the system using the same company name and apply tags to identify one as “HQ” and the other as “Branch.”
You may also consider using our Consolidation feature to automatically consolidate financial data from both the HQ and branch accounts.
For Malaysia:
Some companies register both HQ and branch under the same legal entity, using the same Tax Identification Number (TIN) and Business Registration Number (BRN). Our software does not allow duplicate TINs by default. However, for situations where HQ and branch must share the same TIN and BRN, we can enable this manually. To request this, please email us at info@aiaccount.com and we will assist you in setting up the duplicate TIN and BRN for the branch. Once this setup is complete, you will be able to issue e-invoices from both company accounts using the same TIN.
Please note: only one account should be designated as the ERP system for receiving e-invoices from suppliers, to avoid duplicate expense records.
Reports
Report Labels Update
You can now add custom language labels to the headers in these 3 reports:
– Balance Sheet
– Profit and Loss
– Other Comprehensive Income (OCI)
These labels can be maintained in Language Settings, similar to how other report and document labels are updated in the system.
Go to Language Settings and select English. For example, you can change the label to “ASSETS BIG BIG”, then scroll to the bottom and click Submit. You can also use the Import and Export functions in Language Settings to update the labels in Excel.
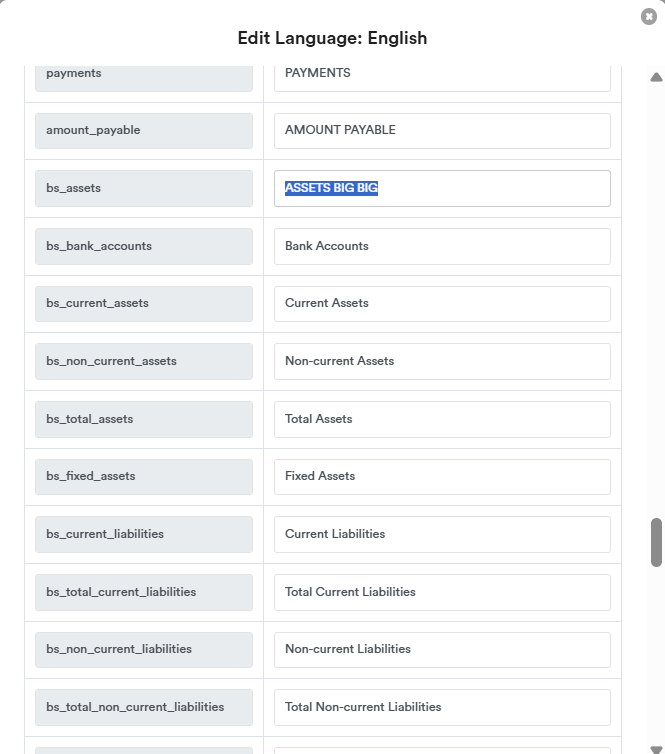
After that, go to the Balance Sheet report and you will see the updated label reflected in the report.
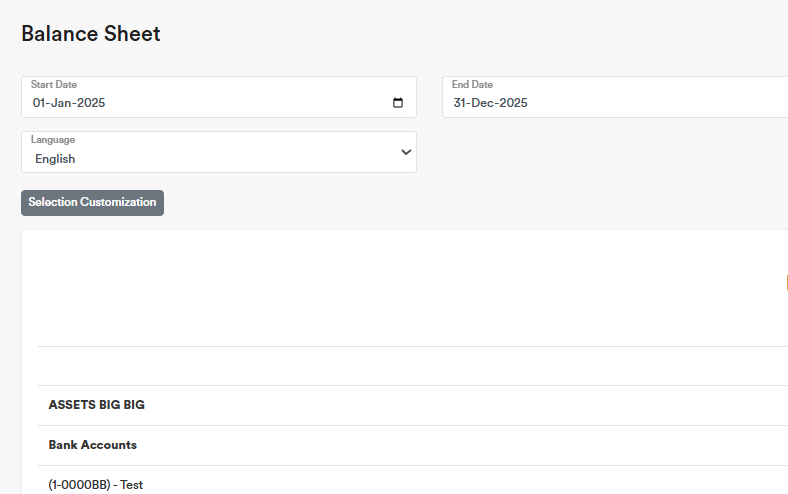
You can also select a different language, such as Chinese. When Chinese is selected, the report headers will be displayed in Chinese.
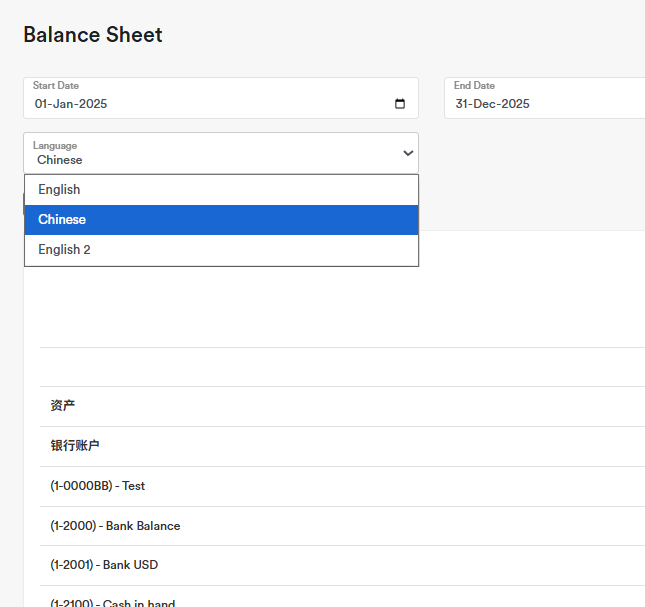
General Ledger
In the General Ledger, the ending balance is shown as either ‘Debit’ or ‘Credit’. A Debit balance means the account is debit in nature (e.g., assets, trade receivables, fixed assets). A Credit balance means the account is credit in nature (e.g., liabilities, trade payables).
By default, we display both debit and credit balances as positive amounts.
If you prefer credit balances (such as liabilities) to appear as negative amounts, tick “Display Negative Sign For Credit Balances.” Then, credit balances will be shown with a negative sign.
You can tick “Hide Debit / Credit Wording at Balance” to hide the words “Debit” and “Credit”
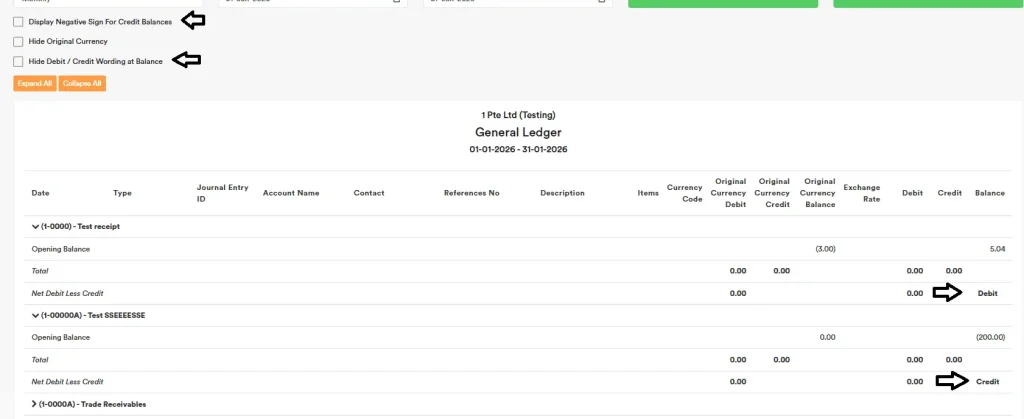
You can tick “Hide Original Currency” to reduce the columns before you click Export to PDF. If you want to export with the original currency, please use Export to Excel.
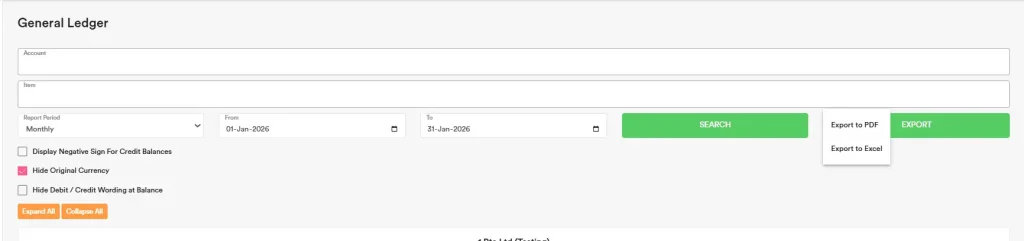
In AI Account software, P&L accounts are carried forward continuously year to year. We do not perform year-end closing entries that transfer P&L balances into Retained Earnings. Instead, Retained Earnings is the balancing total of all P&L transactions accumulated up to the report cut-off date (i.e., before the start date of your report).
We follow this approach because it’s more flexible:
- You can easily generate prior-year or multi-year reports.
- There’s no limitation on how many years you can trace back, since historical P&L balances remain available in the original accounts.
That’s why, when you run the General Ledger for a P&L account (e.g., Sales Income), you will see:
- Opening Balance: accumulated balance from all prior periods before the report start date
- Current period transactions: entries within the selected date range
- Net Debit Less Credit: the net movement for the current period (this is the amount that matches the Profit & Loss report)
So, to get the current year Sales Income, please refer to the Net Debit Less Credit line (e.g., (230.00) Credit in below screenshot).
Important note: “Hide Opening Balance of Profit and Loss Accounts”
By default, in the General Ledger, the option “Hide Opening Balance of Profit and Loss Accounts” is ticked. This means the Opening Balance will not be shown unless you untick this option.
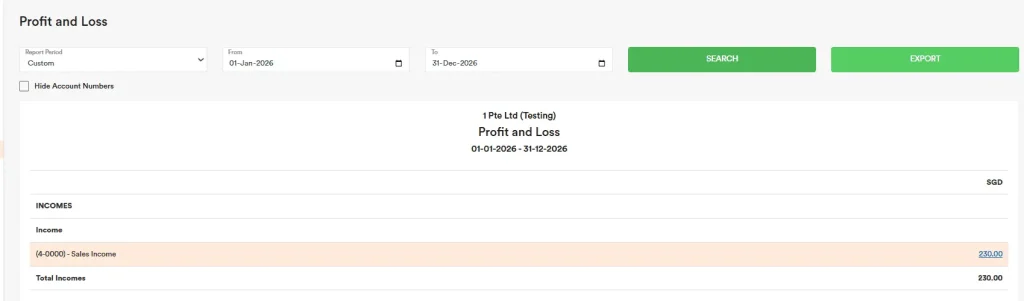
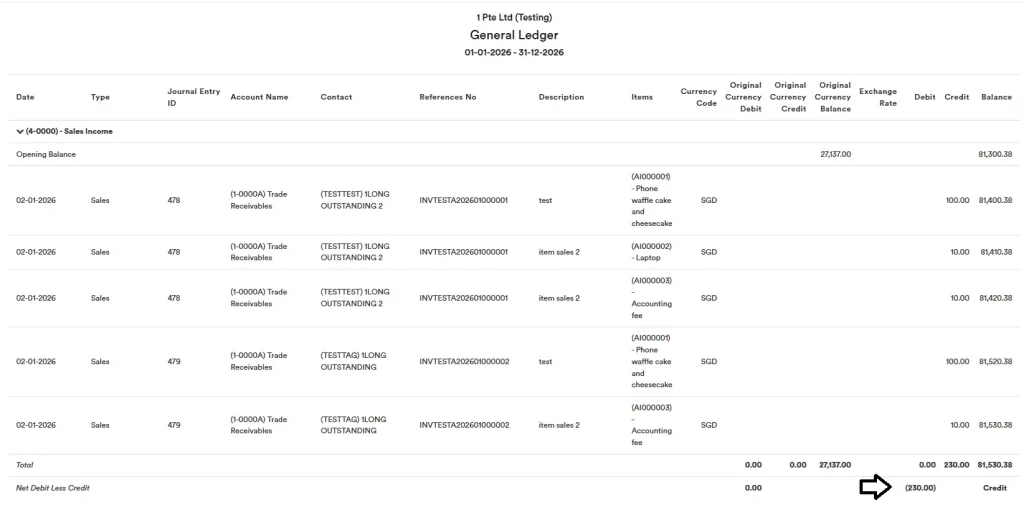
Please note that the P&L balances will not display under the Retained Earnings account directly, because no closing entries are posted to transfer them there. Retained Earnings is derived as a balancing figure based on the accumulated P&L results, rather than being populated by journal lines from each P&L account.
In our system, Profit & Loss (P&L) accounts are not closed via year-end transfer journals. That means we do not post closing entries to move revenue/expense balances into Retained Earnings. Instead, the P&L accounts continue to hold their historical transactions, and Retained Earnings is calculated as the balancing total of all P&L results up to the report cut-off date.
- The Opening Balance you see in each P&L account in the General Ledger represents the brought-forward cumulative balance before the report start date.
- The current year / current period amount is shown as the Net Debit Less Credit movement within the selected date range (this aligns with the Profit & Loss report figure).
You can generate prior-year or multi-year reports easily with this design, and there is no limit on how many years you can trace back, since the balances remain within the original P&L accounts rather than being “reset” by closing journals.
If you would like to see exactly what makes up the Retained Earnings figure, you can generate the “General Ledger (Retained Earnings)” report. This report breaks down the Retained Earnings balance and shows the underlying entries/accumulated P&L results that form the total.
For reference, this is also explained in our guide under the Retained Earnings section.
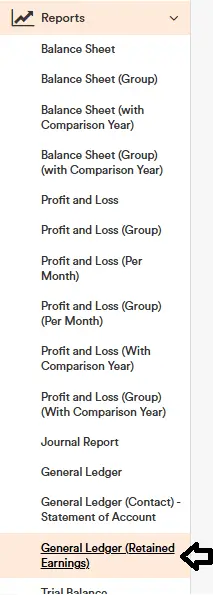
In General Ledger or General Ledger (Contact), you can filter by Currency Code (e.g., USD) to generate a report in that foreign currency only. This makes it easy to quickly identify accounts that have USD balances. This filter is especially useful for accounts with mixed currencies (e.g., trade receivables). When you filter for USD, only the USD portion is displayed—so you can easily identify the relevant accounts and review the movements, opening balances, and closing balances in specific foreign currency.
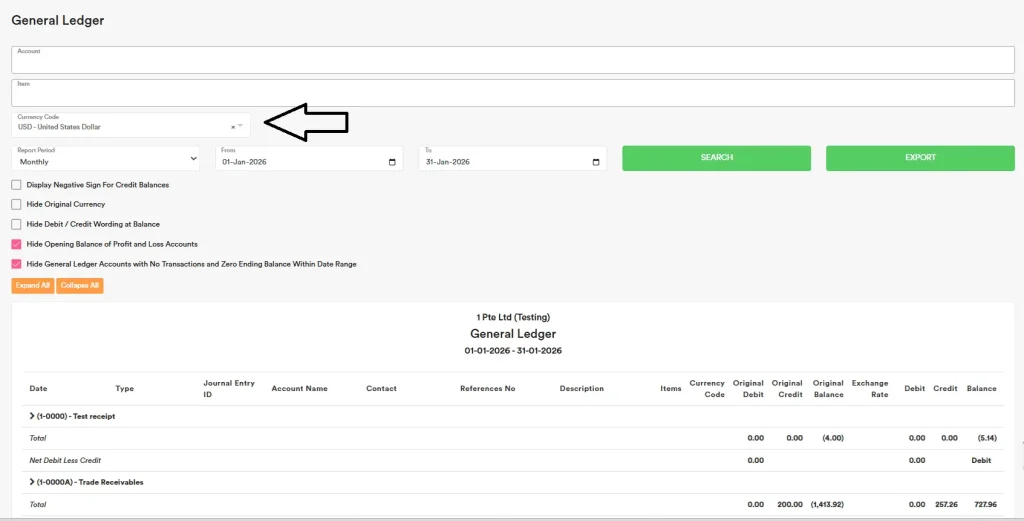
You can use the Column Customization button to choose which columns to show or hide, and to move columns up or down to change their order. When you’re done, click Save as Default to keep this view.
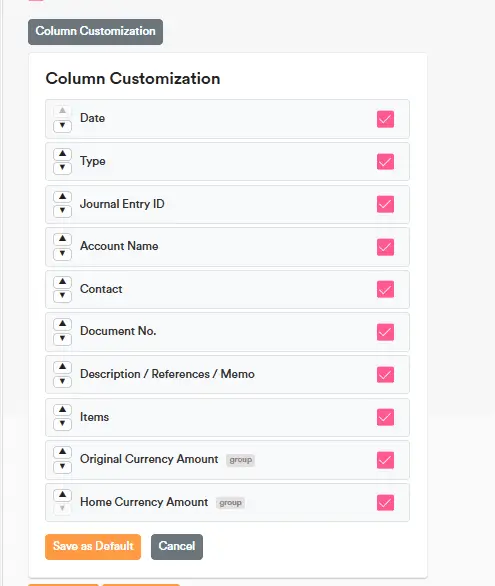
Profit & Loss Report: By Function vs By Nature
Use Account Grouping function to control how Profit & Loss (P&L) lines roll up in reports. Once groupings are saved, run Profit and Loss (Group) to see the new structure reflected.
By Function: You want to show costs by operational purpose (e.g., Cost of Sales, Selling & Marketing, General & Administrative, R&D).
By Nature: You want to show costs by what they are (e.g., Salaries, Rent, Utilities, Depreciation) regardless of department or purpose.
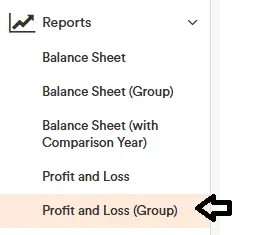
Fixed Asset Report (With Details)
Go to Reports → ‘Fixed Assets Report’ to generate the fixed asset movement report, similar to the Property, Plant and Equipment note in the financial statements.
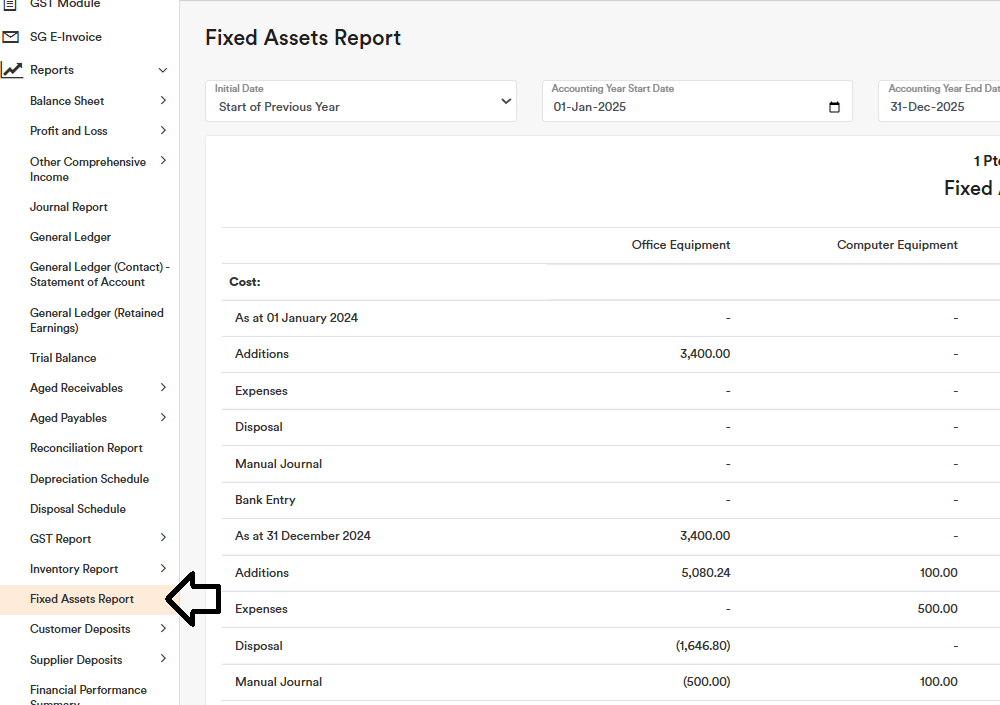
When you click on a figure, such as the net book value, you can view the breakdown of the assets that make up that amount.
GST Report (Cash Basis)
For Malaysia Services Tax, you need to report services tax based on payment basis. Therefore, you can generate the GST Report (Cash Basis) to get the amount of services tax invoices that have been paid by the customers.
Financial Performance Summary
Our software can automatically generate the Financial Performance Summary report, consolidating key figures (income, expenses, assets, liabilities, and equity) together with critical financial ratios such as gross profit margin, net profit margin, liquidity ratios, debt-to-equity, ROA, ROE, and turnover ratios. This gives business owners and investors a clear, easy-to-read snapshot of profitability, cash position, leverage, and efficiency, enabling faster, better-informed decisions without needing deep accounting or Excel skills.
Export to Excel (For FS)
You can export this report “Export to Excel (For FS)” and use it for import to FS software purposes. Remind to select the correct Yearly period and click search before export. When importing the FS software, remember to use the remove decimal point function in FS software to remove decimal points. Do let us know if you need assistance to prepare financial statements.
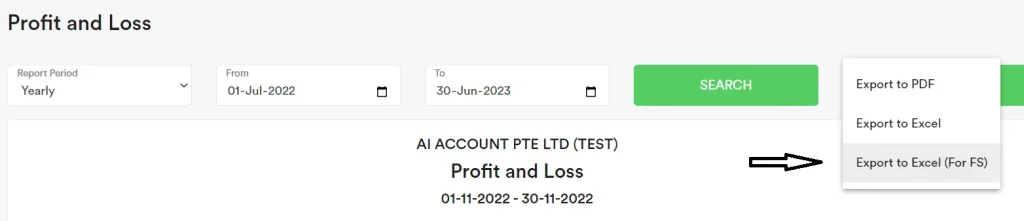
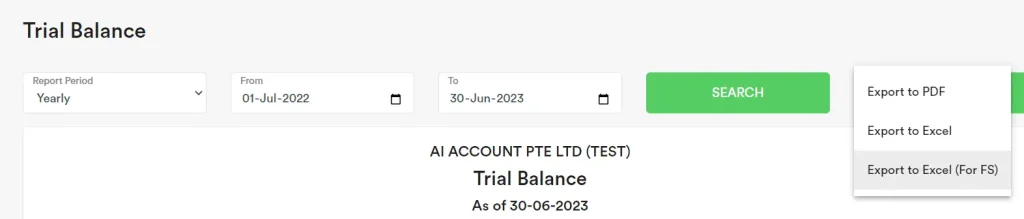
Budget Forecast
Budget Forecast helps you turn your accounting data into a year-ahead budget, a pacing dashboard, an updated forecast, and a 5-year cash flow with business valuation. It pulls your Profit & Loss and Balance Sheet directly from AI Account — no spreadsheet needed.
To open, click Budget Forecast in the left sidebar.
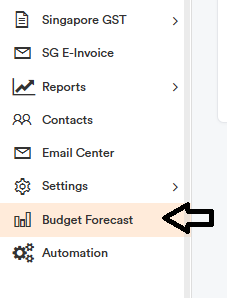
The tool has 8 tabs across the top, designed to be used from left to right.
1. Select Period
Pick the financial year for your P&L and Balance Sheet (defaults to current year vs prior year). If you want to track how you’re doing this year, tick Include YTD Actuals and set the date range (defaults to 1 January up to end of last month). Click Load Data. The system fetches your reports automatically and unlocks the rest of the tabs.
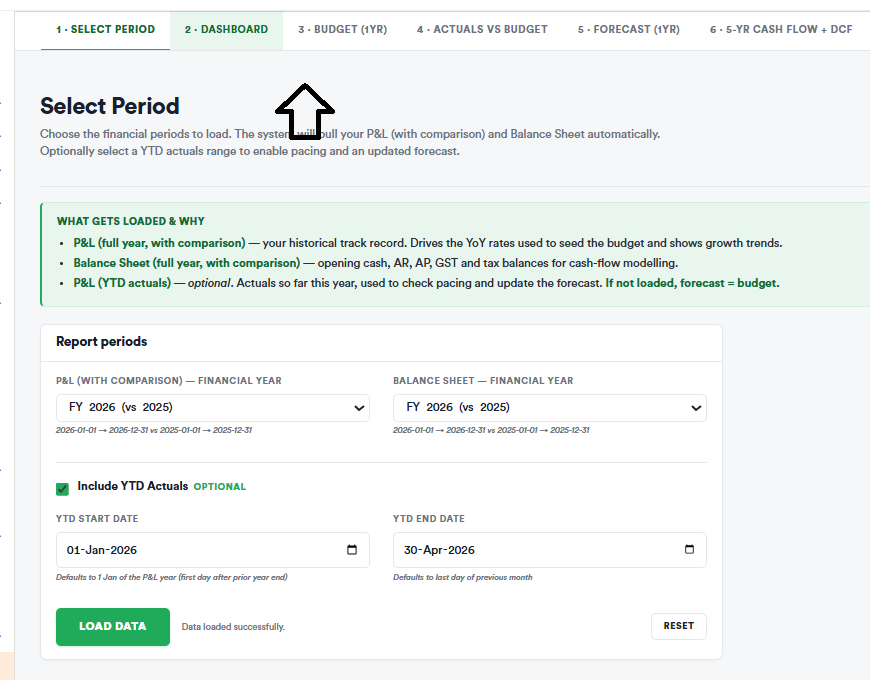
2. Dashboard
A snapshot of your historicals — revenue, gross profit, expenses, net profit, and year-on-year trends. Use this to sanity-check the loaded numbers before moving on. Hover any figure for an explanation.
3. Budget (1Y)
The tool seeds next year’s budget from your year-on-year growth rates. You can override any line by entering a dollar amount, a growth %, a bulk % across a whole section, or a target total. Overridden lines are highlighted.
4. Actuals vs Budget
Available only if you loaded YTD Actuals. Shows line-by-line how you’re tracking — YTD Actual, Pro-rated Budget, Pace %, Implied Annual, and Variance.
Note: with less than 3 months of YTD data, the Implied Annual is just a straight-line × 12 extrapolation and the tool will display a warning. Treat early-year figures as directional only.
5. Forecast (1Y)
Updated full-year forecast: locked YTD actuals plus a projection for the remaining months. For each line you can pick the projection method — run-rate, budget, or your own custom figure.
6. 5-Yr Cash Flow + DCF
Long-term cash flow with three views: 5-year annual + DCF valuation, 12-month (Year 1), and 13-week.
The Cash-flow Assumptions panel auto-derives every figure from your loaded BS and P&L, and shows the formula under each input. You can override any value.
- Opening cash — from Bank Accounts on BS
- AR days — Trade Receivables ÷ Annual Revenue × 365
- AP days — Trade Payables ÷ (COGS + Expenses) × 365
- Lease /mo — P&L ROU Depreciation ÷ 12, or BS current Lease Liability ÷ 12
- Loan /mo — BS Loans ÷ 24
- GST /qtr — BS GST Payable, or estimated from Revenue
- Tax /yr — BS Income Tax Payable, or P&L Tax Expense
The DCF gives you an Enterprise Value — what the next 5 years of cash flow plus the perpetual value beyond are worth in today’s dollars. Adjust Discount rate (typical SME range 8–15%) and Terminal growth (conservatively 2–3%).
7. Report
A one-page executive summary combining budget, pacing, forecast, 5-year cash flow, and DCF — written for non-finance readers. Auto-updates as you tweak assumptions on earlier tabs.
8. Export
- Excel — full workbook with live formulas. Recipients can change assumptions and watch the numbers update.
- PDF — printable version of the Report.
Consolidation Account Automation
Our software can help you set up a consolidation account to effortlessly combine financial data from multiple entities. To request this feature, please email info@aiaccount.com . This function is available as an add-on under the Customise Plan.
Example:
If you have two companies in your group that need to be consolidated, we recommend that all companies share the same financial year-end and financial period.
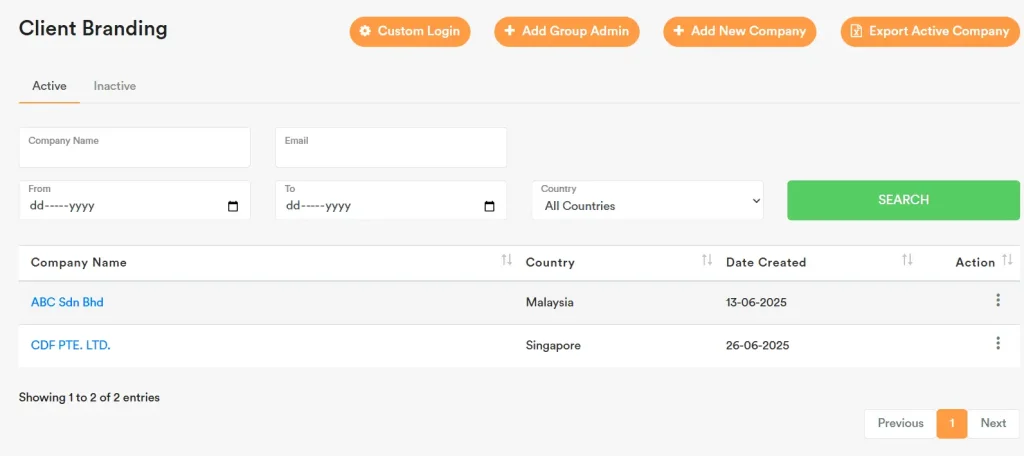
Access the Consolidated Group
Once the setup is completed, you will see your Consolidated Group listed on the dashboard.

Click on the consol group name to open the consolidated view.
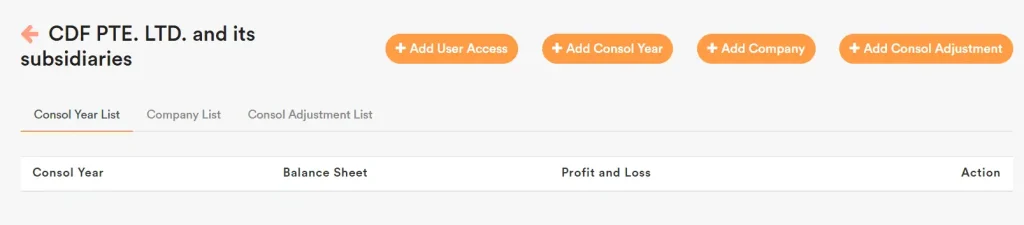
Add User Access
If you would like to grant access to additional users, please email your request to info@aiaccount.com
Create a Consolidation Year
Click + Add Consol Year, fill in the required details, and click Submit.
Note: A new consolidation year must be added for each financial year.
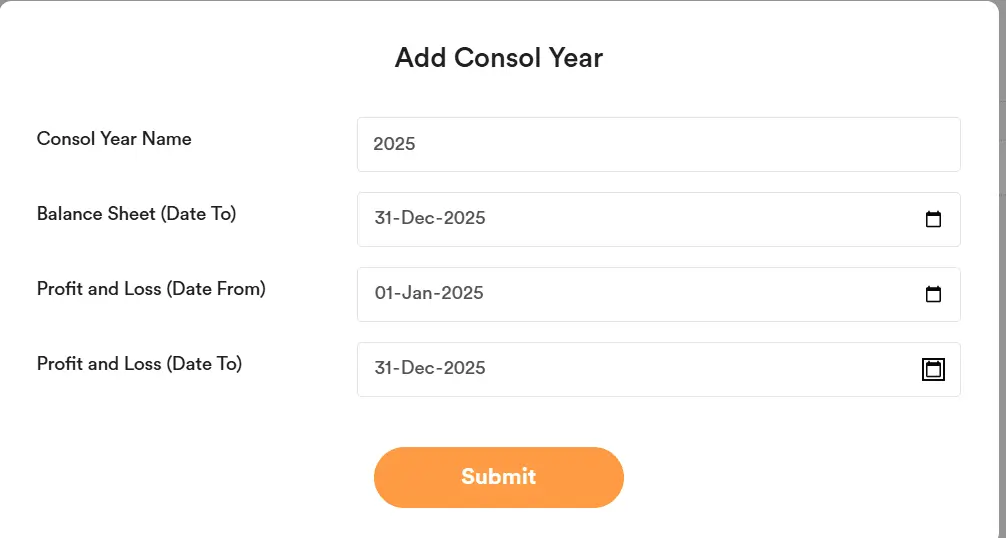
Add Companies to the Group
Select each company you want to include in the group and click Submit.
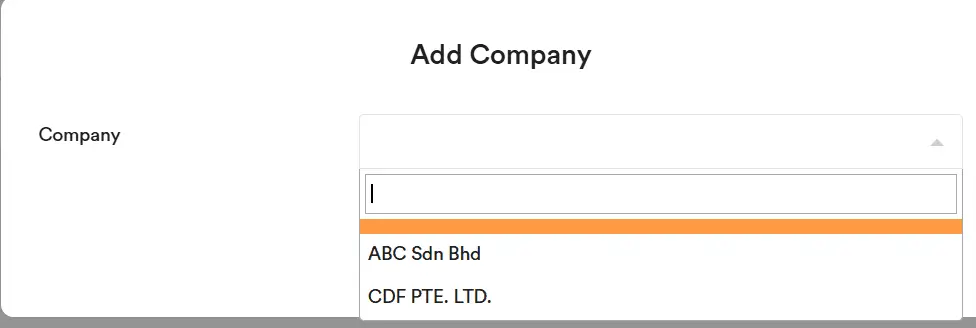
In the Company List, move the holding company to the top — the first company listed will be used as the base currency for consolidation.
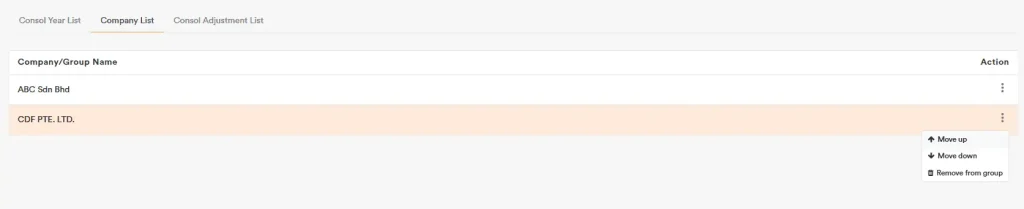
Set Exchange Rates
Click on Consol Year List, then edit the exchange rates for any foreign subsidiaries.
The Translation Reserve for each subsidiary will be auto-calculated as the balancing amount after translation — P&L at the Average Rate, balance-sheet items at the Year-End Rate, share capital at its historical rate, and retained earnings from opening balance plus current-year profit (less dividends).

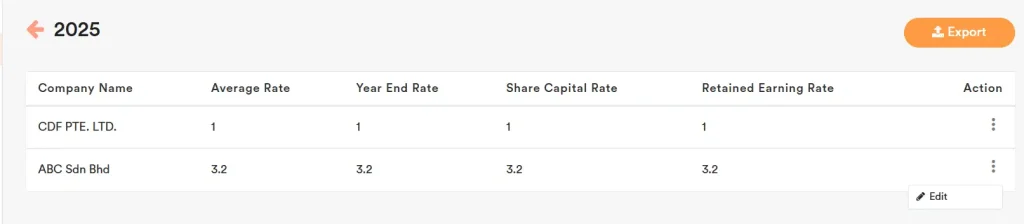
Add Consolidation Adjustments
Click Add Consol Adjustment and choose the type of adjustment:
Permanent: The adjustment will apply from the specified date onward, including future consolidation years.
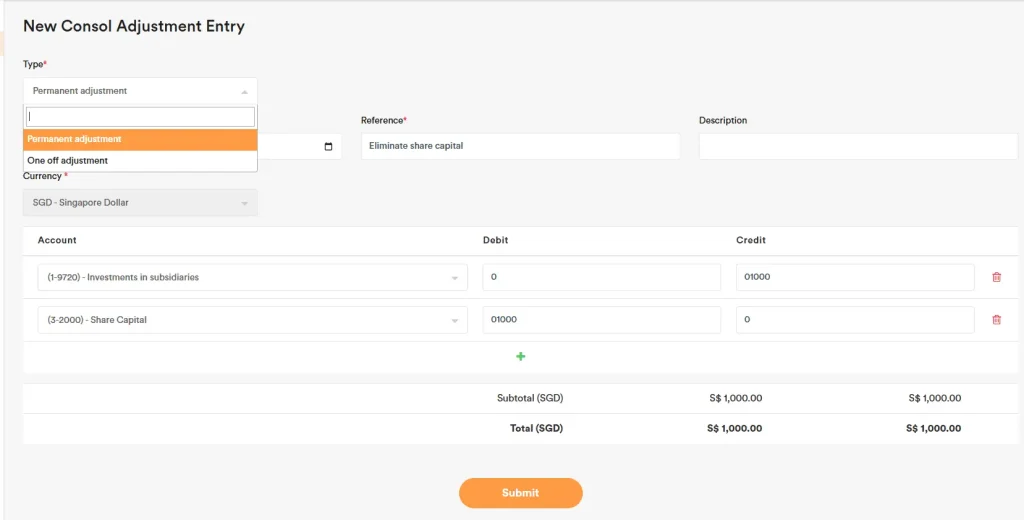
One-Off: The adjustment will apply only to the selected consolidation year.
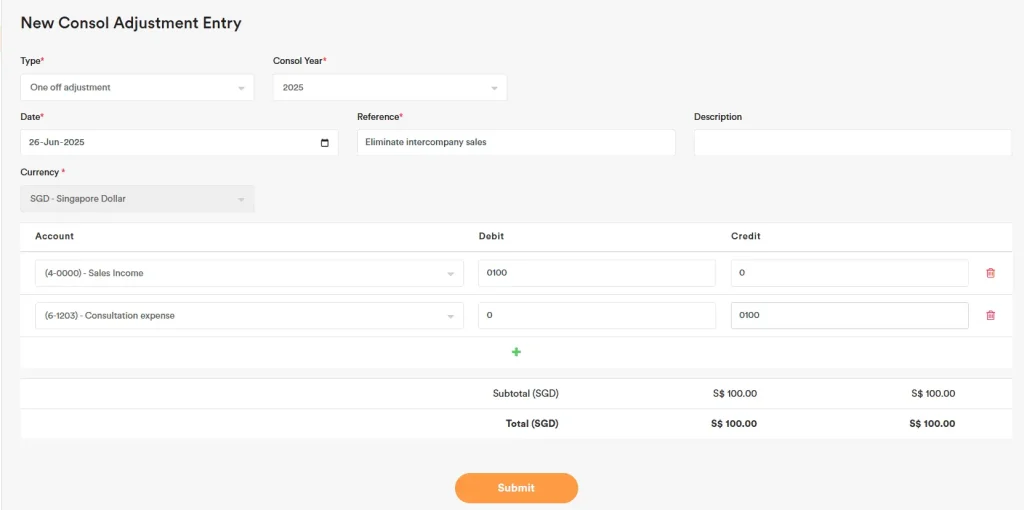
You can view all adjustments in the Consol Adjustment List.
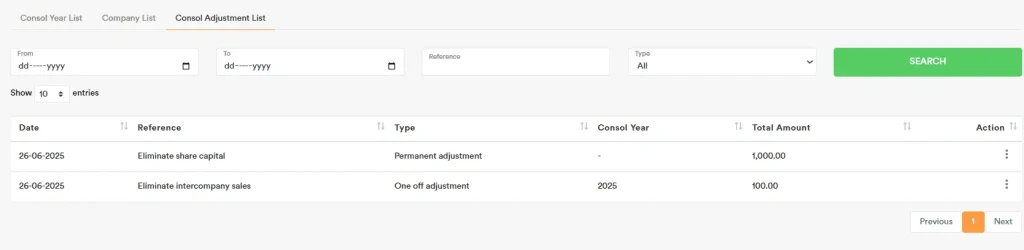
Account selection rules:
1. You cannot select Translation Reserve, Non-Controlling Interest (NCI), or Current-Year Retained Earnings directly.
2. To adjust the current year’s earnings, post to an Income or Expense account so it flows through Net Profit/Loss.
3. To post to Translation Reserve or NCI, first create these accounts in the holding company’s Chart of Accounts. Once created there, they will be available for selection in Consol Adjustment.
Export the Consolidated Worksheet
Go to the Consol Year List section and click Export to download the consolidated worksheet in Excel format.
Note: The consolidation account updates in real-time. Any changes made to individual company accounts will be automatically reflected at the consolidated level.

Note: Do not delete any accounts at the company level that are used in consolidation adjustments. If such accounts are deleted, the consolidation account cannot be exported, as the related adjustments will become empty.
If there are any changes to the account number or account name, you must resubmit the consolidation adjustments to update the information before exporting the consolidated account.
Singapore
GST Treatment of Bad Debts (Singapore)
In Singapore, when claiming bad debt relief, you should report the amount in the input tax box only using the tax code “9% Bad Debt Relief.” If the bad debt is subsequently recovered, you should report it in the output tax box only using the tax code “9% Bad Debt Recovery.”
In Singapore, if you make a sale and charge GST but the customer does not pay you, you may claim back the GST previously accounted for and paid to the government, provided you meet the prescribed conditions for bad debt relief.
Below is an example of the double entries:
1️⃣ When you write off the bad debt (and claim back the GST):
You record the write-off and reduce trade receivables via “Add Receipt”:
Debit: 6-1003 Bad Debt Expense 1,090
Credit: 1-0000 Trade Receivables 1,090
(Assume total invoice was 1,090 including 90 GST)
Record the following manual journal entry to recognise that we need to claim a refund from the government:
Debit: 6-1003 Bad Debt Expense 1,000 (9% Bad Debt Relief) + GST 90
Credit: 6-1003 Bad Debt Expense 1,090 (0% No Tax)

2️⃣ Later, when the government refunds the GST:
You record the cash received from the government:
Debit: X-XXXX Bank 90
Credit: 2-4000 GST Payables 90
3️⃣ If the customer pays you after the bad debt was written off:
You reverse the bad debt expense and repay the GST to the government:
Debit: X-XXXX Bank 1,090
Credit: 6-1003 Bad Debt Expense / 8-9000 Other Income (Bad Debt Recovery) 1,000 (9% Bad Debt Recover) + GST 90
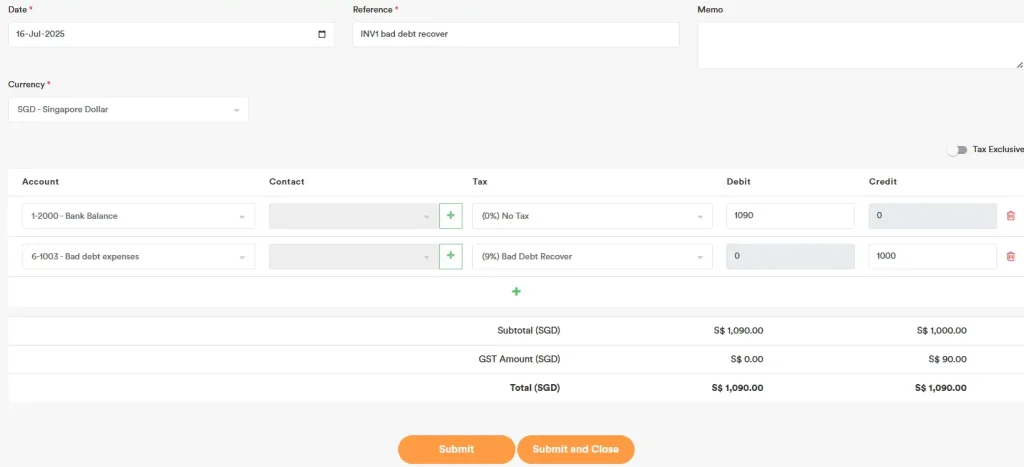
Then, you repay the GST portion to the government:
Debit: 2-4000 GST Payables 90
Credit: X-XXXX Bank 90
Singapore InvoiceNow (E-Invoices)
With AI Account, you can manage outgoing and incoming InvoiceNow e-invoices in one portal. You can send invoices in bulk, receive supplier e-invoices directly in the system, and track all InvoiceNow transactions in one place.
AI Account supports both PEPPOL e-invoicing and InvoiceNow submission to IRAS.
There are 2 possible options:
- PEPPOL + InvoiceNow IRAS
Send the invoice through the PEPPOL network and submit the invoice data to IRAS. - InvoiceNow IRAS only
Submit the invoice data to IRAS without sending the invoice through the PEPPOL network.
For non-GST-registered businesses, you can use PEPPOL e-invoicing, but InvoiceNow submission to IRAS is not applicable.
For GST-registered businesses, you can register for InvoiceNow with IRAS through AI Account. You may send through PEPPOL + InvoiceNow IRAS, or submit to InvoiceNow IRAS only, depending on your requirement.
This is useful because not all customers have a PEPPOL ID. If your customer is not registered on PEPPOL, you can still issue your normal tax invoice PDF and collect payment as usual, while submitting the required invoice data to IRAS through InvoiceNow where applicable.
Please note that InvoiceNow submission to IRAS is an additional invoice data submission step. It does not replace your normal GST filing. GST returns still need to be submitted as usual.
Our system also helps you monitor missing supplier invoices and maintain a complete audit trail for easier reconciliation and compliance.
This guide will show you how to connect your Company to InvoiceNow, send and receive e-invoices, and use the available features to streamline your invoicing process.
SG Connect to PEPPOL and InvoiceNow
First, go to the SG E-Invoice module to get started. Before proceeding, make sure the basic information in the Company Information section is complete. If any required details are missing, the system will display a pop-up message prompting you to update the information, such as the email address, company address, or UEN number.
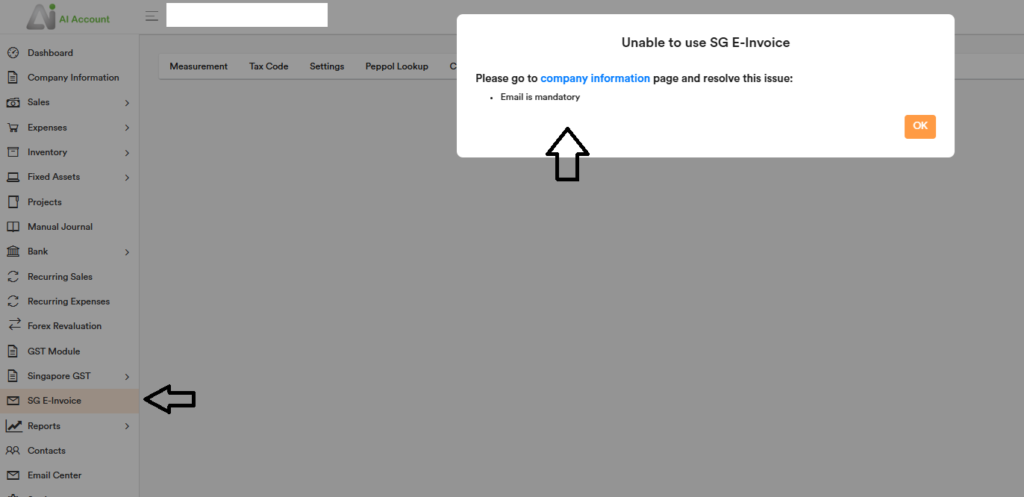
Once the required details have been completed, click the SG E-Invoice module again. This will bring you to the Connector tab. Enter the Business Representative Name and click Register. An email will then be sent to the email address shown on the screen for PEPPOL ID activation. Click OK when prompted.
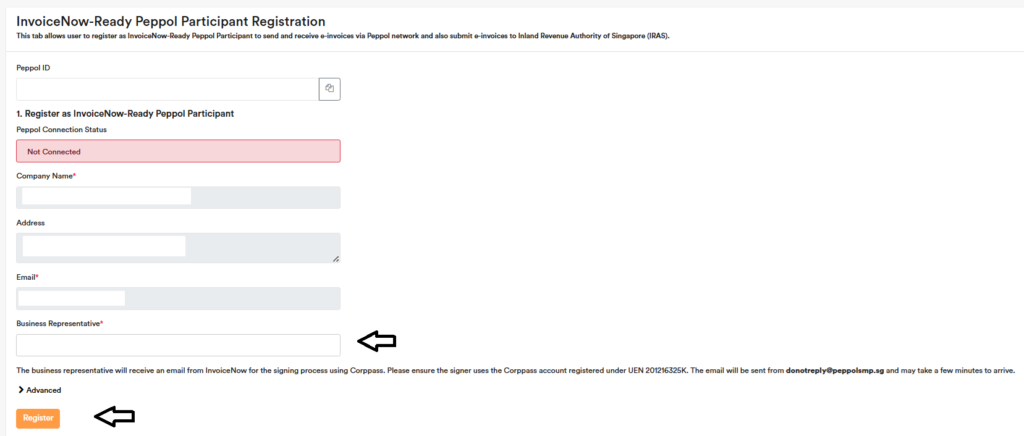
You will receive a registration email. Click HERE in the email to begin the activation process.
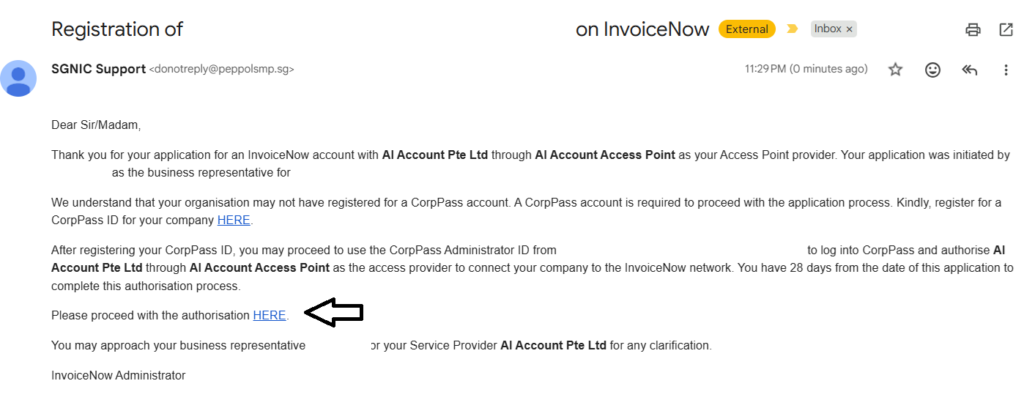
Next, click the Corppass button. Ask the company’s Corppass Administrator to scan their Singpass, select the relevant company name, and proceed.
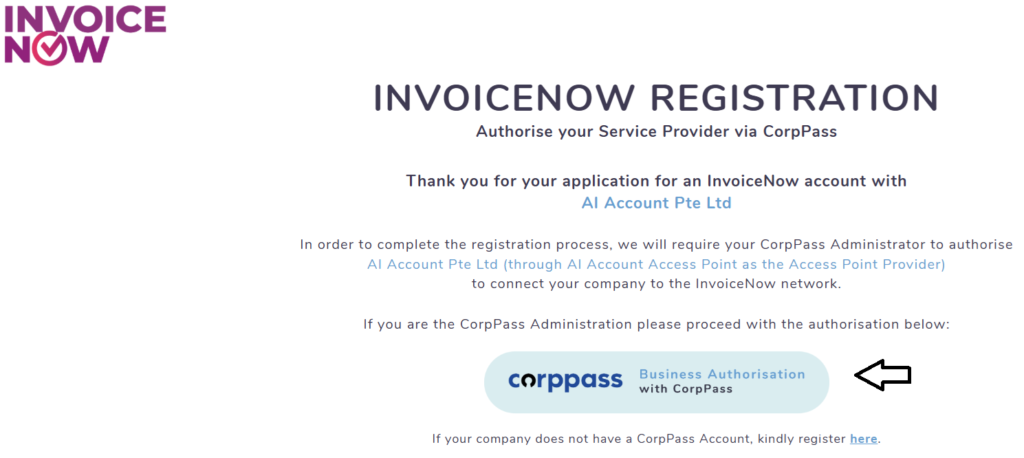
The system will then display Successful Activation. Please wait about 5 minutes before refreshing the page in AI Account, as the status may take a short time to be updated.
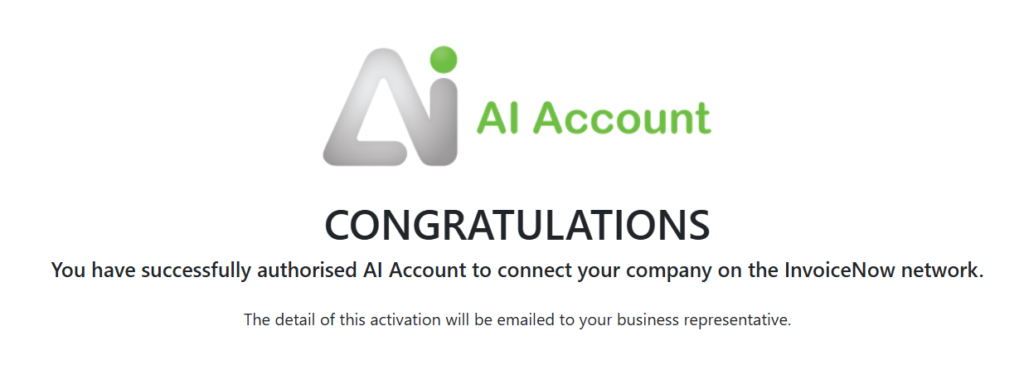
If your company is GST-registered and you have entered the GST registration number in the Company Information section, you will see a second section to authorise the submission of e-invoices to IRAS. Enter the Business Representative Name and click Initiate. Click OK when prompted.
As IRAS is progressively requiring GST-registered companies to adopt the InvoiceNow function, please check your application deadline and complete the setup early to avoid delays.
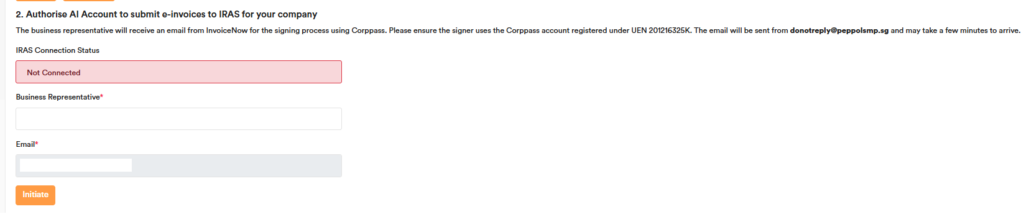
You will then receive another email. Click HERE in the email to start the activation process.
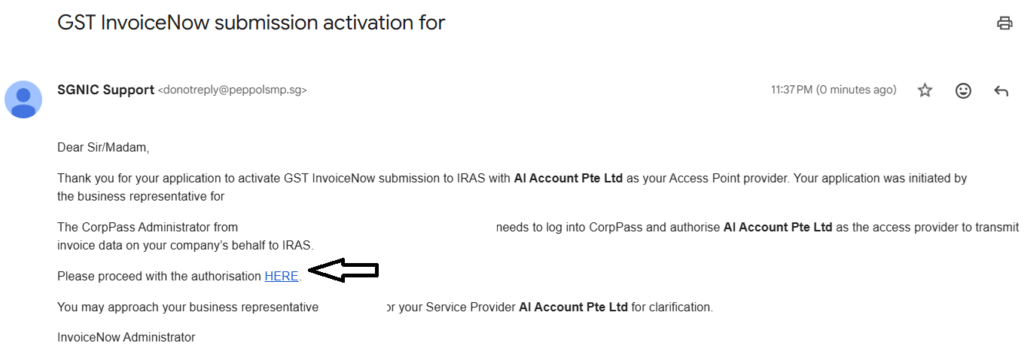
Next, click the Corppass button again. Ask the company’s Corppass Administrator to scan their Singpass, select the relevant company name, and proceed.
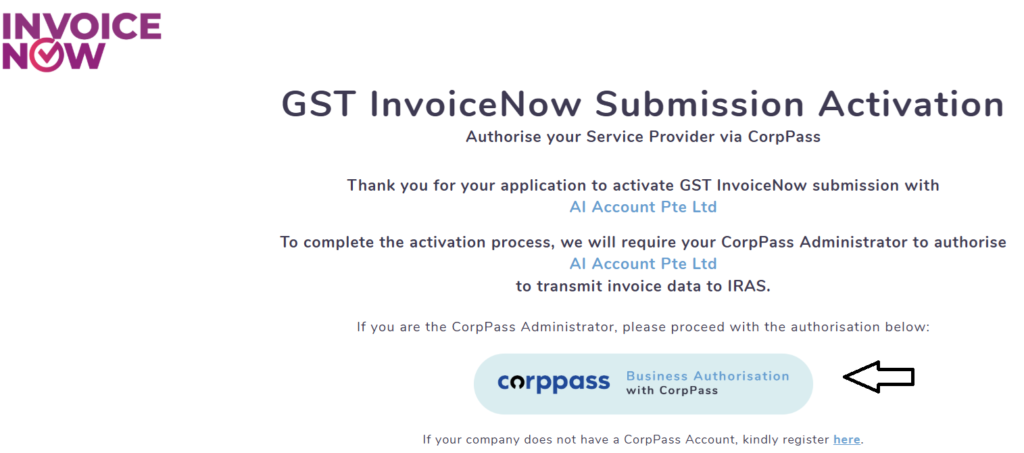
The system will then display Successful Activation. Please wait about 5 minutes before refreshing the page in AI Account, as the status may take a short time to be updated.
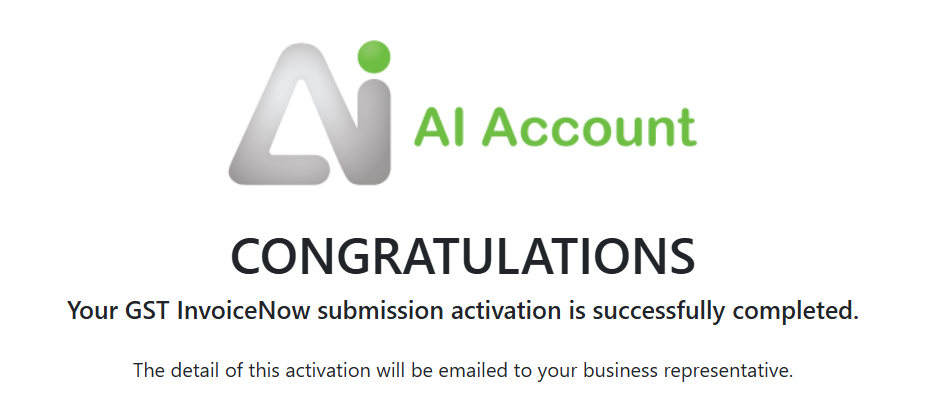
Finally, both statuses will show as Connected. If your company is not GST-registered, the second section will not be applicable.
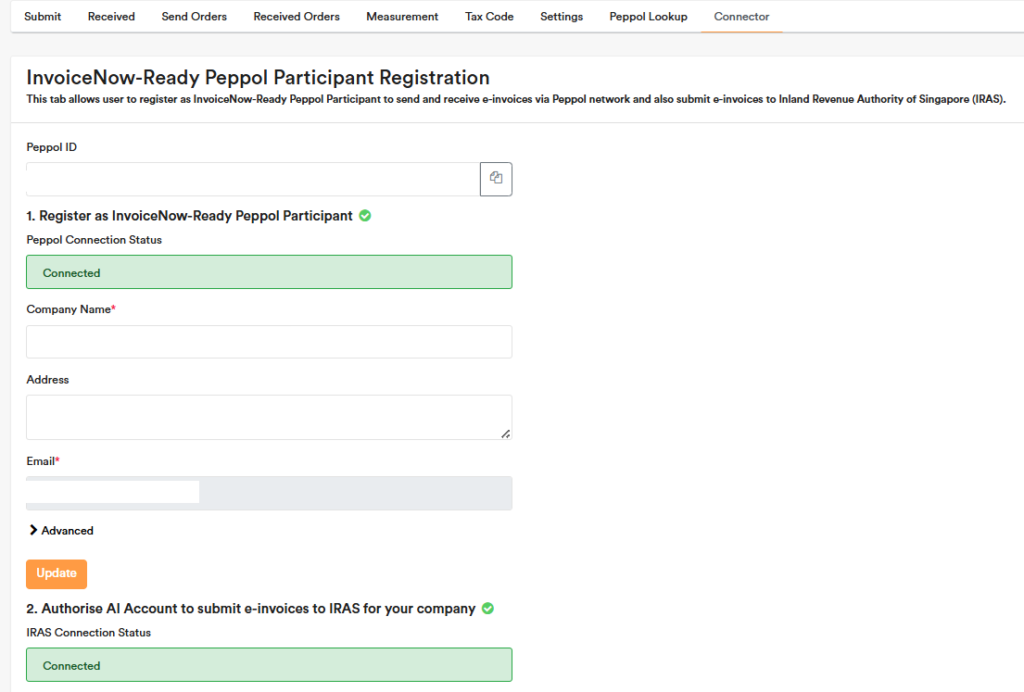
SG PEPPOL Lookup
In the PEPPOL Lookup tab, you can check the PEPPOL ID status of other companies.
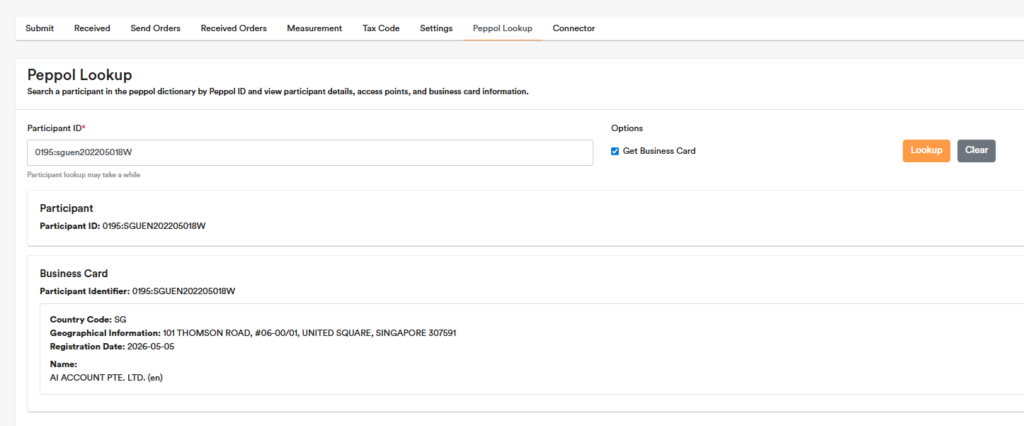
SG E-Invoice Settings
In the Settings tab, you can enter the Effective Date for when you want the feature to start.
Once this date is set, the Submitted tab and Received tab will only show transactions from that date onward. Any transactions dated before the effective date will be hidden.
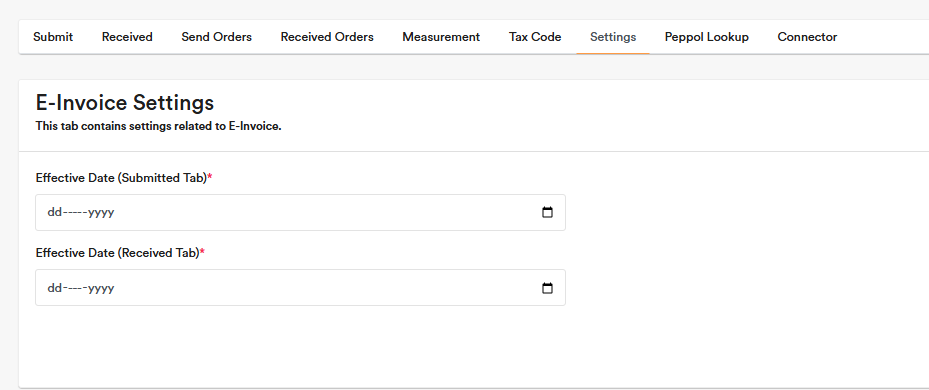
SG Tax Code
If you are using the system tax codes, no setup is required, as they are automatically matched to the corresponding PEPPOL tax codes.
If you have created your own tax codes, you will need to select the corresponding PEPPOL tax code for each one.
For more details on these tax codes, please refer to the section below titled “Codes for Singapore GST Categories”.
SG Measurement
If you have created your own measurement units, you will need to map them to the corresponding PEPPOL standard measurement codes in the Measurement tab.
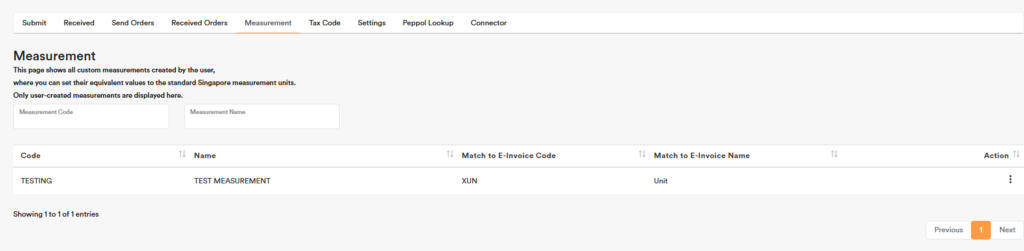
SG Submit Sales Invoices to PEPPOL and InvoiceNow IRAS
The Submit tab shows sales invoices and inventory sales invoices created in the system. Select the invoices you want to send, then click Send E-Invoice to submit them.
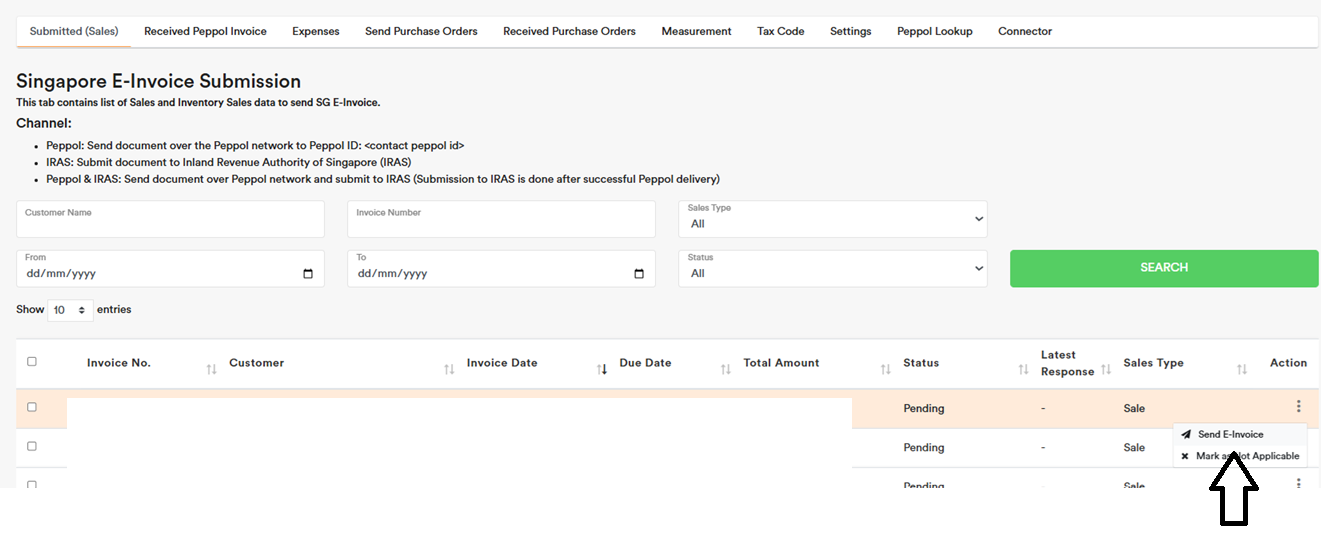
A submission confirmation prompt will appear. It will show the submission channel. The available channels are usually as follows:
## PEPPOL & IRAS – This channel applies when your company is GST-registered and registered for InvoiceNow, and your customer is PEPPOL-registered with a PEPPOL ID updated in the customer contact information. In this case, the invoice will be submitted through both **PEPPOL & IRAS**.
## IRAS Only – This channel applies when your company is GST-registered and registered for InvoiceNow, but your customer is not PEPPOL-registered or does not have a PEPPOL ID updated in the customer contact information. In this case, the invoice will be submitted to **IRAS only**. If the customer later obtains a PEPPOL ID and it is updated in the contact information, you can subsequently send the invoice through PEPPOL. This will not duplicate the IRAS submission for the same invoice. The channel will be updated to **PEPPOL & IRAS** after the PEPPOL submission.
## PEPPOL Only – This channel applies when your company is not GST-registered, but your customer is PEPPOL-registered with a PEPPOL ID updated in the customer contact information. In this case, the invoice will be submitted through **PEPPOL only**. If your company later becomes GST-registered, you can choose to submit the invoice to IRAS as well. The channel will then be updated to **PEPPOL & IRAS**.
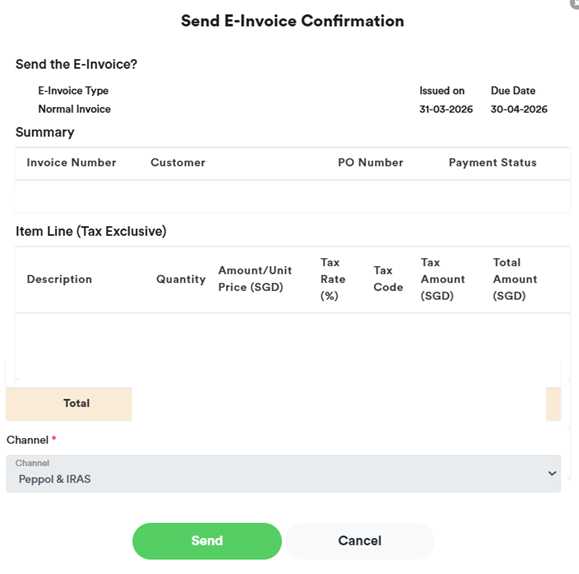
After you click **Send**, the following prompt will appear: **“E-Invoice Successfully Sent.”**
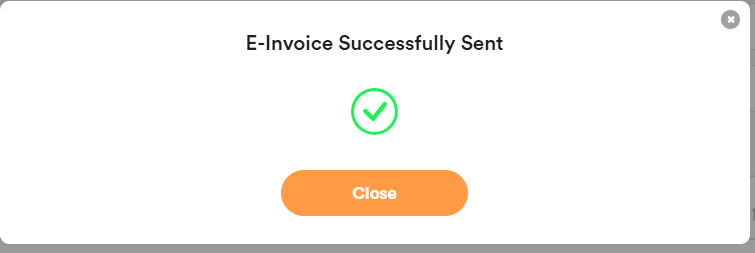
SG Receive PEPPOL Invoices
The Received tab shows e-invoices sent to you by other companies through the PEPPOL network. When a supplier sends you an invoice electronically, it will appear here for your review and action.
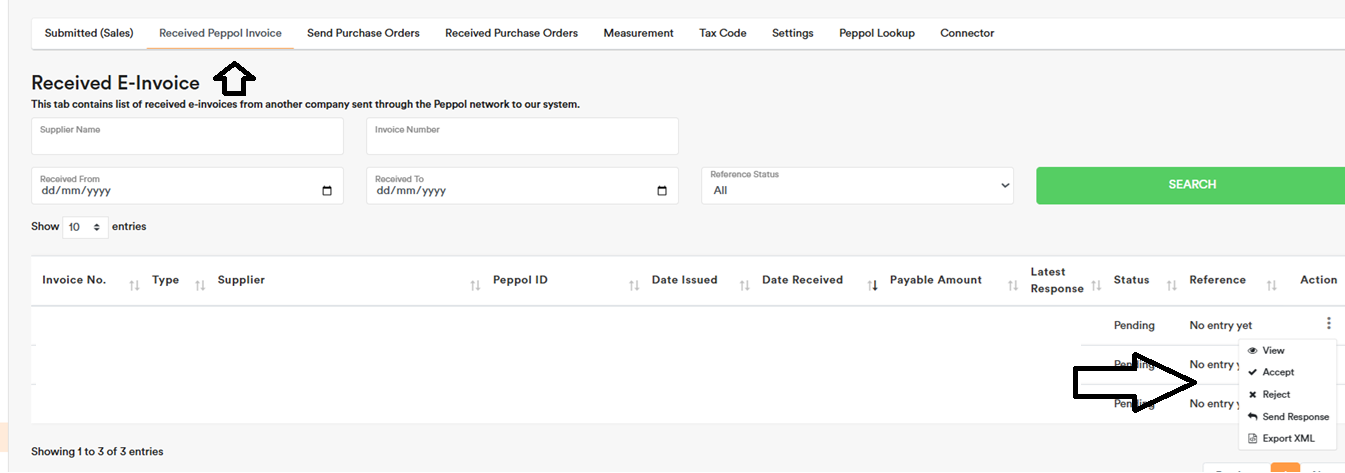
You can click View to create an expense if it has not been created yet, or link the PEPPOL invoice to an existing expense.
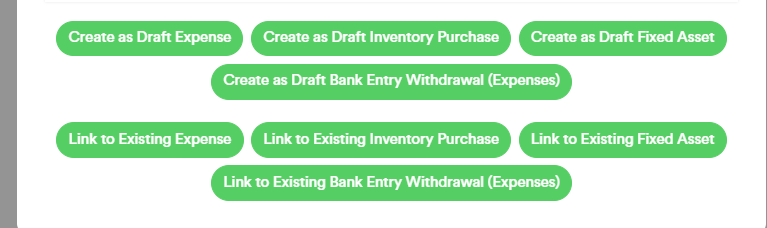
After the invoice is linked, the related expense will show the status Linked to InvoiceNow at the top of the page.
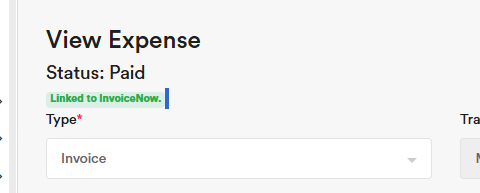
In the Received PEPPOL Invoice tab, the status will become Completed once the invoice has been linked to an expense.
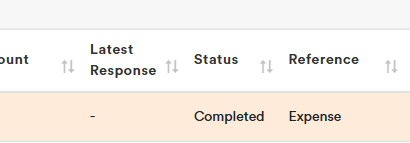
This step is important because whether an expense is linked to a PEPPOL invoice may affect the type of expense data submitted to IRAS for InvoiceNow. Linking the received PEPPOL invoice to the correct expense helps ensure the InvoiceNow records are complete and properly matched.
SG Send Expenses to IRAS via InvoiceNow
IRAS requires the system to differentiate whether an expense invoice submitted through InvoiceNow was received via PEPPOL or was a non-PEPPOL invoice.
AI Account will handle this for you. If you receive a PEPPOL invoice and link it to an expense, the system will track the connection. When the expense data is submitted to IRAS, AI Account will automatically detect the correct category and submit it accordingly.
Go to the Expenses tab in the SG E-Invoice module. This tab is available only after you have activated the InvoiceNow connection with IRAS.
You can click “Send to IRAS for All Pending Expenses” to submit all pending expenses at once. Alternatively, you can tick selected expenses and click Send to IRAS to submit only those selected items.
If an expense is not applicable for submission to IRAS, you can mark it as Not Applicable.
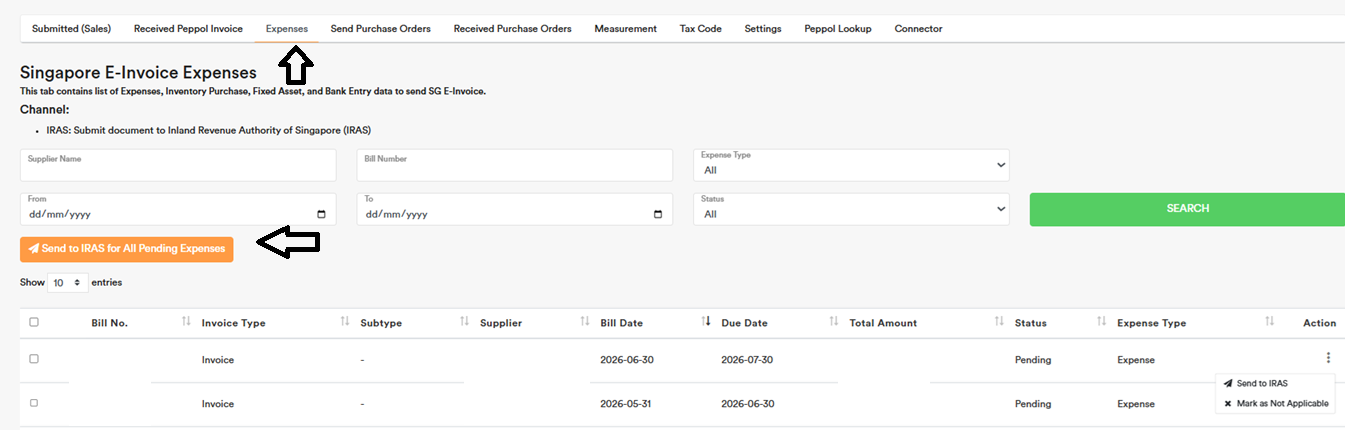
SG Send Purchase Orders via PEPPOL
The Send Orders tab shows purchase orders created in the system. If your supplier is registered on PEPPOL, you can send the purchase order directly from this tab.
First, create a Purchase Order in the Expenses module.
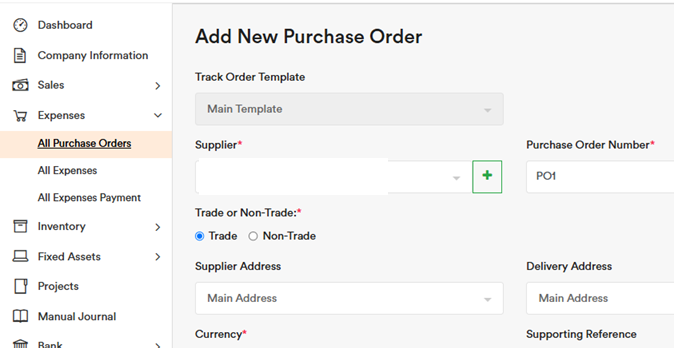
Then, go to the SG E-Invoice module and select the Send Purchase Orders tab. You will see the purchase order you created.
Under Action, choose the type of order you want to send to your supplier:
- Order Only (Profile 3) — One-way order, no response expected.
- Ordering (Profile 28) — Order + Accept/Reject response from supplier.
- Advanced Ordering (Profile 65) — Full cycle with change and cancellation support.
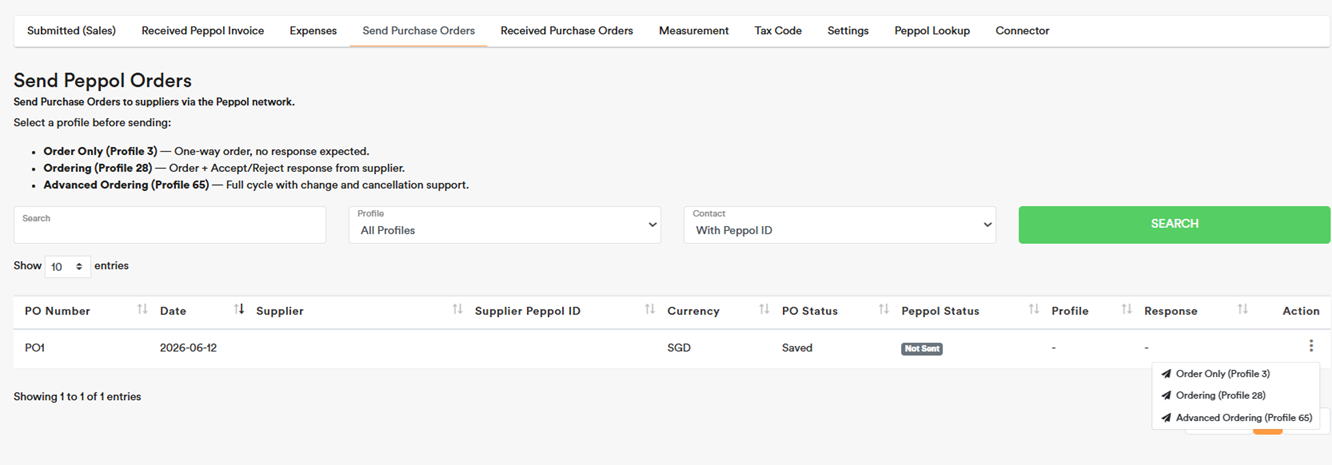
SG Receive Purchase Orders via PEPPOL
The Received Orders tab shows purchase orders sent to you by other PEPPOL IDs. When another PEPPOL-registered party sends you a purchase order, it will appear here for your action.
When you receive a purchase order from your customer, you can view it in the “Received Purchase Orders” tab under the SG E-Invoice module.
You can go to Action to process the purchase order and respond to your customer.
You can also click Action “View Details” to create a Draft Quote, create a Draft Sales Invoice, or link it to an existing sales invoice if you have already created one for the customer.
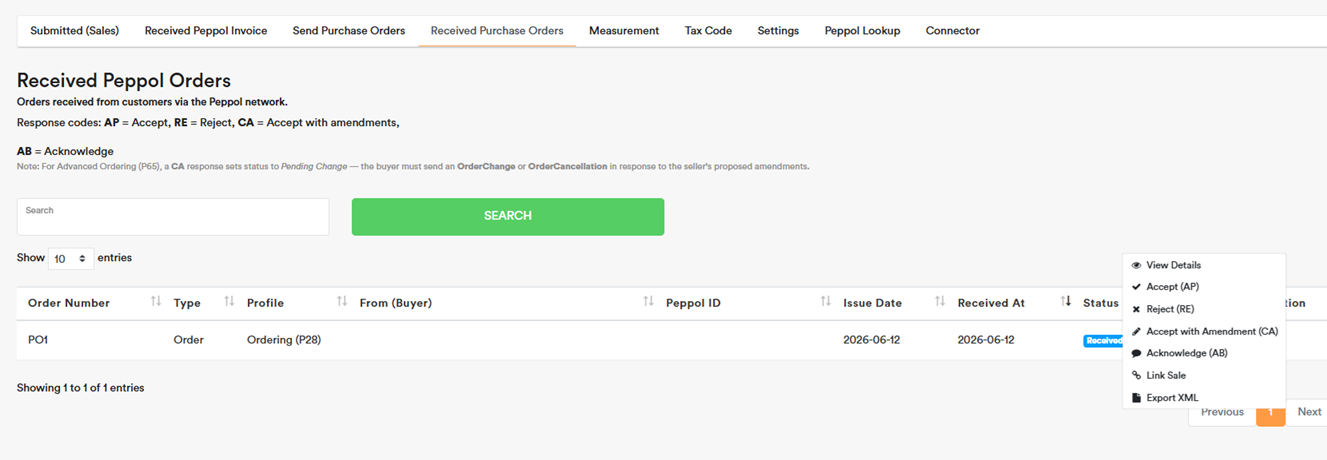
SG E-Invoice Customer Details
After PEPPOL is activated in your account, an extra tab called SG E-Invoice Customers Details Need will appear in the Contacts module.
This tab helps you review and update the customer details required for SG E-Invoicing, including:
- UEN
- PEPPOL ID
- GST number
- phone number
- email address
- country
- city
- state
- address
You can also use the available functions to speed up the update process:
- Auto-fill empty Country fields with Singapore
- Recheck All PEPPOL ID Status
- Recheck All GST Status
- Auto-fill UEN by Company Name
- Auto-fill PEPPOL ID based on UEN
- Auto-fill GST Number based on UEN
- Auto-fill Address by UEN
You may also use the Export function to download the contact list, update it in Excel, and import it back later. This makes it easier to complete the required customer details in bulk.
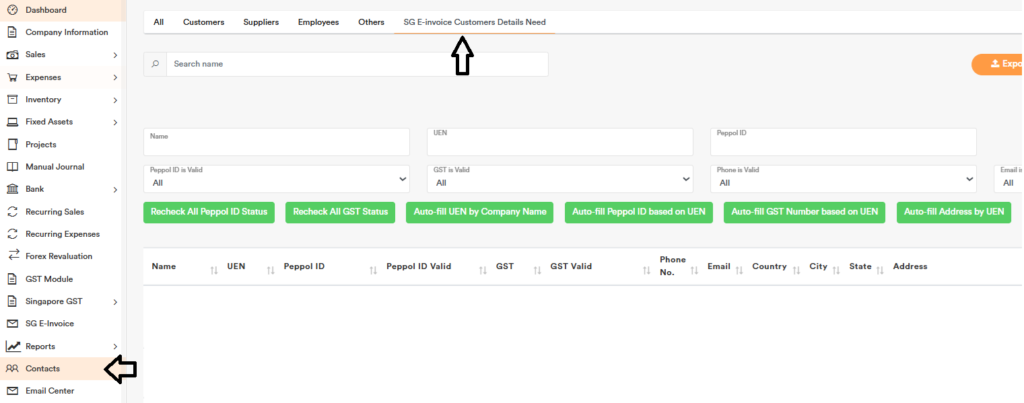
SG How to Deregister InvoiceNow and Your PEPPOL ID
Before you can deregister your PEPPOL ID with us, you need to go to the Connector tab and deregister the InvoiceNow connection first.
Click Deactivate, fill in the required details, and then click Initiate.
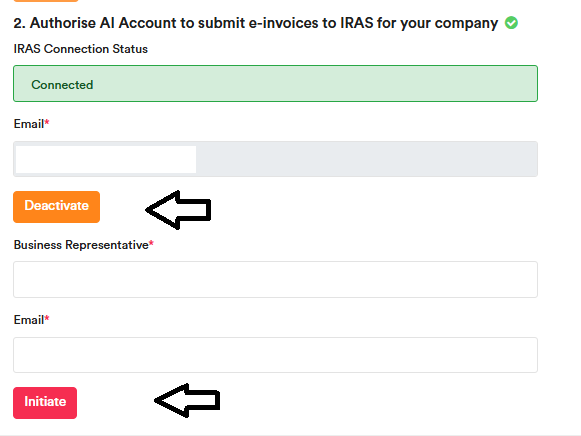
A confirmation prompt will appear. Click OK.
After that, you will receive a deactivation email. Click HERE in the email to begin the deactivation process.
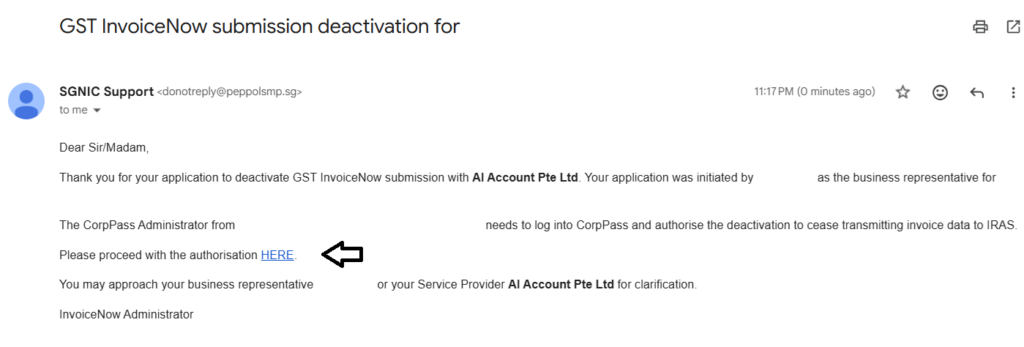
Next, click the Corppass button. Ask the company’s Corppass Administrator to scan their Singpass, select the relevant company name, and click on it.
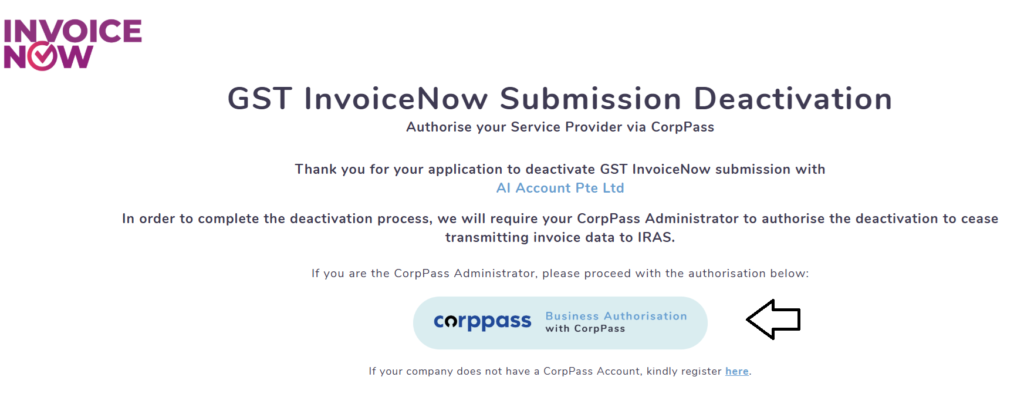
The system will then show Successful Deactivation.

After that, return to the same tab and click Unregister at the top section to unregister your PEPPOL ID with AI Account. When prompted, click OK.
The process is then complete, and the status will show as “Not Connected”.
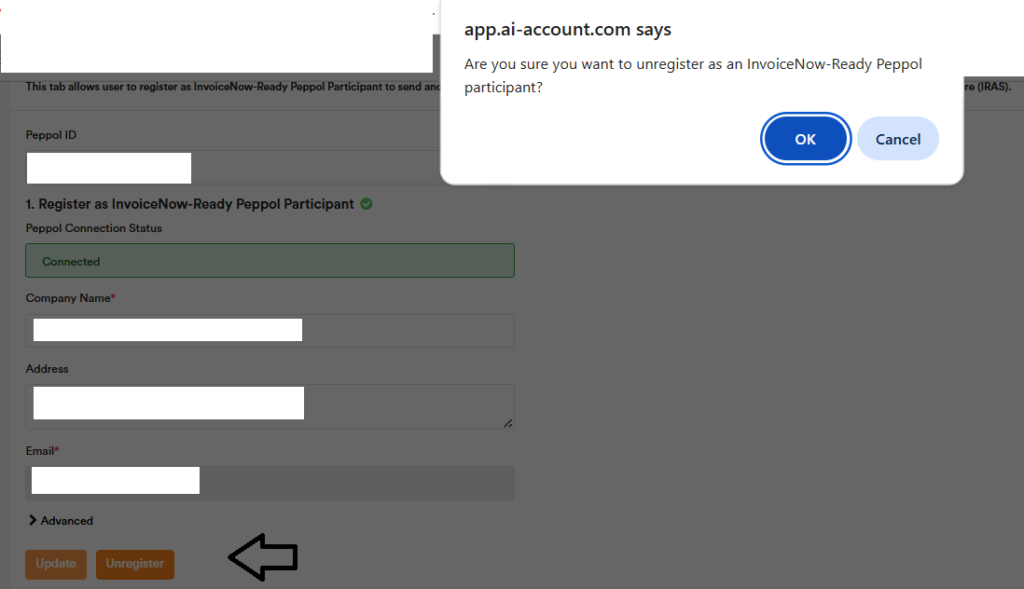
SG Codes for Singapore GST categories
GST Category Codes – Supplies and Purchases
| Section | Types of supplies/purchases | GST category code | GST rate | Description |
|---|---|---|---|---|
| Supplies (GST-registered business) | Standard-rated supplies | SR | 9% | Standard-rated supply of goods or services |
| Supplies (GST-registered business) | Standard-rated supplies | SRCA-S | NA | Customer accounting supply made by supplier |
| Supplies (GST-registered business) | Standard-rated supplies | SRCA-C | 9% | Customer accounting supply accountable by the customer on supplier’s behalf |
| Supplies (GST-registered business) | Standard-rated supplies | SRLVG | 9% | Own supply of Low-Value Goods (“LVG”) |
| Supplies (GST-registered business) | Standard-rated supplies | NA | NA | Taxable supplies where GST need not be charged under specific GST schemes such as Gross Margin Scheme (“GMS”), Approved Marine Fuel Trader (“AMFT”) Scheme, Approved 3rd Party Logistics (“A3PL”) Scheme. Please refer to the respective e-Tax Guides for invoicing and GST reporting requirements. |
| Supplies (GST-registered business) | Standard-rated supplies | SRRC | 9% | Imported services and LVG accountable by the GST-registered customer under reverse charge |
| Supplies (GST-registered business) | Standard-rated supplies | SROVR-RS | 9% | Supply of remote services accountable by the electronic marketplace on behalf of third-party suppliers |
| Supplies (GST-registered business) | Standard-rated supplies | SROVR-LVG | 9% | Supply of LVG accountable by the redeliverer or electronic marketplace on behalf of third-party suppliers |
| Supplies (GST-registered business) | Standard-rated supplies | DS | 9% | Deemed supplies |
| Supplies (GST-registered business) | Zero-rated supplies | ZR | 0% | Zero-rated supplies |
| Supplies (GST-registered business) | Exempt supplies | ES33 | NA | Regulation 33 Exempt Supplies |
| Supplies (GST-registered business) | Exempt supplies | ESN33 | NA | Non-Regulation 33 Exempt Supplies |
| Supplies (GST-registered business) | Out-of-scope supplies | OS | NA | Supplies outside the scope of the GST Act |
| Supplies made by non-GST registered business | Out-of-scope supplies | NG | NA | Supplies made by non-GST registered business, i.e. the non-GST registered business is not required to determine GST treatment, charge GST or file any GST returns. |
| Purchases (GST-registered business) | Standard-rated purchases | TX | 9% | Standard-rated taxable purchases |
| Purchases (GST-registered business) | Standard-rated purchases | IM | 9% | Import of goods (9% GST paid to Singapore Customs on the import of goods into Singapore) |
| Purchases (GST-registered business) | Standard-rated purchases | ME | 0% | Import of goods under the Major Exporter Scheme (“MES”), A3PL Scheme or other approved schemes |
| Purchases (GST-registered business) | Standard-rated purchases | IGDS | 9% | Import of goods under the Import GST Deferment Scheme (“IGDS”) |
| Purchases (GST-registered business) | Standard-rated purchases | TXCA | 9% | Standard-rated purchases of prescribed goods subject to customer accounting |
| Purchases (GST-registered business) | Standard-rated purchases | TXNA | NA | Purchases made under specific GST schemes, such as Gross Margin Scheme (“GMS”), Approved Marine Fuel Trader (“AMFT”) Scheme, Approved 3rd Party Logistics (“A3PL”) Scheme. Please refer to the respective e-Tax Guides for invoicing and GST reporting requirements. |
| Purchases (GST-registered business) | Standard-rated purchases | TXRC-TS | 9% | Imported services and LVG claimable by the GST-registered customer under reverse charge |
| Purchases (GST-registered business) | Standard-rated purchases | TX-ESS | 9% | Standard-rated purchases directly attributable to Regulation 33 exempt supplies |
| Purchases (GST-registered business) | Standard-rated purchases | TXRC-ESS | 9% | Imported services and LVG claimable by the GST-registered customer under reverse charge that are directly attributable to Regulation 33 exempt supplies |
| Purchases (GST-registered business) | Standard-rated purchases | IM-ESS | 9% | Import of goods with GST paid to Singapore Customs that are directly attributable to Regulation 33 exempt supplies |
| Purchases (GST-registered business) | Standard-rated purchases | TX-N33 | 9% | Standard-rated purchases directly attributable to non-Regulation 33 exempt supplies |
| Purchases (GST-registered business) | Standard-rated purchases | TXRC-N33 | 9% | Imported services and LVG claimable by the GST-registered customer under reverse charge that are directly attributable to non-Regulation 33 exempt supplies |
| Purchases (GST-registered business) | Standard-rated purchases | IM-N33 | 9% | Import of goods with GST paid to Singapore Customs that are directly attributable to non-Regulation 33 exempt supplies |
| Purchases (GST-registered business) | Standard-rated purchases | TX-RE | 9% | Residual input tax – purchases from GST-registered suppliers that are subject to GST at 9% and are either: – Attributable to the making of both taxable and exempt supplies; or – Incurred for the overall running of the business |
| Purchases (GST-registered business) | Standard-rated purchases | TXRC-RE | 9% | Imported services and LVG claimable by the GST-registered customer under reverse charge that are residual |
| Purchases (GST-registered business) | Standard-rated purchases | IM-RE | 9% | Import of goods with GST paid to Singapore Customs that are residual |
| Purchases (GST-registered business) | Zero-rated purchases | ZP | 0% | Zero-rated purchases |
| Purchases (GST-registered business) | Non-reportable purchases | BL | 9% | Disallowed expenses |
| Purchases (GST-registered business) | Non-reportable purchases | EP | NA | Exempt purchases |
| Purchases (GST-registered business) | Non-reportable purchases | OP | NA | Out-of-scope purchases received from GST-registered suppliers. Purchases from GST-registered suppliers where input tax is not claimed (e.g. not for business purposes, invalid tax invoices, not claiming input tax out of prudence etc.) |
| Purchases (GST-registered business) | Non-reportable purchases | NR | NA | Purchases received from non-GST registered suppliers |
| Purchases received by non-GST registered business | Non-reportable purchases | NR | NA | Purchases received by non-GST registered business, i.e. the non-GST registered business is not allowed to claim any input tax and not required to file any GST returns. |
Malaysia
Malaysia SST
You can generate the Malaysia SST reports from the modules below:
SST Report (Cash Basis)
Shows the Service Tax details for each tax code and transaction. This report only includes sales for which payment has been received, because Service Tax in Malaysia is reported on a cash basis.
SST Summary Return (Cash Basis)
Shows a summary of the total amount for each Service Tax code.
SST Report (Accrual Basis)
Shows the Sales Tax details for each tax code and transaction. This report is based on the accrual basis, because Sales Tax in Malaysia is reported on an accrual basis.
SST Summary Return (Accrual Basis)
Shows a summary of the total amount for each Sales Tax code.
SST Summary Return (Cash Basis)
In this module, you can open ‘Service Tax Setting’. Here, you can save the Declarant Information, which will be used when generating the SST-02 Report – Service Tax in the ‘SST-02 Report – Service Tax’ tab.
In the ‘Service Tax Codes’ section, created own tax codes can map them to the correct master tax code. This ensures the SST report is generated correctly.
You can find a similar setting for Sales Tax under SST Summary Return (Accrual Basis).
Please also remember to fill in the GST/SST/VAT Registration Number in Company Information. This number is used when generating the SST report. If it is not filled in, the field will appear blank in the report.
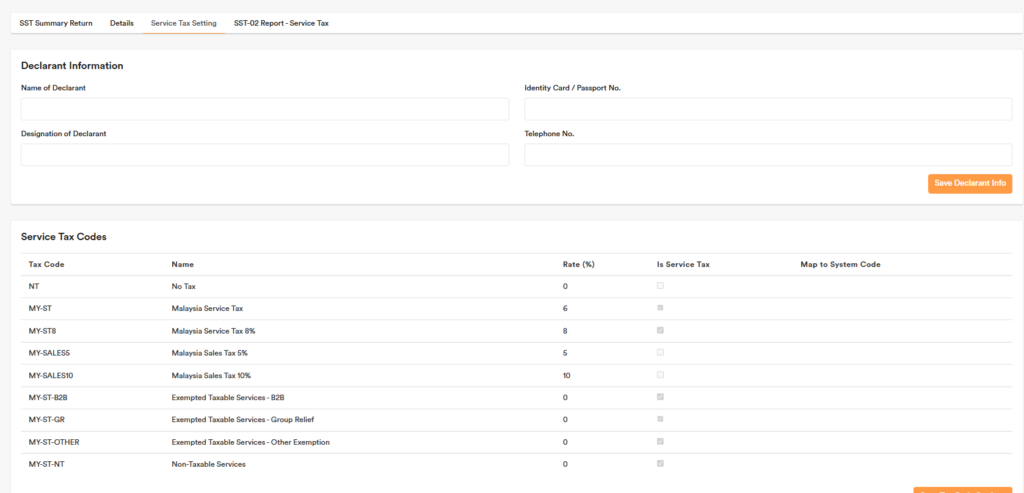
Malaysia E-Invoices
With AI Account, you can track both outgoing and incoming e-invoices all within one intuitive portal. Say goodbye to manual processes – you can send out hundreds of e-invoices automatically with just a single click, and easily auto-populate TIN numbers for all your contacts, eliminating the need to ask customers for this information. For sales not sent e-invoice individually, you can send consolidated e-invoices with a single click.
Our software is intelligent that when a sales invoice has items for which an e-invoice is not applicable, such as a client deposit, it will automatically exclude these items when sending the e-invoice to the client, ensuring only applicable details are sent.
In addition, you can receive supplier e-invoices directly in our software without needing to log in to the MyInvois portal, saving you time and hassle. Our software also allows you to efficiently track expenses awaiting e-invoices from your suppliers, follow up with them, issue self-billed e-invoices when necessary, or mark them as not applicable. What’s more, if you have multiple such expenses, you can easily send consolidated self-billed e-invoices, saving significant time compared to individual creation.
With our software, you’ll never have duplicate e-invoices, and every e-invoice sent or received is automatically tracked to ensure completeness. This gives you full confidence that nothing is missed, making LHDN and year-end audits hassle-free, as you can easily monitor and verify everything within the AI Account system.
This guide will walk you through connecting your AI Account to the MyInvois Portal, sending and receiving e-invoices, and utilizing the various e-invoice features within AI Account to streamline your processes and ensure compliance. Let’s get started!
Connect to MyInvois Portal
Click on “MY E-Invoice” to begin connecting your AI Account to the MyInvois Portal. Then, follow the step-by-step instructions provided in our software.
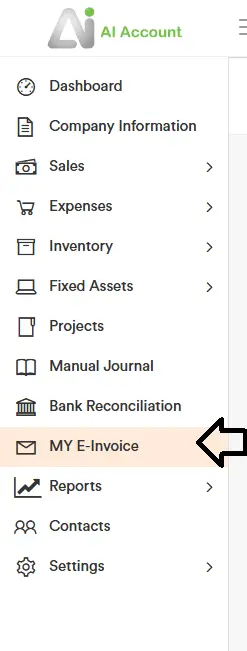
Connector Tab
This tab contains guide for users to add AI Account as Intermediary at MyInvois Portal.
You must have an account first on MyInvois Portal.
1. Go to Company Information and make sure you have filled the correct BRN and TIN. Also, make sure to fill out Contact Number, Company Email, and Address.
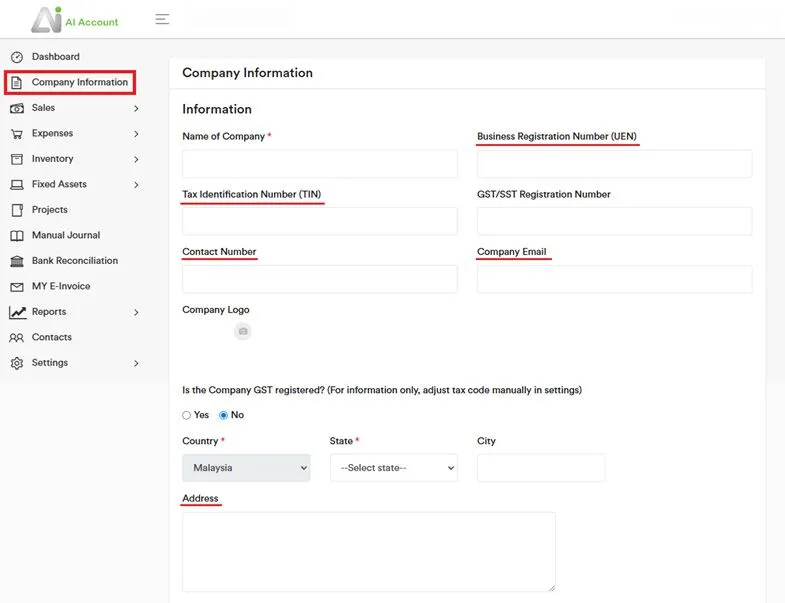
2. Go to MyInvois Portal and login using the company’s director account.
3. After login, click ‘MyInvois’ at the top bar.
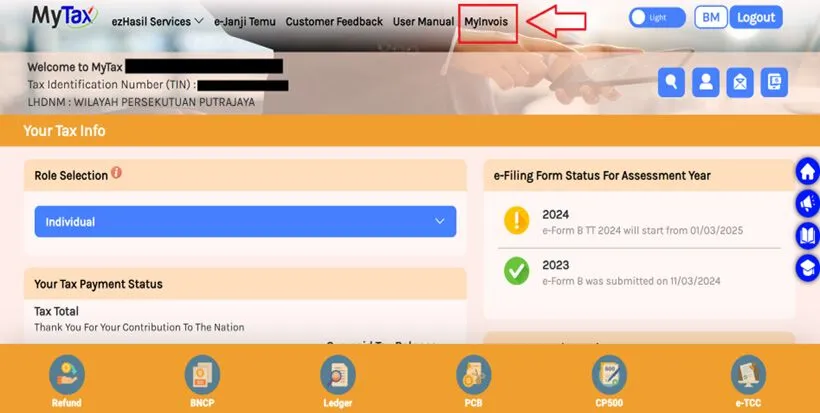
4. Go to your profile on right top navbar, please see image below.
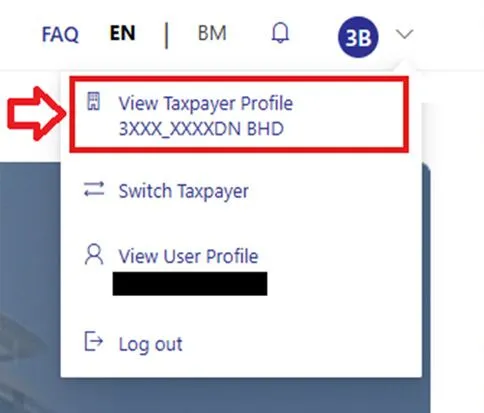
5. Scroll to bottom page there will be a table and click “Add Intermediary”.
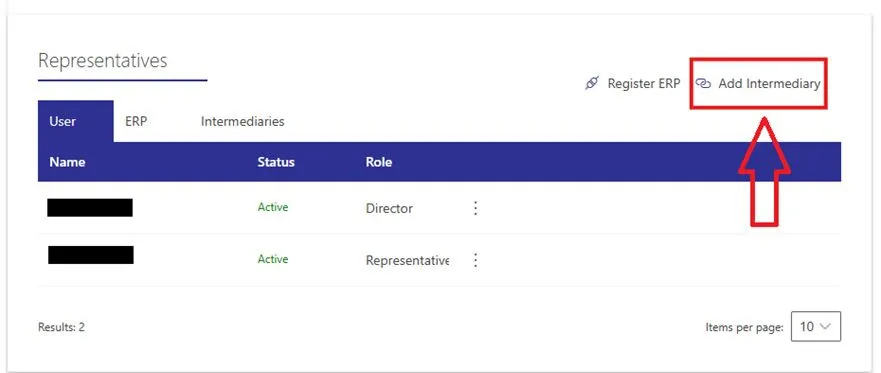
6. At the Add Intermediary screen, fill the TIN, BRN, and our company name (TIN : C58923977050, BRN : 202401035225, Company Name : AI ACCOUNT SDN. BHD.). Company name needs to be in capital letters.
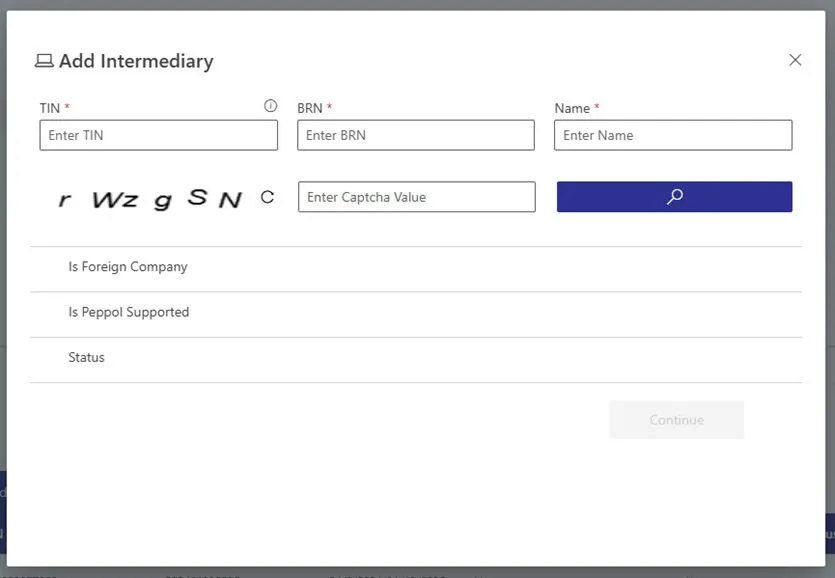
7. Set the representation date range and enable all permissions. Then, click ‘Add Intermediary’ button.
- For the “Representation From” field, you can use today’s date.
- For the “Representation To” field, you can use a date up to 10 years from today.
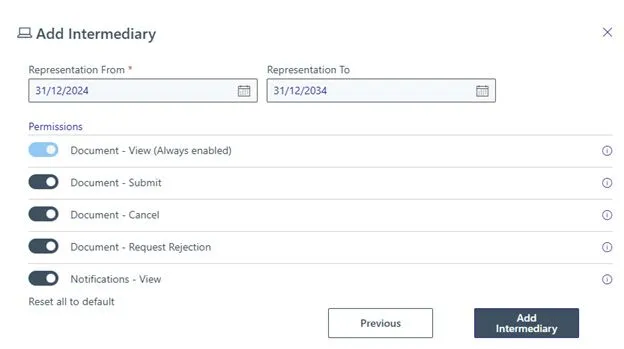
8. After successfully add intermediary, you will see our company on the Intermediary tab.

9. Go to settings tab and fill out the required information then save the settings.
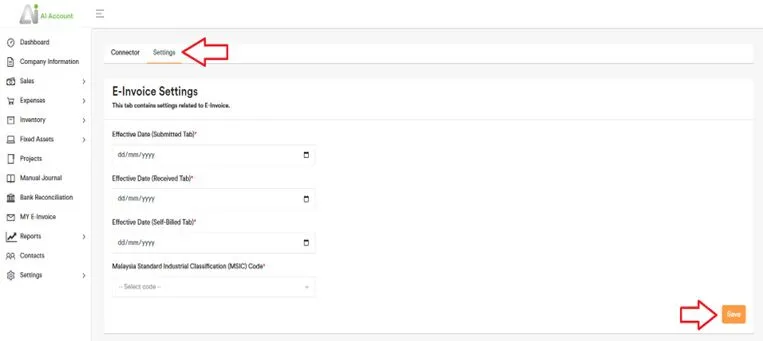
10. You have successfully added AI Account as an Intermediary in MyInvois Portal and can start using the e-invoice feature.
Change of Intermediary
You may encounter an issue when adding a new intermediary if the existing one is still active. To resolve this:
1. Open the existing intermediary and click Edit.
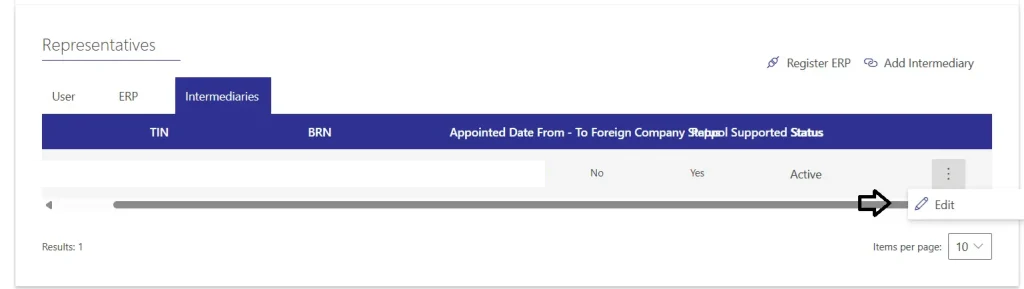
2. Click Continue.
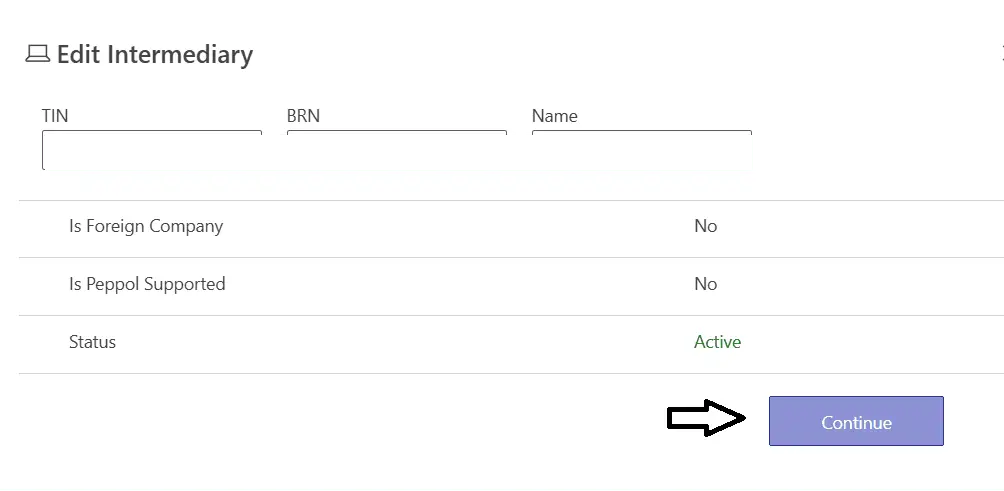
3. In the Representation To field, change the date to yesterday so the record expires, then click Save.
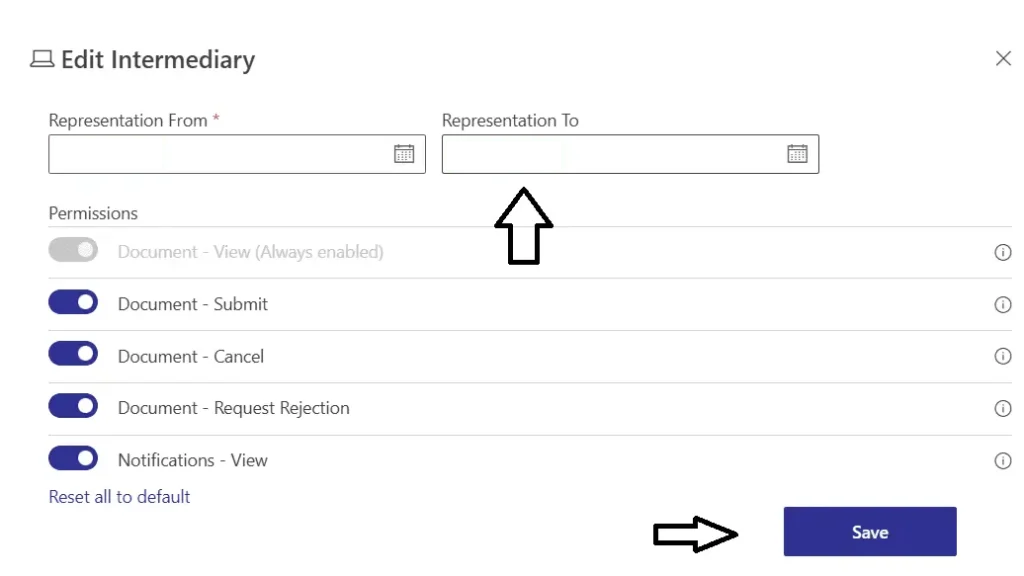
4. The Status will update to Expired.
5. Go to the Connector tab and follow the steps to add AI Account as the new intermediary.
Enable access to the Received tab to view incoming e-invoices in AI Account
By default, the MyInvois portal only lets intermediaries like AI Account access e-invoices submitted on your behalf. To manage received e-invoices in AI Account, you must grant additional access. Follow these steps to enable full access and use the Received tab.
11. On the representatives table, click “Register ERP”.
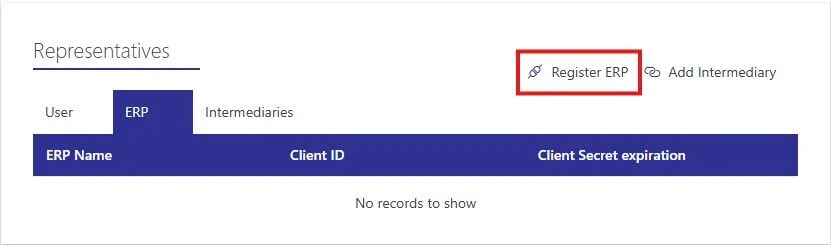
12. At the Add ERP System screen, fill out the ERP Name, Select the Client Secret expiration (3 Year is recommended), and optionally check Primary ERP System. When all field on the form is filled, click “Register” button.
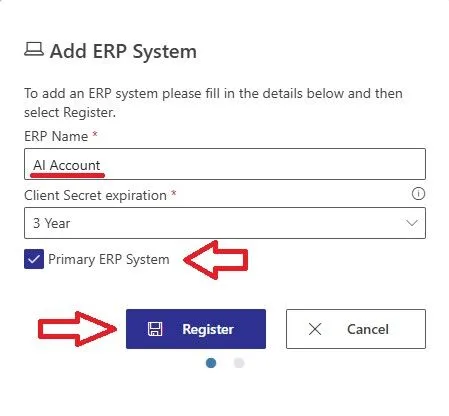
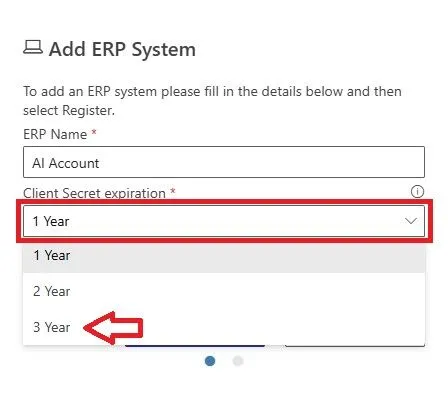
13. After successfully registering, you will be given 1 Client ID and 2 Client Secret. Make sure to take note of this information and copy it to somewhere safe. Then check the confirmation box and click “Done” button. You will need this information to fill out the Client ID and Client Secret on the AI Account Settings tab.
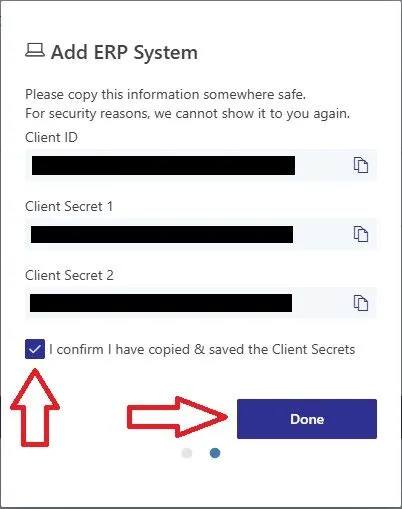
14. Go to Settings tab and scroll down to the ERP Access Credentials section
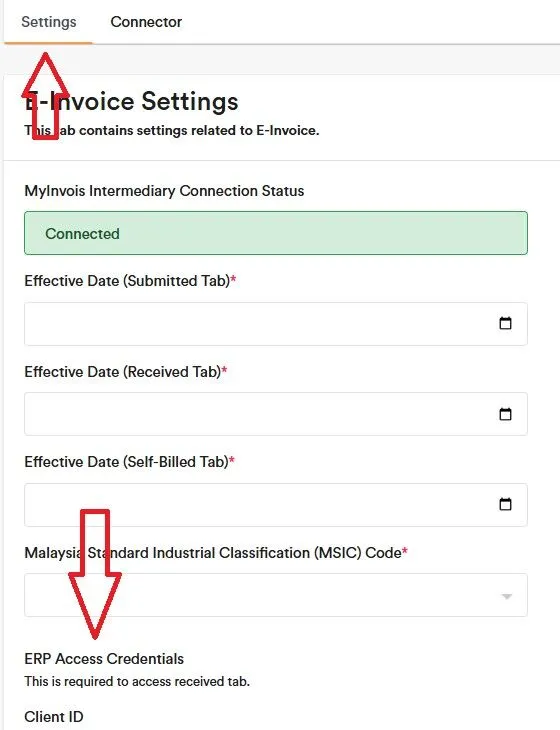
15. Fill out the Client ID and Client Secret then click save. Below is an example of a filled Client ID and Client Secret. You will need to use the Client ID and one of the Client Secret that you have been given on step 13.
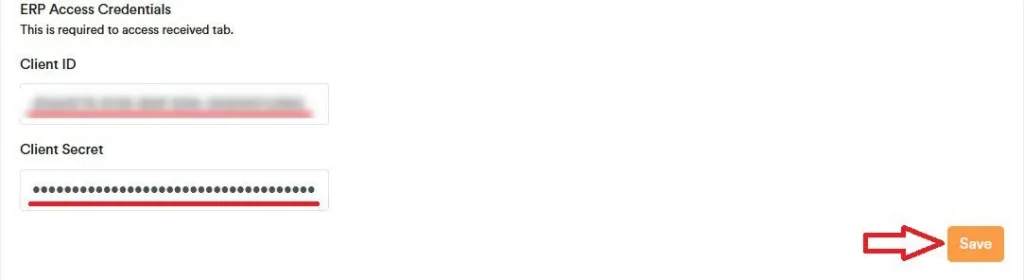
16. You have successfully granted AI Account full access to your received e-invoice. You can now use the received tab to manage e-invoice from other company.
Process Received E-Invoices into Accounting Entries
When you receive an e-invoice from your supplier, it will appear under the Received tab as shown below. Click ‘View’ to open it.
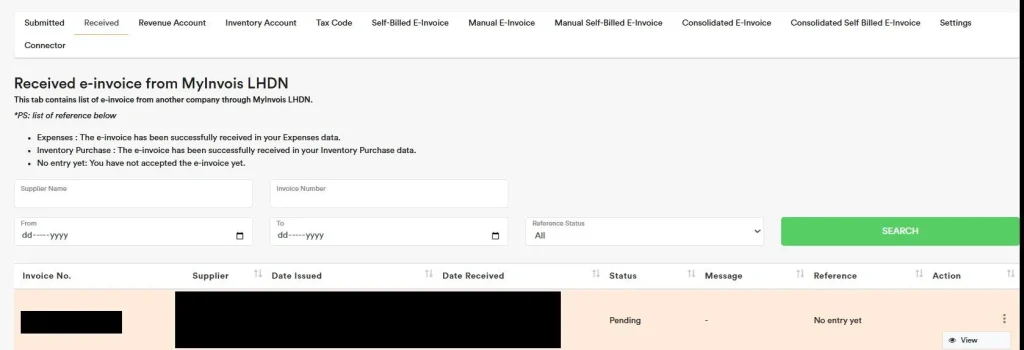
You can review the details and select the relevant green box to either connect to an existing entry already recorded in your account or create a new one if it has not been recorded yet. The received e-invoice will automatically link to it once you complete the process.
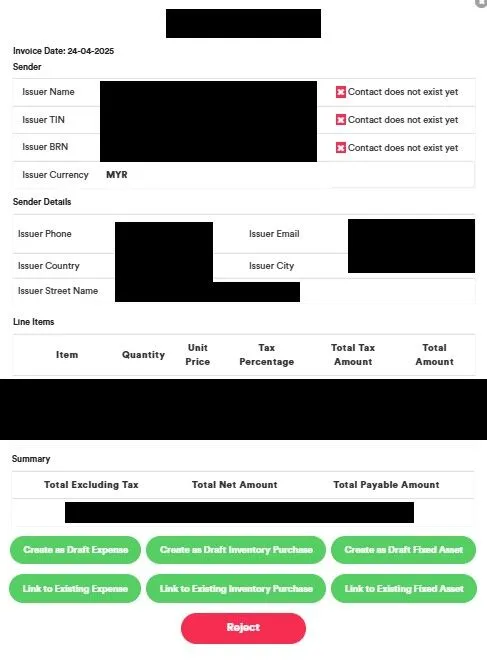
Reject E-Invoice Received
When you receive an e-invoice from a supplier, it will appear under the Received tab with the status Pending. If you believe the supplier has sent you the wrong invoice, go to Action and select Reject. Enter your message and send your rejection to the supplier.
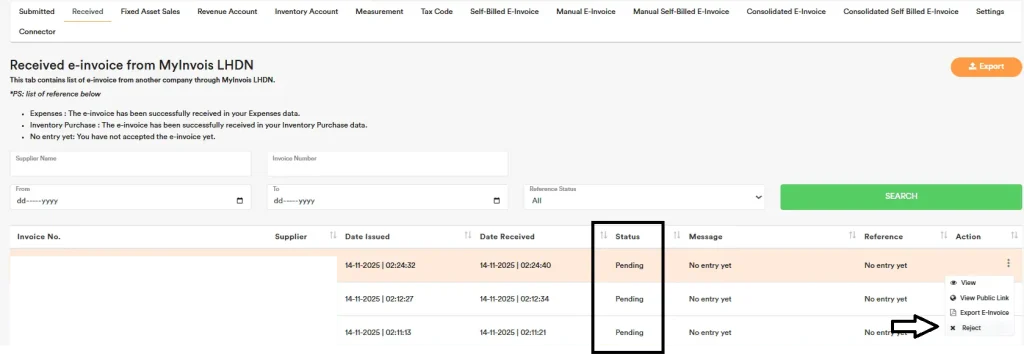
If the e-invoice was issued more than 72 hours ago, you will see a warning message stating that it can no longer be rejected, as invoices cannot be cancelled after 72 hours.
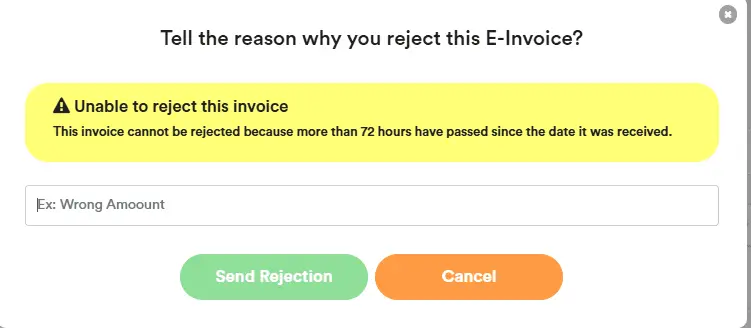
After you send the rejection message to the supplier, the invoice will display as shown below.
Submitting a rejection for the e-invoice is still valid, but it is advisable to email your supplier as well, because sometimes suppliers do not log in to the MyInvois portal to check messages and may overlook cancelling the invoice for you.
Once the supplier cancels the e-invoice on their side within 72 hours, the invoice status will change to Cancelled, as shown below.

Import E-Invoice Data for Contacts
Once the connection is complete, go to the Contacts section and click the new tab “MY E-Invoice Customers Details Need.” This tab displays the missing information required for e-invoices, such as the BRN (Business Registration Number in the new format), SST number (if available), phone number, country, city, state, and address. Please use the dropdown options for country and state to ensure error-free data import. You can export into Excel file, update the required details, and then re-import it; the existing data will be replaced with the new information.
Thereafter, click on “Auto-fill TIN based on BRN,” and our software will automatically locate and populate your TIN number.
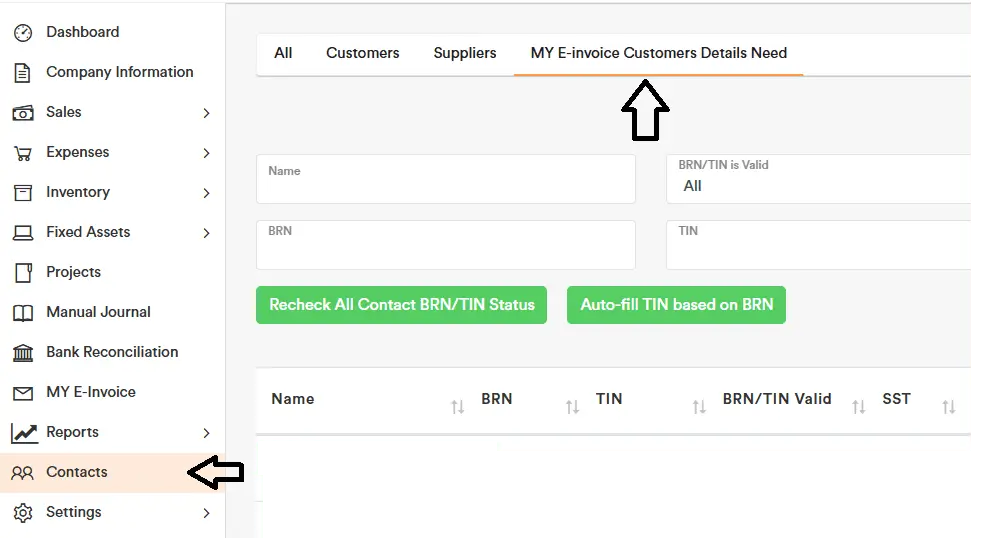
MY E-Invoice section
In the “MY E-Invoice” section, once your connection is complete, you’ll see the following tabs on the top bar:
- Submitted: This tab displays your sales entries. Click on an entry to send an e-invoice to your customer. If a contact’s email is provided, the system will automatically send the e-invoice to your customer. You may also export the e-invoice format and manually email it. Once an e-invoice is sent through, the customer will receive the e-invoice in their MyInvois portal.
- Received: E-invoices received from suppliers appear here. You can link these invoices to existing expenses or create new expense entries.
- Fixed Asset Sales: In the Fixed Asset section, any disposal will be reflected here, and an e-invoice can be triggered for the sale of the fixed asset under this tab.
- Revenue Account: Match your accounts to the appropriate classification code. The default code is 022 – Other.Only accounts with “Sales Selection” ticked can be used to send e-Invoices and assigned a classification code.If an item does not require an e-Invoice, select the classification code “EXMPT – Exempt from e-Invoice.”
- Inventory Account: Match your inventory list to the relevant classification code. The default is also 022 Other.
- Tax Code: This remains set according to the system default.
- Self-Billed E-Invoice: Issue self-billed e-invoices from this tab based on recorded expenses.
- Manual E-Invoice: Issue manual e-invoices here. These are not connected to any accounting record and are useful, for example, when a consolidated e-invoice has been issued and the customer requests a separate one to reverse part of the consolidated entry.
- Manual Self-Billed E-Invoice: Use this option to issue manual self-billed e-invoices when needed. These are not connected to any accounting record.
- Consolidated E-Invoice: Select invoices that haven’t been sent as individual e-invoices and easily submit them as a consolidated e-invoice to LHDN.
- Consolidated Self-Billed E-Invoice: Select invoices that haven’t been submitted as individual self-billed e-invoices and submit them as a consolidated Self-Billed E-Invoice to LHDN.
- Settings: Update your effective date for e-invoice implementation here if it was entered incorrectly during the initial setup.
- Connector: The steps provided here to add your AI Account as an intermediary in the MyInvois Portal.
Customise the E-Invoice Email to Customers
You can customise the ending of the E-Invoice email to customers by replacing the default “Thank you.” with your preferred content.
Set CC Email for Customer E-Invoices
You can choose which email address(es) to CC in E-Invoice Settings. After you enter the email address(es) here, they will be automatically CC’d whenever you send an e-invoice to your customers.
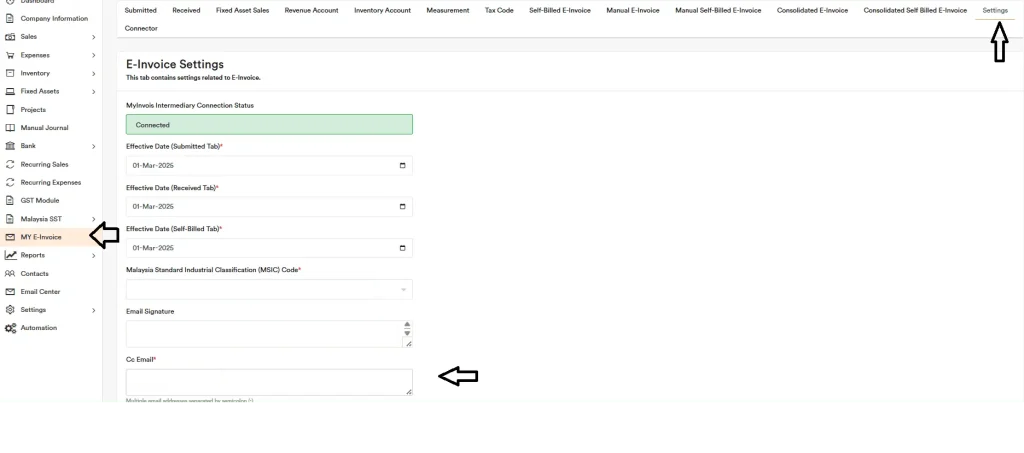
Send e-Invoice email to customers
By default, in E-Invoice Settings, the option “Send e-Invoice email to customers (after submission to LHDN)” is ticked.
If you want to stop the system from emailing customers after submission to LHDN e-Invoice, untick this option and click Save.

Consolidated e-Invoice Limit
You can adjust the Consolidated e-Invoice Limit in E-Invoice Settings when regulations change or to align with your company policy.
1) Consolidated e-Invoice Amount Limit
Default: 10,000
Meaning: Maximum allowed amount for a consolidated e-invoice.
If the user sets 0: No limit (can send consolidated e-invoice above RM10,000).
2) Consolidated e-Invoice Amount Limit Message
Default message:
“From 1 Jan 2026, amounts exceeding RM10,000 cannot be included in a consolidated e-invoice.”
Used as the message shown to users (e.g., notice / when limit is exceeded).
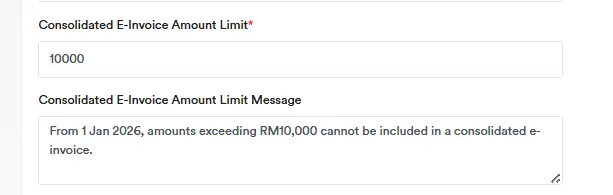
Show E-Invoice QR Code and UUID Number on Tax Invoices
Go to E-Invoice Settings, tick the option “Show the QR Code and UUID Number in Tax Invoice”, and click Save to display the E-Invoice QR Code and UUID Number on your tax invoices. Once enabled, every invoice generated will show the QR code and UUID for the e-invoice that has been sent out.

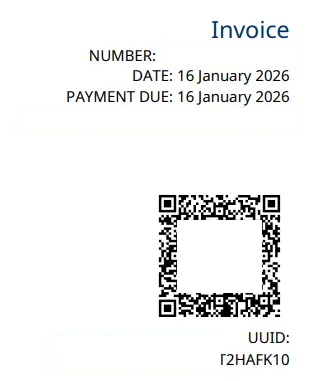
Steps for Sending an E-Invoice to Your Customer
Step 1: Enter your sales invoice details in the “All Sales” module by clicking “Add New Sale.”

Step 2: Navigate to the My E-Invoice Module. In the Revenue Account and Inventory Account tabs, select the correct classifications for your revenue and inventory accounts.
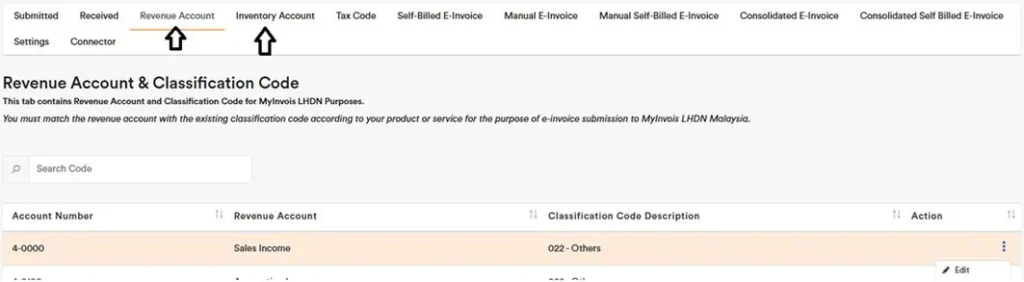
Step 3: Once the sale is created, the sales invoice will automatically appear as a line in the Submitted Section.
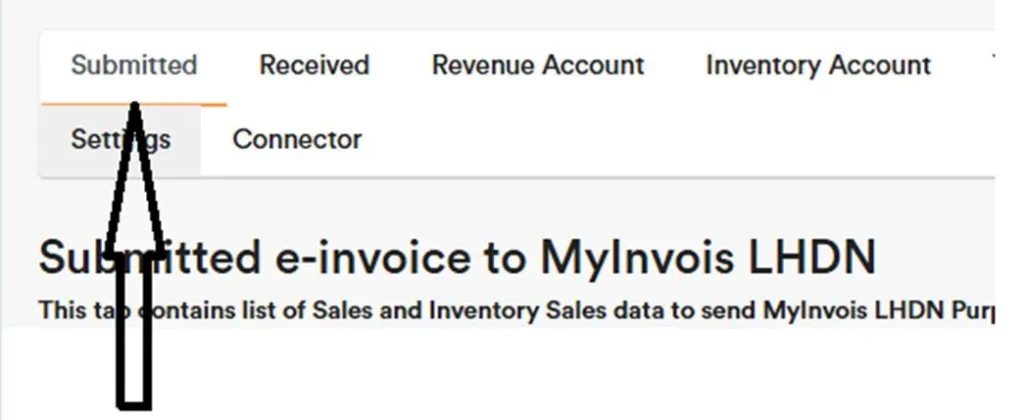
Step 4: Filter for invoices with Pending Status. If any warnings appear, click on them to view the errors and make the necessary corrections.
Kindly ensure that both the ID number and TIN number fields are filled in for the contact. If the customer is an individual and you wish to send an e-invoice using only the NRIC or only the TIN, the other required field should be filled with the recommended default number as per the E-invoice government guidelines.
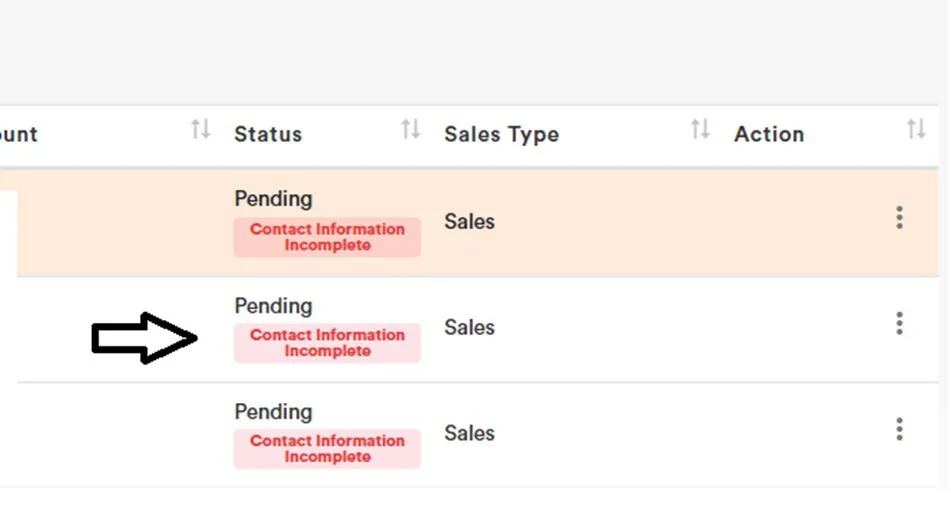
Step 5: When there are no errors, select the invoices you want to send as E-invoices to your customers, and then click “Send E-Invoice.” The E-invoice will be sent automatically.
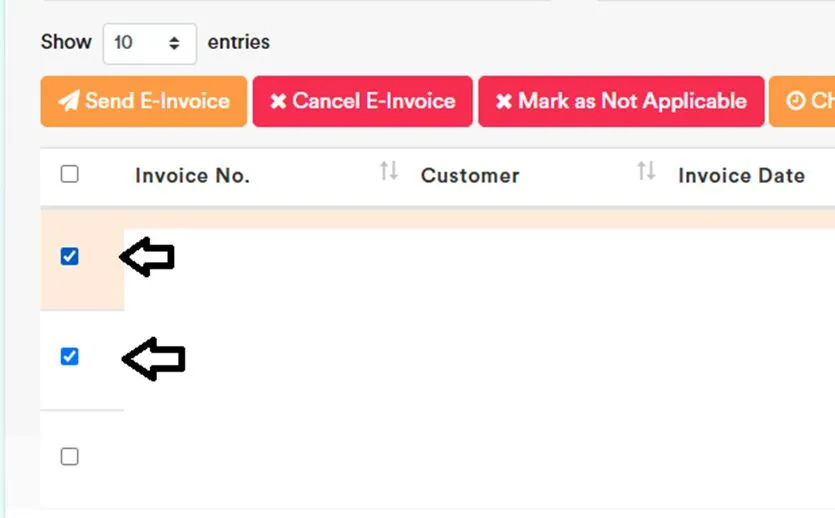
Alternatively, you can simply click “Send E-Invoice for All Pending Sales” without selecting any items. The system will automatically send out all E-invoices with Pending status and without errors. Afterwards, you can filter the remaining items and fix the errors if any.
Please note that the manual journal does not generate an automatic e-invoice. Therefore, if you wish to send an e-invoice related to manual journal, please use the Manual E-Invoice tab.
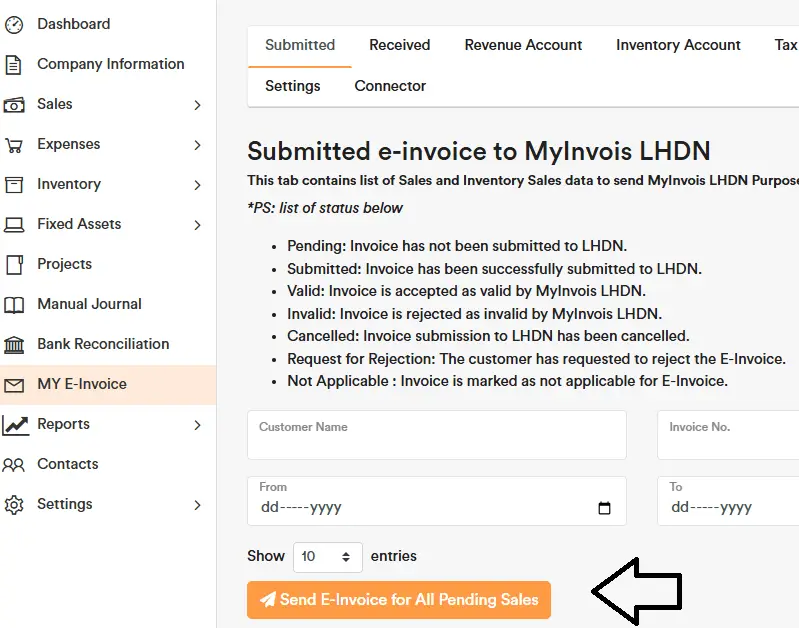
Step 6: To view the public link, open the relevant invoice and check the top section for the public E-invoice link.
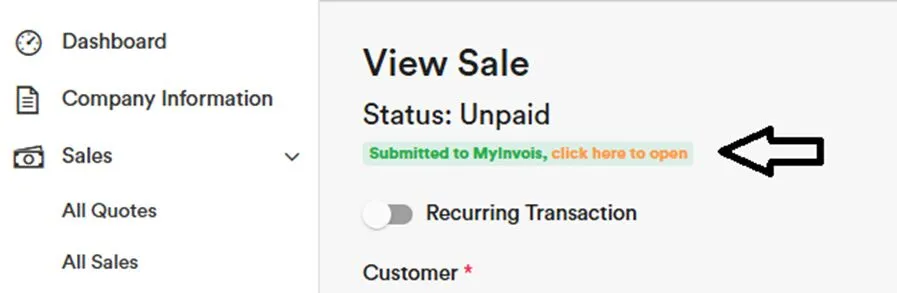
Step 7: In the Submitted Tab under the action section, you can view the public link or export the E-invoice as a PDF to send to your customer. Alternatively, if the contact has an email address input, you can resend the E-invoice email to your customer.
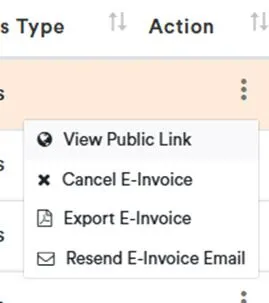
Steps for Sending Consolidated E-Invoice
Supplier will be allowed to aggregate transactions with Buyers who do not require an e-Invoice on a monthly basis and submit a consolidated e-Invoice to IRBM, within seven (7) calendar days after the month end.
Go to the “Consolidated E-Invoice” tab and click on “Add Consolidated E-Invoice”.
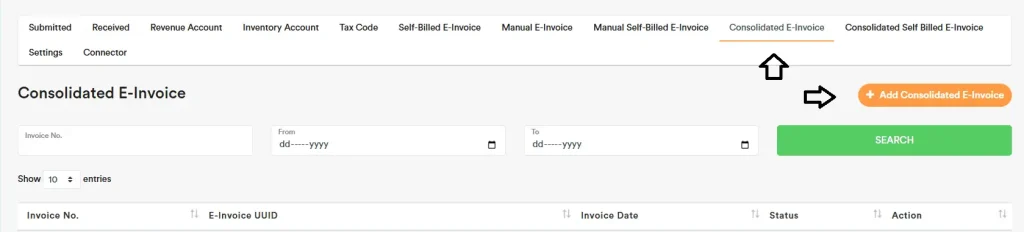
You can select invoices for which an e-invoice has not been sent individually. After selecting, click Submit to send all selected items as a Consolidated E-Invoice to LHDN.
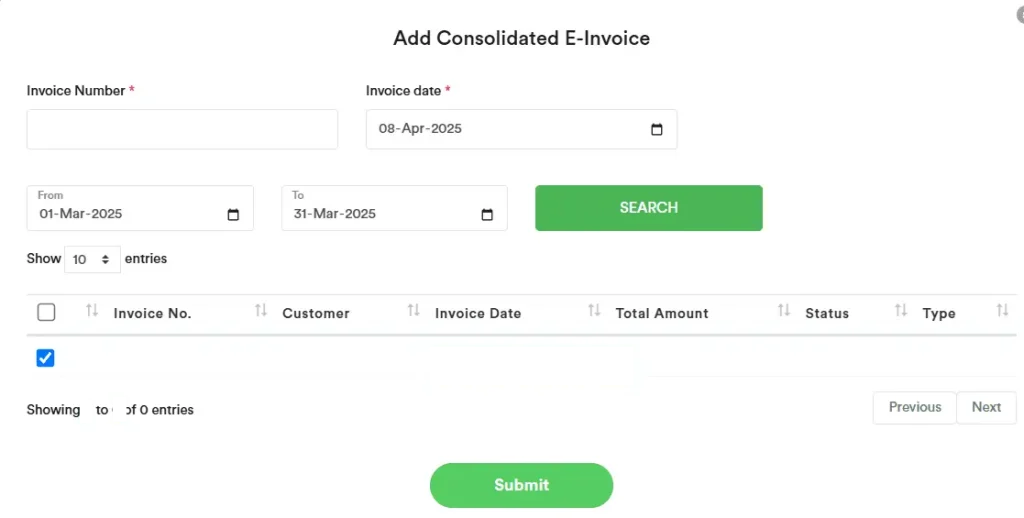
You will notice that consolidated e-Invoices with amounts above RM10,000 are not allowed.
If you still need to submit one, you can go to the ‘Manual E-Invoice’ tab and create a consolidated e-Invoice for an amount above RM10,000 like below.
After that, go to the “Submitted” tab, locate the individual e-Invoices that were submitted manually, and mark them as Not Applicable to avoid duplicates.
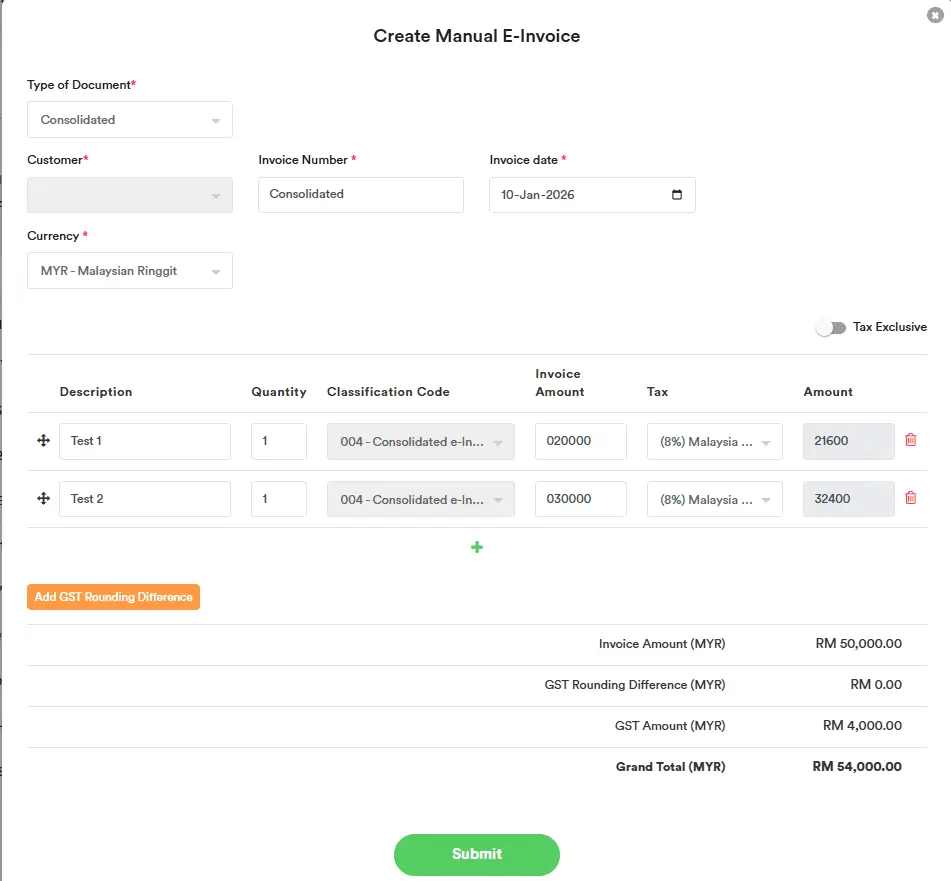
Steps for Sending Self-Billed E-Invoice
You can issue a Self-Billed E-Invoice under the “Self-Billed E-Invoice” tab.
All expenses and inventory purchases entered will appear in this section.
You can select specific expenses and mark them as Not Applicable if a Self-Billed E-Invoice is not required. For example, when a supplier’s revenue is below RM150,000, making them exempt from issuing an E-Invoice.
Please refer to the IRB E-Invoice Specific Guidelines to understand which transactions require a Self-Billed E-Invoice. Examples include:
- Goods sold or services rendered by foreign suppliers
- Transactions with individuals who are not conducting a business
- Interest payments
- More at IRB E-Invoice Specific Guidelines
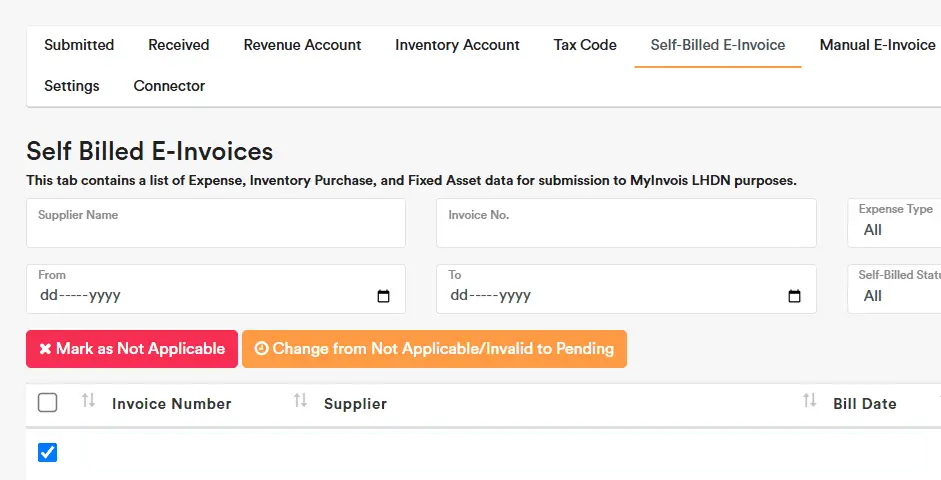
For entries showing an error prompt, click on the error to view the error details and provide the required information. Once completed, you will be able to submit the Self-Billed E-Invoice.
If there are no errors, select “Create Self-Billed E-Invoice”.
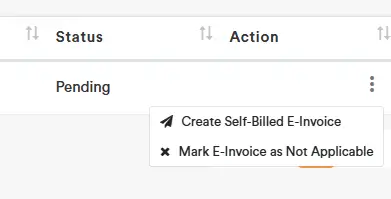
Select the Supplier MSIC Code if available, or select “00000 Not Applicable” if you do not have this information.
Choose the relevant classification code.
Click Submit, and the Self-Billed E-Invoice will be sent to LHDN.
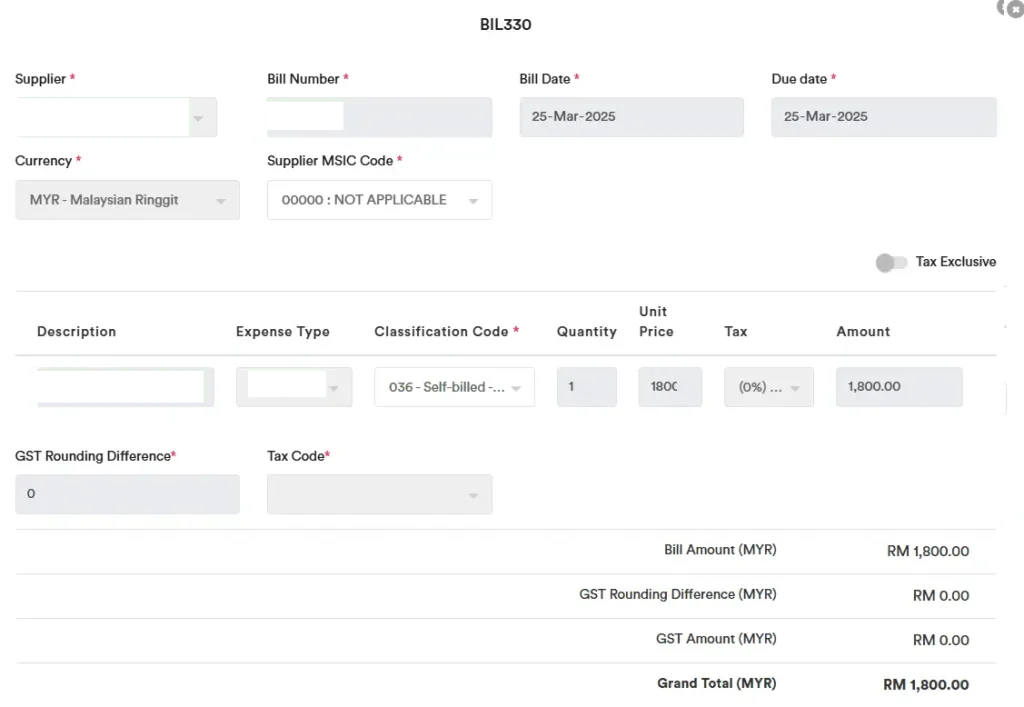
Steps for Sending Consolidated Self Billed E-Invoice
Go to the “Consolidated Self Billed E-Invoice” tab and click on “Add Consolidated Self Billed E-Invoice”.
You can select expenses that have neither been submitted individually nor marked as “Not Applicable.” After selecting these expenses, click Submit to send all selected items as a Consolidated Self-Billed E-Invoice to LHDN.
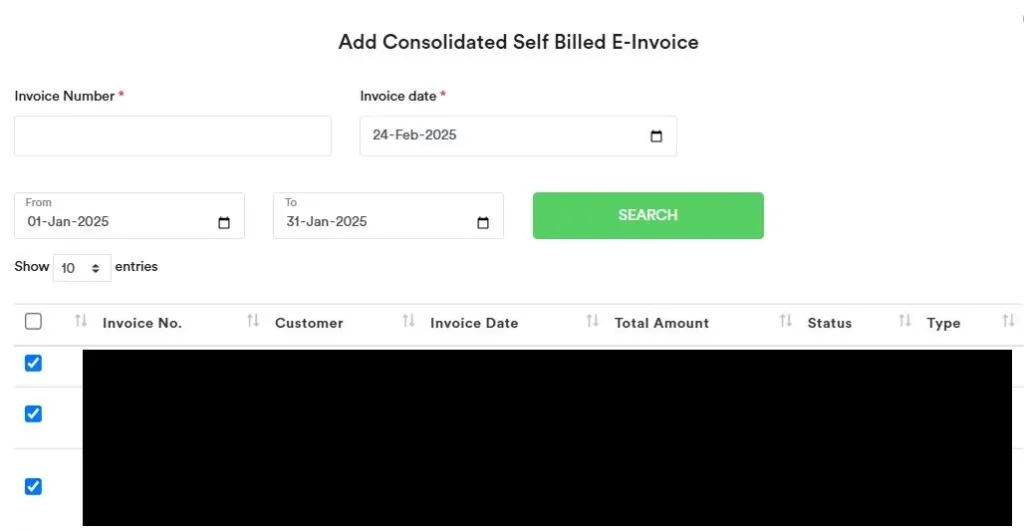
How to Reverse a Consolidated E-Invoice Amount and Issue It Individually
Steps to Reverse and Re-issue From a Consolidated E-Invoice (LHDN)
- After you’ve submitted a consolidated e-invoice to LHDN and a customer asks for their own e-invoice, first reverse the portion you plan to issue individually (to avoid duplicate submission to LHDN).
- Go to Manual E-Invoice → Create Manual e-Invoice.
- Set Type of Document to Consolidated.
- Enter the original consolidated invoice number in the Description, reference the specific invoice you are reversing (e.g., “Reverse INV-12345”).
- Enter the amount as a negative value for the portion to be reversed and select the correct tax code. (Ensure the negative amount exactly matches the portion you will re-issue.)
- Click Submit.
- Now, you can create another Manual e-Invoice for the customer (individual issuance) and fill in all relevant details, then Submit.
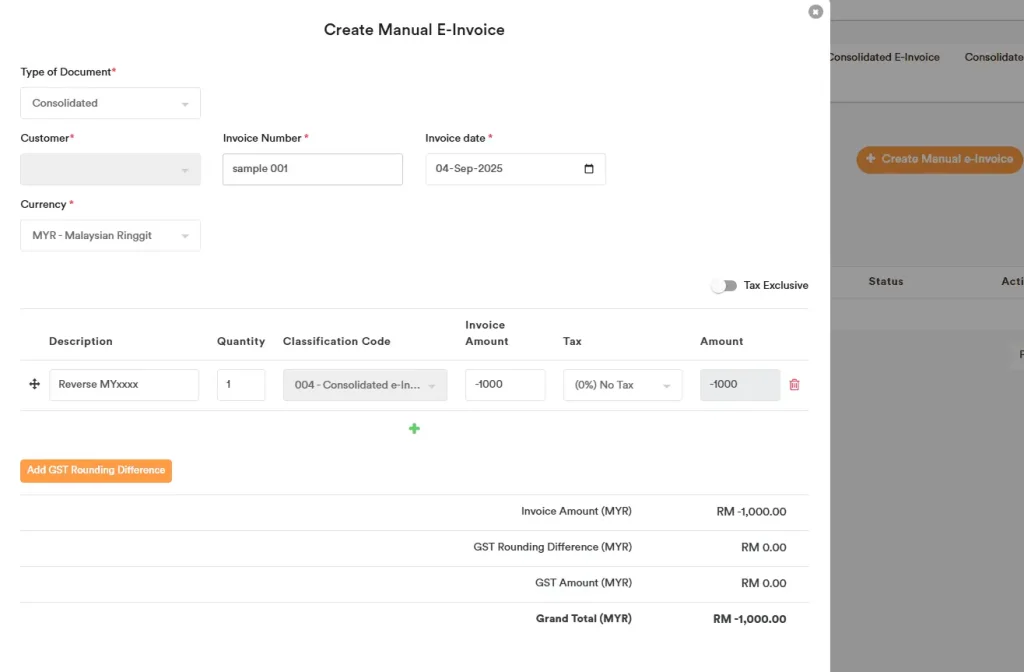
How to obtain BRN Number (Business Registration Number)
1. Go to website https://www.ssm-einfo.my/
2. Need to register an account before you can check the BRN Number. Click ‘Register’ on the right top corner and fill in the necessary information.

3. Verify the email address in your email inbox
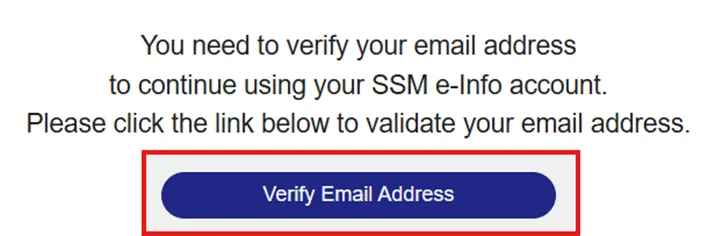
4. Go back to the website and login by entering your Username and Password

5. After login, click the Search Entity on the top right corner

6. Type the Company Name in the search box and the BRN will appear.
How to obtain SST Number (Sales & Service Tax Number)
1. Go to website https://sst01.customs.gov.my/account/inquiry
2. Select Name of Business in the dropdown and enter the company name, then click Submit
3. The SST Number will be appear, along with the other information such as service tax group and taxable service
How to obtain TIN Number (Tax Identification Number)
AI Account can automatically populate TIN number for you. You can also follow the manual steps below to search for your TIN number.
1. Go to LHDN websitehttps://mytax.hasil.gov.my
2. Proceed to Login (choose ID type, and enter the ID number and Password)
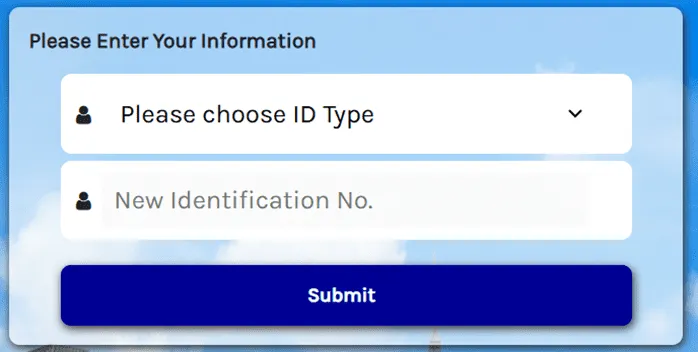
3. After login, click ‘Search TIN’at the top right corner

4. Click the dropdown and select ‘Individuals’ or ‘Other than Individuals’

5. Choose ID Type (select Identification Card No. or Passport No.)
6. Enter the 12 digits NRIC(without dash), then clickSearch
7. The TIN number will be shown in the tax payer information tab, you can copy and paste into the TIN number for issue e-invoice
How to login to MyInvois Portal under Sole Proprietor’s Account
- If taxpayers are unable to see the Sole Proprietor’s name under “Switch Taxpayer”, then to logout from the MyInvois Portal by clicking the “Profile Icon”, and log in back via the MyTax Portal.
- The Sole Proprietor’s name should appear. Then to register as taxpayer (sole proprietor) profile.
- Terms & Conditions – Read and accept the terms and conditions, and proceed.
- Taxpayer Profile – Fill up the postal code. Enter the SST registration number and tourism tax registration number if available or NA if not applicable. Check other information and ensure they are correct. Then click save.
- Complete user profile.
- Registration is completed and click “Finish Setup”.
- If you still cant find your Sole Proprietor Taxpayer profile, you will need to register the Role Application (Business Owner) via https://mytax.hasil.gov.my/
Role Application (Business Owner) – Sole Proprietorship
1. Click on “Profile”

2. Click on “Role Application”
3. Select type of application “New Application”
4. Select type of role “Business Owner”
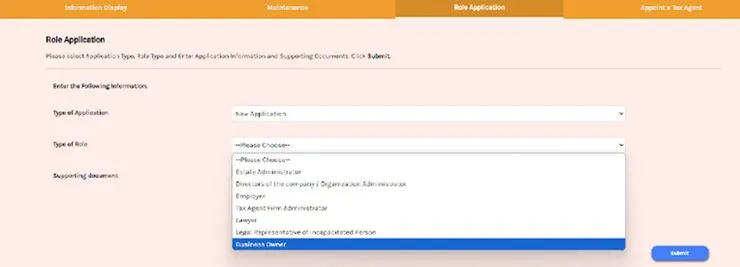
5. Key in personal tax file number (11 digit number)
6. Click “Upload File” to upload document/ file.
Document to upload:-
– Copy of business registration certificate or SSM profile; OR
– Copy of the identification card for sole proprietorships without a business registration certificate.
7. Click “Submit”.
8. Signing field is popped out.
9. Enter identification number.
10. Enter correct password.
11. Click “Signature” to continue the application.
12. Click “Cancel” to return to main page.
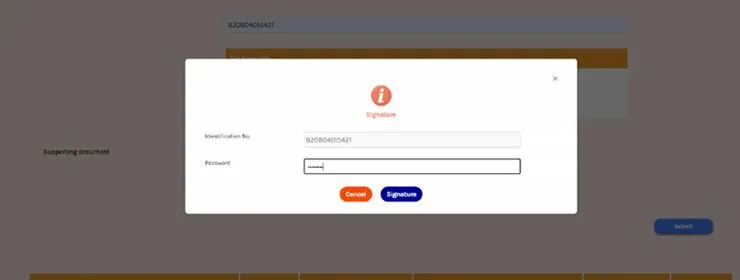
13. If application is success, successful notification is displayed.
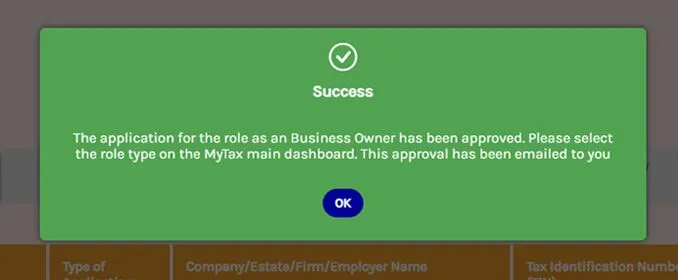
Invalid TIN During e-Invoice Submission
When submitting an e-Invoice shows “Invalid TIN” (but you believe the TIN is valid)
Use LHDN MyInvois Live Chat to confirm the TIN status and what the customer needs to do.
1) Open LHDN Live Chat
Go to the LHDN e-Invoice Contact Us page: https://www.hasil.gov.my/en/e-invoice/contact-us/
Click “CHAT with us”
2) Fill in your details
Enter the required info in the chat form (name/email/phone/etc.), then proceed.
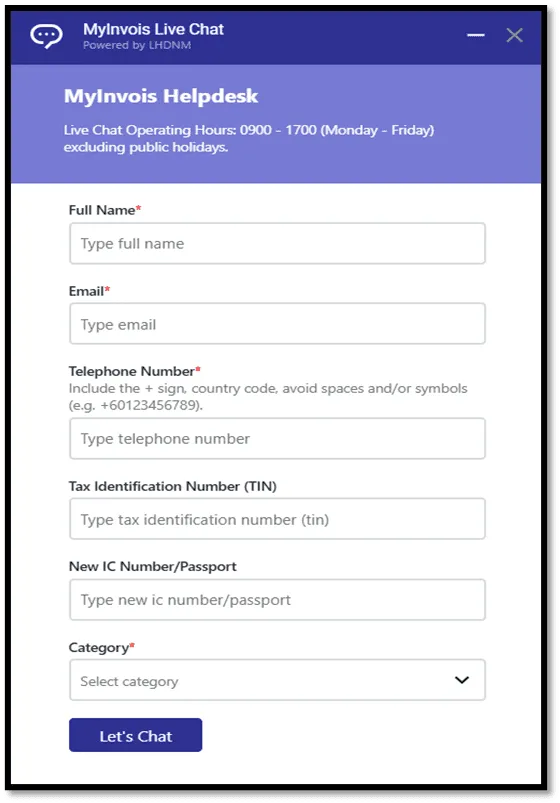
3) Choose the right category
Recommended (for most cases): General Enquiries on MyInvois
Click “Let’s Chat”
4) Ask LHDN to verify the TIN (Invalid TIN case)
Explain: MyInvois rejects the customer TIN as “Invalid”, but you believe it is correct.
Ask them to verify the TIN and confirm if the customer is registered/active in MyInvois.
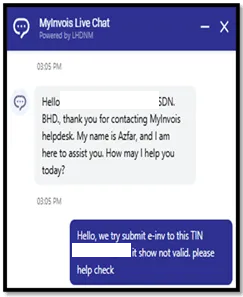
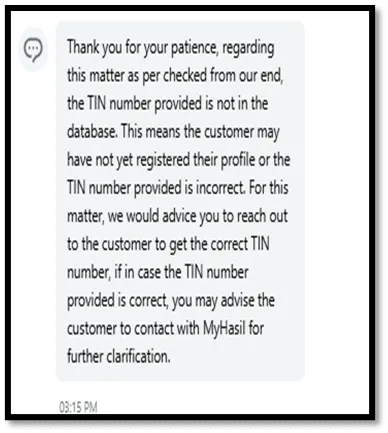
If LHDN confirms the TIN is not valid/active:
→ Ask the customer to complete MyInvois registration or contact LHDN to resolve the matter.
Australia
Business Activity Statement (BCA)
In Australia, your business is required to submit Business Activity Statement (BAS). The information needed to complete the BAS can be obtained from the GST Report.
The GST payable amount is recorded under account code 2-4000 GST Payables. When you make a GST instalment payment, you can post the entry to this account.
Our system automatically generates the relevant tax codes. You can select Sales or Expenses to enable the code for data entry purposes. If not selected, the code will not appear when entering transactions.
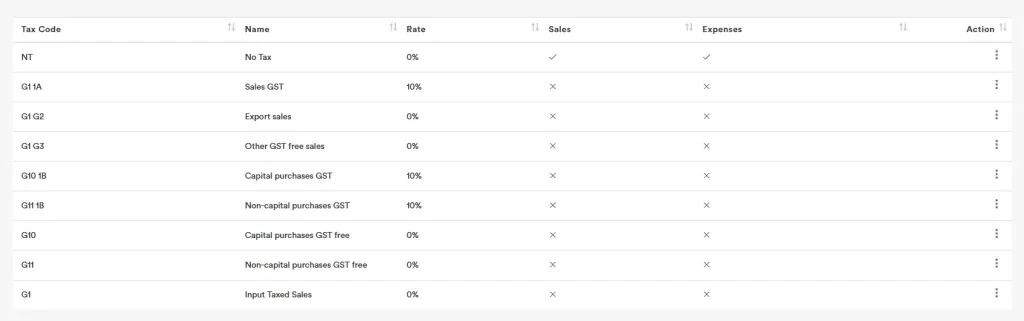
All relevant information can be found in the GST Report.
- For accrual basis, use the GST Report.
- For cash basis, use the GST Report (Cash Basis).

BAS Field References:
- G1: Total up the amount indicated as G1 in the report.
- G2: Total up the amount indicated as G2 in the report.
- G3: Total up the amount indicated as G3 in the report.
- G10: Total up the amount indicated as G10 in the report.
- G11: Total up the amount indicated as G11 in the report.
W1 – PAYG Tax Withheld – Total Salary, Wages and Other Payments:
- To easily obtain this information, you can create an Account Grouping for “W1 Total salary, wages and other payments.” This allows the data to be grouped together for easier extraction via reports. In the Chart of Accounts – “Accounts” section, configure Account Grouping (via the top-right button). Then generate the Profit and Loss (Group) reports, which will reflect the defined groupings.
Withholding Tax Accounts to Use When Recording Expense Payments:
- PAYG Withholding Tax Payable W2
- No ABN Withholding Tax Payable W4
- PAYG Other Withholding Tax Payable W3
These account balances can be used to complete the “PAYG Tax Withheld” section of the BAS.
For Income Tax Payable Recording:
- 2-6000 Current Income Tax Liabilities (similar to PAYG Instalment Payable)
- 9-3000 Income Tax Expense (similar to PAYG Income Tax Expense)
1A and 1B: Totals can be obtained directly from the GST Report.
4: Total is based on W5.
5A and 5B: Use accounts:
- 2-6000 Current Income Tax Liabilities
- 9-3000 Income Tax Expense
7 – Deferred Tax Payment: Use the accounts:
- Deferred Tax Expense
- Deferred Tax Liabilities
Canada
GST/HST/PST/QST
Our system automatically generates the relevant tax codes. You can select Sales or Expenses to enable the code for data entry purposes. If not selected, the code will not appear when entering transactions.
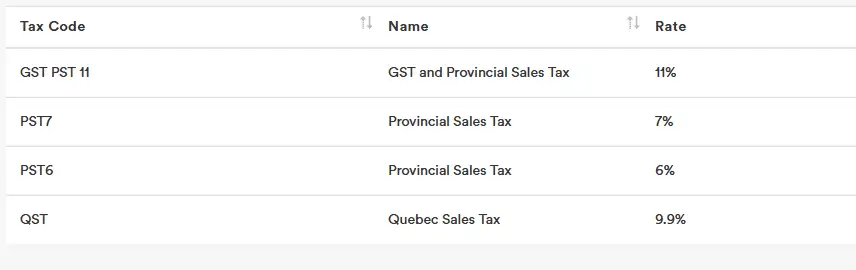
The GST/HST/PST/QST payable amount is recorded under account code 2-4000 GST Payables. When you make a GST/HST/PST/QST payment, you can post the entry to this account.
Summary Table
| Province / Territory | GST | HST | PST | QST | Total Tax |
|---|---|---|---|---|---|
| Alberta | 5% | — | — | — | 5% |
| British Columbia | 5% | — | 7% | — | 12% |
| Manitoba | 5% | — | 7% | — | 12% |
| Saskatchewan | 5% | — | 6% | — | 11% |
| Ontario | — | 13% | — | — | 13% |
| Quebec | 5% | — | — | 9.975% | 14.975% |
| New Brunswick | — | 15% | — | — | 15% |
| Nova Scotia | — | 15% | — | — | 15% |
| Prince Edward Island | — | 15% | — | — | 15% |
| Newfoundland & Labrador | — | 15% | — | — | 15% |
| Territories (YT, NT, NU) | 5% | — | — | — | 5% |
India
Our software does not currently support e-invoicing in India. You may consider using a dedicated e-invoicing solution for generating invoices and then importing the data into our software for accounting purposes.
GST
Our system automatically generates the relevant tax codes. You can select Sales or Expenses to enable the code for data entry purposes. If not selected, the code will not appear when entering transactions.
The GST payable amount is recorded under account code 2-4000 GST Payables. When you make a GST payment, you can post the entry to this account.
For transactions recorded with tax codes related to Intra-state GST (CGST + SGST), since our software does not currently display the breakdown, you will need to manually split the total GST 50:50 in your own working. Then, make two separate payments — one for CGST and one for SGST — to the 2-4000 GST Payables accounts.
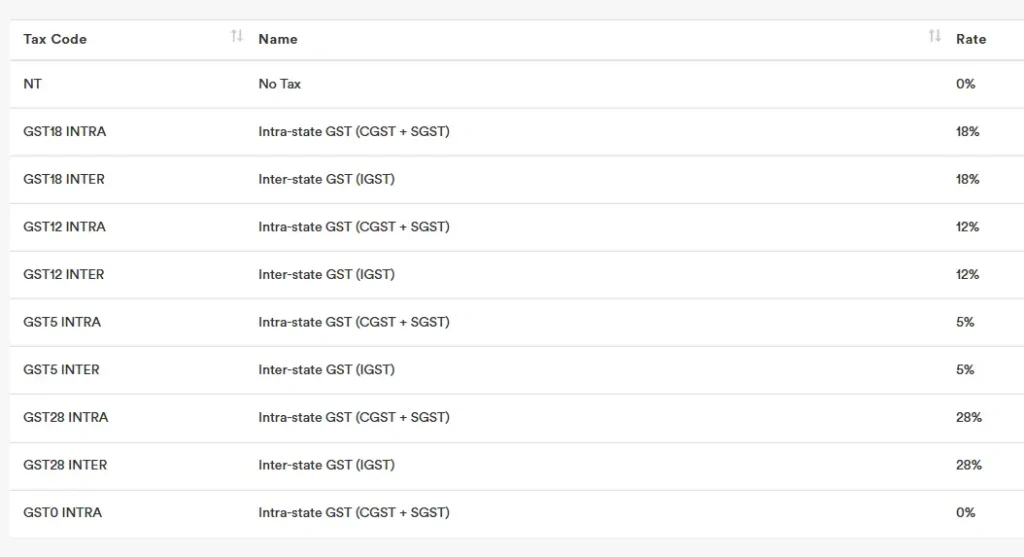
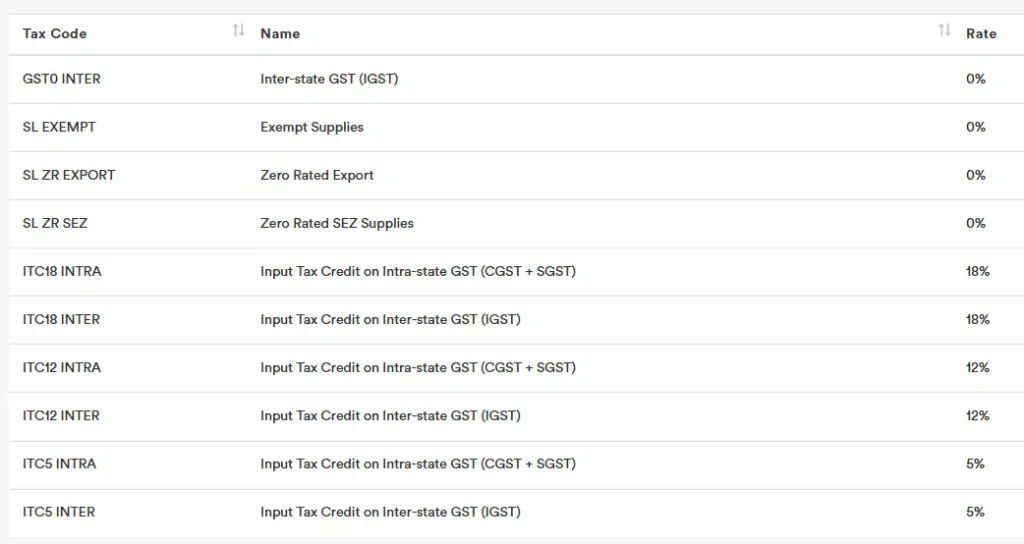
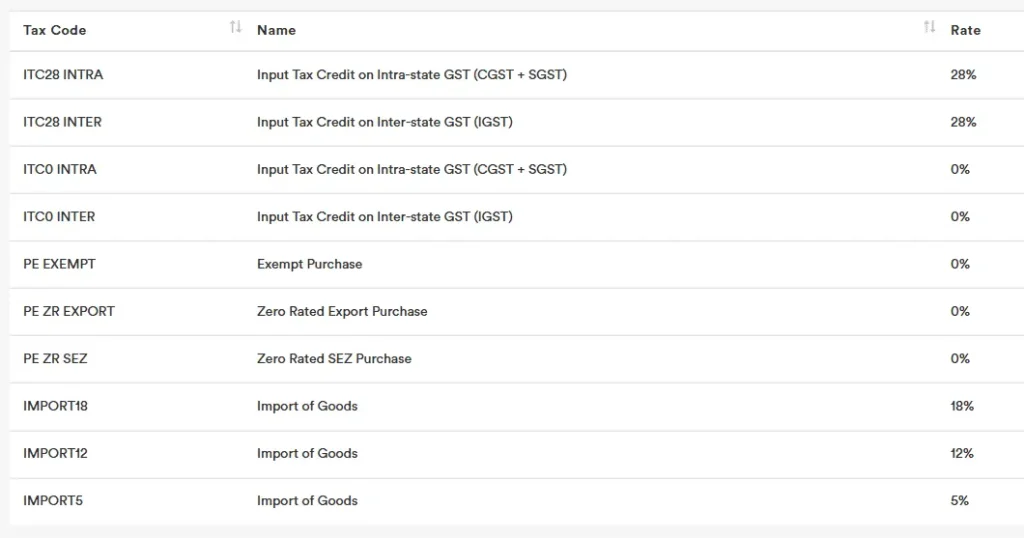
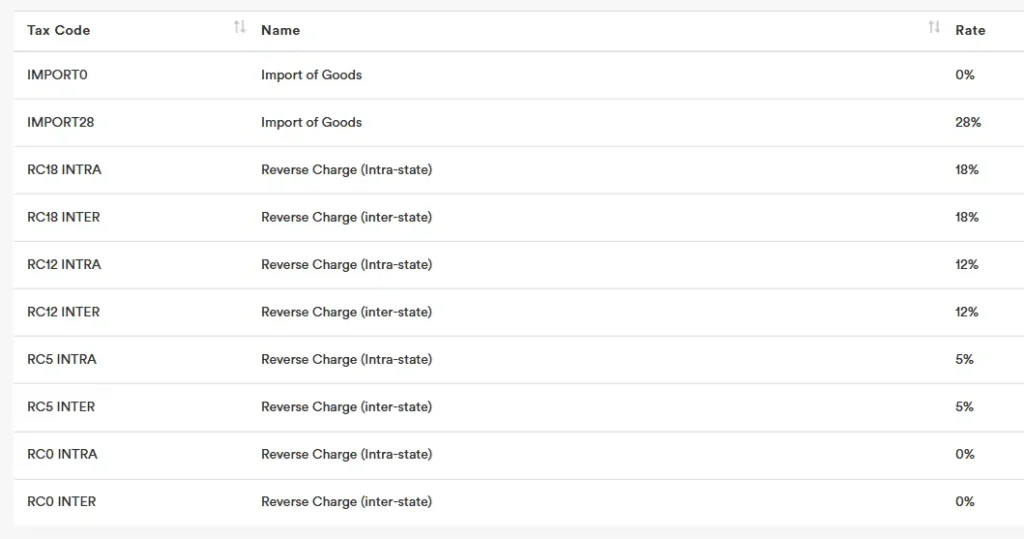

New Zealand
GST
Our system automatically generates the relevant tax codes. You can select Sales or Expenses to enable the code for data entry purposes. If not selected, the code will not appear when entering transactions.
The GST payable amount is recorded under account code 2-4000 GST Payables. When you make a GST payment, you can post the entry to this account.
You need to use different tax codes for GST input tax claims on purchases and imported goods, as the GST form requires you to declare “Total purchases and expenses (including GST) – excluding any imported goods.”
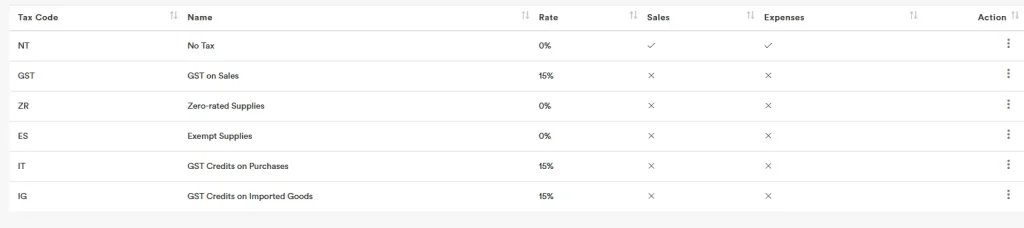
All relevant information can be found in the GST Report.
- For accrual basis, use the GST Report.
- For cash basis, use the GST Report (Cash Basis).
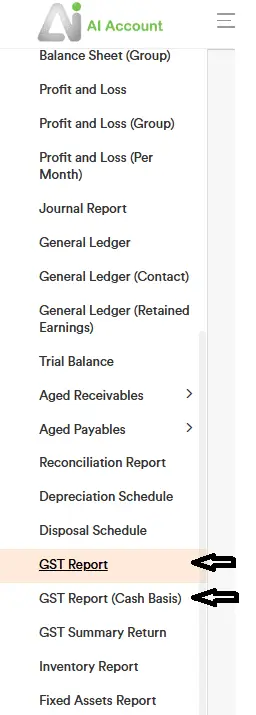
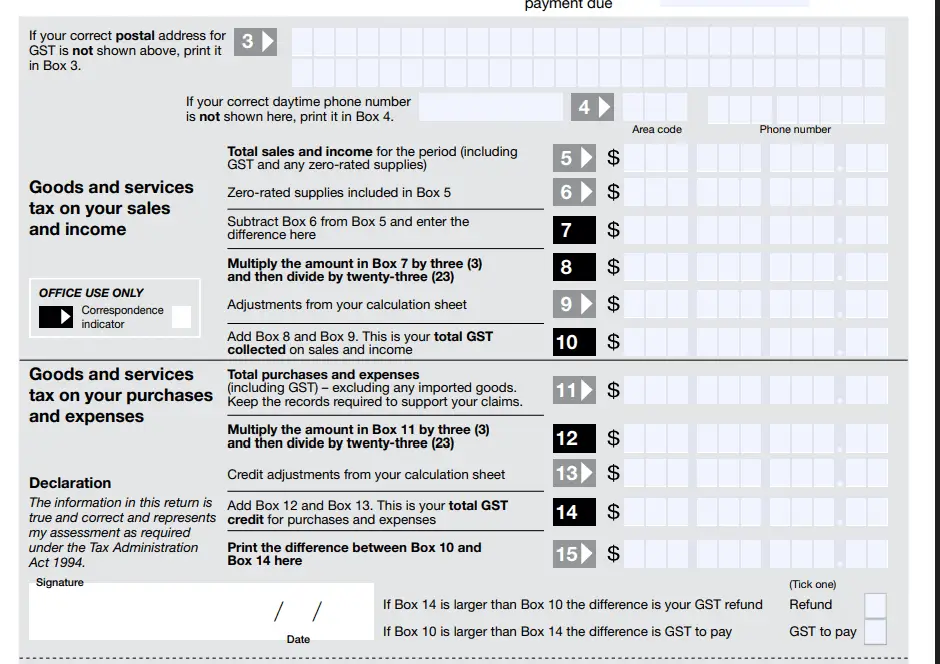
Resident With holding Tax (RWT)
You can record the Resident Withholding Tax (RWT) under account “2-4100 Expenses Withholding Tax”
Fringe Benefit Tax (FBT)
You must file FBT returns if all the following apply:
- You are an employer in New Zealand
- You provide non-cash benefits to employees, shareholder-employees, or their associates (e.g., personal use of company vehicles, subsidised goods, low-interest loans)
- You are registered as an FBT payer with Inland Revenue (IRD)
An FBT payer is a business registered with IRD to declare and pay tax on non-cash employee benefits.
- Registration is required if you provide fringe benefits.
- FBT obligations apply whether or not you are GST-registered.
You can use the following accounts to record Fringe Benefit Tax (FBT) transactions:
- Fringe Benefit Expense – to record the value of the fringe benefit provided to employees (this value should be GST-exclusive).
Example:
Record Fringe Benefit Adjustment- GST-inclusive fringe benefit value = $3,000
- GST portion (Box 7 of FBT form): $3,000 × 3 ÷ 23 = $130.43
- Net private-use value = $3,000 – $130.43 = $2,869.57
Double Entry:
- Debit – Fringe Benefit Expense $2,869.57 ← non-deductible portion
- Debit – GST Payables $130.43 ← goes to GST return (Box 9) & FBT return (Box 7)
- Credit – Motor Vehicle $3,000.00 ← goes to FBT return (Box 3)
- Fringe Benefit Tax Expense – to record the actual FBT payable to Inland Revenue, based on the fringe benefit value and applicable rate.
- Fringe Benefit Tax Payable – a liability account used to record the amount payable to IRD as declared in your FBT return.
Example:Record the FBT Payable (Actual Tax)- You must now pay Fringe Benefit Tax to IRD on the $3,000 value.
- FBT rate (Alternate Rate) = 63.93%
- FBT payable = $3,000 × 63.93% = $1,917.90
Double Entry:
- Debit – Fringe Benefit Tax Expense $1,917.90
- Credit – Fringe Benefit Tax Payable $1,917.90
Box 3 of the FBT return requires you to report the total taxable value of fringe benefits, which must be GST-inclusive. As your accounting entry for “Fringe Benefit Expense” is recorded exclusive of GST, be sure to manually add the GST portion when completing Box 3 to reflect the full GST-inclusive amount as required.
If your company is GST-registered, remember to separately account for the GST portion of the fringe benefit value. The FBT return (Box 7) displays this GST component for reference only. The actual GST payable is declared and paid through your regular GST return (specifically in Box 9 – Adjustments to Output Tax), not through the FBT form.
If your company is not GST-registered, then:
- You do not include GST in your FBT calculations.
- You leave FBT return Box 7 blank.
- No GST is recorded or returned for fringe benefits.
United Kingdom (UK)
VAT
Our system automatically generates the relevant tax codes. You can select Sales or Expenses to enable the code for data entry purposes. If not selected, the code will not appear when entering transactions.

The VAT payable amount is recorded under account code 2-4000 GST Payables. When you make a VAT payment, you can post the entry to this account.
For steps on recording reverse charge for imported goods and services, please refer to:
/guide/#reverse-charge-recording-for-import-service
The reverse charge in the GST report must be manually identified and entered in the VAT return form to avoid reporting the gross amount as sales. Under the reverse charge mechanism in UK, only the output VAT is recorded, not the sales value.
Example:
| VAT Return Boxes (Standard UK VAT Return) | ||
|---|---|---|
| Box 1 | Output VAT (due on services received) | £400 |
| Box 4 | Input VAT (if reclaimable) | £400 |
| Box 6 | Net sales | ❌ Not included |
| Box 7 | Net purchases | £2,000 |
All VAT relevant information can be found in the GST Report.
- For accrual basis, use the GST Report.
- For cash basis, use the GST Report (Cash Basis).

United States
Sales Tax
Our system automatically generates the relevant tax codes. You can select Sales or Expenses to enable the code for data entry purposes. If not selected, the code will not appear when entering transactions.
The actual tax on an invoice is calculated based on:
1️⃣ The customer’s address (jurisdiction)
2️⃣ The products/services being sold (some may be taxable, some exempt)
You can add more sales tax codes manually, specifying the rates you require.
The Sales Tax payable amount is recorded under account code 2-4000 GST Payables. When you make a Sales Tax payment, you can post the entry to this account.
Common 1099-Eligible Expense Categories
You can track 1099 payments using existing expense accounts by including “1099” in the account name for clarity.
Here are typical expense accounts (Chart of Accounts) you might use to track 1099 payments:
| 📋 Category / Account Name | 📝 Examples |
|---|---|
| Contract Labor / Independent Contractors | Freelancers, consultants, part-time workers, temporary workers |
| Professional Fees | Attorneys, accountants, architects, engineers |
| Legal Services | Lawyers (note: attorneys always get a 1099-MISC, even if <$600) |
| Repairs & Maintenance (Services) | Plumbers, electricians, mechanics, cleaners (if unincorporated) |
| Commissions & Fees | Sales commissions paid to individuals |
| Rent (Real Property) | Office, warehouse, or equipment rent paid to an unincorporated landlord |
| Royalties (if applicable) | Payments for use of intellectual property (over $10 → 1099-MISC) |
| Nonemployee Compensation | General catch-all for services rendered by non-employees |
| Medical & Healthcare Payments | Doctors, nurses, other providers (on 1099-MISC if over $600) |
| Prizes & Awards | If paid to non-employees |
| Other Income (if not fitting above) | Miscellaneous taxable payments |